Key Takeaways
- Creality Firmware: Official firmware with basic features and compatibility. Easy to install on Ender 3 V2.
- Marlin Firmware: Open-source firmware with advanced features and customization. Requires code editing and Arduino Uno for older Ender 3 models.
- TH3D Unified Firmware: User-friendly firmware based on Marlin 2.0. Tested and stable with pre-configured Ender 3 profiles.
- Klipper Firmware: High-speed firmware that uses a Raspberry Pi to process G-Code. Complex to set up but offers unique features and performance.
For most hobbyists, the best Ender 3 firmware will be the standard Creality stock firmware. It covers all your basic 3D printing needs and will keep your printer running smoothly.
But if you’re looking to expand your Ender 3’s functionality with hardware upgrades – such as automatic bed leveling, thermal runaway protection, and PID tuning – you’ll need to install more specialized firmware.
Firmware like Marlin and Jyers will expand the capability of your device and are easier to install than you might think.
Those are my top two recommendations, but the right firmware for you will depend on the specific changes you’re looking to make.
I’ll explain the particular merits of each to help you make the right choice – including how easy they are to install.
If you happen to own an Ender 3 V2, you’re in luck. A simple microSD card and the requisite files are everything you’ll need to install fresh firmware.
It’s a little more “hands-on” for Ender 3/Pro, but if you follow the steps in this guide, you’ll be able to set it up without any of the beginner mistakes I made the first time around!
Best Ender 3 Firmware (Pro/V2) – Full Round-Up
3DSourced is reader-supported. When you buy through links on our site, we may earn an affiliate commission. Learn more
Official Creality Ender 3 Firmware
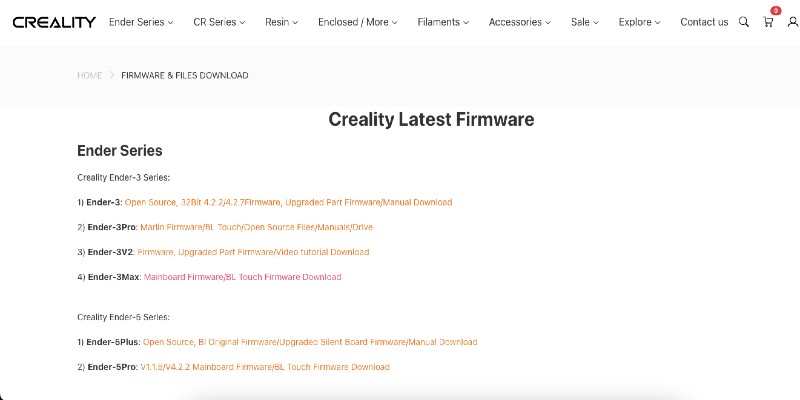
If you want the most frictionless path to upgrading your Ender 3’s firmware and don’t want to tweak the code, drawing from Creality’s pool of official firmware updates is the way to go.
Unsurprisingly, these are tuned to suit the Ender 3, meaning you won’t encounter any compatibility issues, and there’s a version for every iteration of the Ender 3. These include the older 8-bit mainboards and the newer 32-bit V4.2.2 and V4.2.7 boards found on the Ender V2.
Over on Creality’s official forum, you’ll find a wealth of firmware versions.
There is all manner available based on your printer and options for specific hardware upgrades such as BL a Touch and a filament runout sensor. You also benefit from thermal runaway protection in the latest Creality firmware, which itself is reason enough to push through an update.
To install on the Ender 3 V2, load the BIN file onto a microSD card and pop it into the mainboard’s microSD card slot.
The process is more involved for the stock Ender 3 and Ender 3 Pro. You’ll need to flash a bootloader onto the printer using an Arduino Uno, then upload the new firmware to your printer’s mainboard.
Marlin 2.0

Marlin is an open-source firmware with a long history dating back to the early days of RepRap printers.
It’s used by many of the leading consumer printer manufacturers. Creality uses an altered and customized version for its official firmware.
So what sets it apart from Creality’s official Ender 3 firmware?
Adaptability, features, and self-configuration. If you need to tune the firmware to suit particular upgrades, fix bugs, and fine-tune the real-time coordination of the printer’s active parts, then Marlin 2.0 offers an extra degree of freedom.
PID heater control, linear advance, automatic bed leveling, power loss recovery – these are a taste of the advanced, sophisticated functions Marlin offers to those partial to tinkering their way to higher quality prints.
You can freely toggle features on and off to find the perfect mix for your needs.
Alternatively, there are great pre-configured Ender 3 profiles that you can upload straight to the printer. And, should you stumble, there’s strong community support ready to help you troubleshoot.
It’s compatible with both the older 8-bit Ender 3s along with the newer 32-bit variants, though the installation process differs as we saw above with the official Creality Ender 3 firmware.
TH3D Unified Firmware
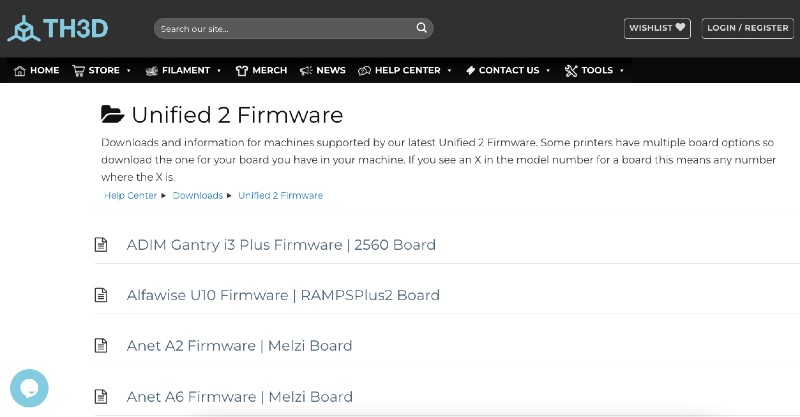
TH3D Unified firmware is among the most accessible Ender 3 firmware options out there.
It makes tweaking settings easy while guaranteeing version stability through heavy testing, so you’re unlikely to meet any bugs or problems. Most of its iterations have pre-configured profiles specifically for the Ender 3, all tuned to work from the get-go.
TH3D is based on Marlin 2.0. It bundles in all the firmware’s basic benefits but throws in a few unique features such as:
- PID autotuning
- Power loss print resume
- Preheating for different filament types
- Assisted bed leveling
- Support for E3D V6 hot end upgrades
- Manual mesh leveling support
Much like the other firmware options in our guide, Ender 3 V2 owners have it easy with a simple microSD card upload to the mainboard. Ender 3 and Pro users will need to draft in an Arduino and flash the board with a bootloader before uploading the firmware file.
Klipper
A one-person-developed open-source firmware, Klipper is designed to dramatically boost the printing speed of the Ender 3.
Klipper achieves this by delegating computational duties to a single-board computer such as a Raspberry Pi. The board takes care of the G-Code processing side of things and calculates printer movements.
Doing so introduces more processing power into the mix than you’d get with the Ender 3’s mainboard alone.
With that extra outside SBC help, the Ender 3’s mainboard is left to concentrate exclusively on executing the G-Code commands, resulting in faster and quieter printing thanks to high-precision acceleration physics and machine kinematics-based stepper movements.
Aside from this unique approach, Klipper has a stacked feature set.
These include:
- Smooth pressure advance to reduce ooze
- Input shading to counter vibrations
- Custom programmable macros
- Automatic bed leveling support
- Thermal runaway protection
- Stepper phase end stop algorithm to improve first layer adhesion
- Support for filament sensors
Just to name a few…
It goes without saying that using a Raspberry Pi alongside the printer itself adds another layer of complexity.
In our estimation, Klipper is an advanced option better suited to seasoned tinkerers with experience working with SBCs and happy to configure the firmware themselves.
It’s also worth checking out Fluidd, a bespoke UI for Klipper if you decide to take the plunge.
It’s a lightweight and responsive interface to tame and shape the firmware to your needs. If you’ve never dabbled in similar projects, we highly recommend more beginner-friendly options such as TH3D Unified firmware or Creality’s official Ender 3 firmware.
Jyers

An up-and-coming firmware that’s slowly gaining traction among Ender 3 owners, the Jyers firmware is one to keep an eye on.
It’s based on Marlin 2.0 and is incredibly user-friendly.
Notable features include a revamped Ender 3 menu with manual leveling, Z offset, preheat, change filament menus, labeled error messages, M600 G-Code, PID autotune, and manual mesh leveling.
We can’t recommend it as it stands due to various major bugs hampering an otherwise excellent set of features. However, active development should see these smoothed out before long, at which point Jyers has everything to make it a superior alternative to the official Creality firmware.
If you are nevertheless tempted and don’t mind navigating the bugs, installation follows the usual Arduino Uno bootloader flash and firmware installation for the Ender 3 and Ender 3 Pro.
Installing Jyers on the Ender 3 V2 requires no more than a formatted microSD card and the firmware files.
What You’ll Need to Update Your Ender 3 Firmware
Depending on what Ender 3 version you have, you’ll need to make sure you have all the right gear to get started.
Below, you’ll find a breakdown of everything you need if you have an Ender 3, Ender Pro, or the newer Ender 3 V2.
Ender 3 and Ender 3 Pro
- Arduino Uno or other microcontroller
- Five female-to-female jumper cables
- One male-to-female jumper cable
- USB cable
- PC
- Latest version of the firmware you plan to install
- Latest version of Arduino IDE software
- Single-board computer for Klipper
- Micro-USB cable for Klipper
Ender 3 V2
- A clean, formatted microSD card
- Latest version of the firmware you plan to install
- PC
- Unzip program such as WinRAR (optional – only needed if the download comes as a RAR file)
- Microsoft Visual Studio Code (optional – only needed to tweak and modify the firmware’s code)
- Single-board computer for Klipper
- Micro-USB cable for Klipper
Ender 3 S1/S1 Pro
- A clean, microSD card formatted to FAT32
- Latest version of the firmware you plan to install
- PC
- Unzip program such as WinRAR (optional – only needed if the download comes as a RAR file)
- Microsoft Visual Studio Code (optional – only needed to tweak and modify the firmware’s code)
Ender 3 V2 Neo
- A clean, microSD card with a capacity of no more than 8 GB formatted to FAT32
- Latest version of the firmware you plan to install
- PC
- Unzip program such as WinRAR (optional – only needed if the download comes as a RAR file)
- Microsoft Visual Studio Code (optional – only needed to tweak and modify the firmware’s code)
FAQ
What firmware does the Ender 3 use?
The stock Ender 3 firmware is an altered version of Marlin 2.0. The Ender 3 is compatible with other altered Marlin 2.0-based firmware.
What firmware does the Ender 3 Pro use?
The Ender 3 Pro uses the same stock Creality Marlin 2.0-based firmware as the vanilla Ender 3.
How do I know what firmware my Ender 3 has?
To find out your Ender 3’s current firmware name and version, you’ll need to pair the printer with a PC via USB, then load up a 3D printer controller application program like Octoprint.
From the software’s console, send the G-Code command M115 via the terminal. The command requests the firmware version and related information.
How do I update the firmware on my Ender 3 V2?
1. Download the latest version of your firmware of choice.
2. Copy and paste the BIN file to a clean microSD card
3. Connect the microSD card to the Ender 3 V2
4. Power up the Ender 3 V2
How to update Ender 3 firmware without an Arduino?
Unfortunately, this isn’t possible as an Arduino (or another knock-off Arduino clone) is required to flash a bootloader onto the Ender 3 mainboard.
Without a bootloader, something the Ender 3 lacks as standard, there’s no way to update the firmware. However, once you’ve done it once, you can install any future firmware update via microSD card or USB.
How do you flash the Ender 3 V2 firmware?
1. Download the latest version of your firmware of choice
2. Copy and paste the BIN file to a clean microSD card
3. Connect the microSD card to the Ender 3 V2
4. Power up the Ender 3 V2
How do I reset my Ender 3 V2 to factory firmware?
After upgrading to a different firmware than the stock version, there’s no way to revert without downloading the necessary files and flashing these to the mainboard. The previous version isn’t saved on the Ender 3 as flashing the firmware wipes out any previous files.
Here are the steps required to return to the factory firmware:
1. Download the factory firmware from the Creality forum
2. Copy and paste the BIN file to a clean microSD card
3. Connect the microSD card to the Ender 3 V2
4. Power up the Ender 3 V2
Why upgrade the Ender 3 firmware?
There are many reasons to upgrade the Ender 3 firmware:
– Improve the performance of the Ender 3.
– Install specific hardware such as a BL Touch and a filament runout sensor.
– Gain access to additional capabilities such as automatic bed leveling, linear advance, PID tuning, thermal runaway protection, power loss recovery, manual mesh leveling, input shading, and more.
– Customize the feature set to suit your needs.
– Tweak the firmware to fix any number of bugs and issues.
If you enjoyed this article, check our other Ender 3 software guides to help get the most from your 3D printer:
- The Best Ender 3 3D Printing Software Overall
- Which Slicer Tool is Best for Ender 3? (Free and Premium)
- How-to: Fixing the Ender 3 “No TF Card” Message