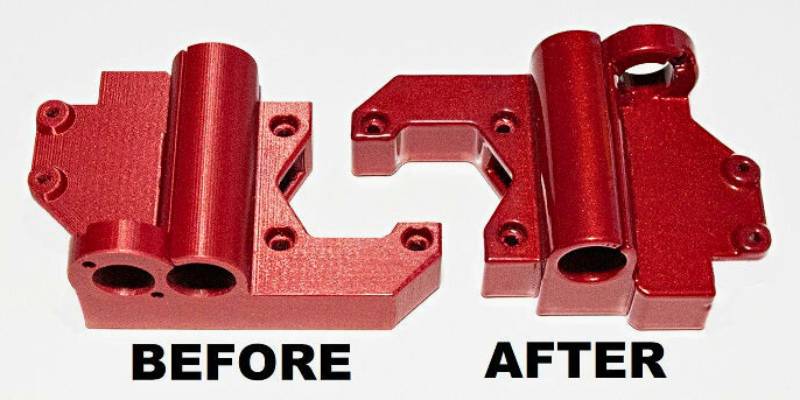
FDM (FFF) 3D printers often produce objects that, while being strong, tend to have layer lines that don’t give you that ‘professional look’ you really want.
Acetone polishing or smoothing is therefore used as a safe and easy method to smooth out layer lines and give your 3D prints a glossy finish, without causing structural damage to the print.
Layer lines are the visible layer separations you see on the sides of prints, as you can see here below:

Layer lines are uneven and prevent a 3D printed part from having a glossy, shiny finish. This is especially a problem for users printing parts to be displayed, such as cosplay armor or a trophy.
On top of that, layer lines technically make a 3D print weaker than a traditionally manufactured part, because each layer line is a potential breaking point for the model (which is partly why 3D prints are quite brittle).
However, you need to know what you’re doing before acetone smoothing, since acetone is highly flammable and volatile.
Some may argue that you can mitigate layer lines by reducing your layer height slicer setting. However, this can result in weaker parts, longer print times, and less precision in your model.
So, in this guide, I’ll take you through the step-by-step approach to acetone smoothing ABS and ASA, and discuss the differences for other filament types.
I’ll also share a few handy tips for avoiding common beginner mistakes so you can produce crisp 3D prints without the hassle – so let’s get started!

How Acetone Vapor Smoothing Works
Acetone smoothing involves applying acetone to the surface of a model to dissolve the layer lines and surface imperfections on your model. It’s commonly used for cosplay and other display-type 3D prints.
With acetone vapor smoothing, you are turning the liquid acetone into vapors… and then letting gravity do some of the work for you.
A few common 3D printing filament materials that are compatible with acetone include:
However, materials like PLA and PETG don’t dissolve in acetone. As such, you’ll have to use other layer smoothing methods like sanding, or a different solvent chemical, such as isopropyl alcohol.
Vapor smoothing involves trapping liquid acetone in a contained space with your 3D print and allowing the chemical to turn into an aerosol form by introducing heat (e.g. sunlight). From there, the acetone vapors travel freely through the air, covering the outer surface of your print.
As it covers the 3D print’s surface, the outermost layer of plastic temporarily dissolves into a sort of slurry. It quickly solidifies, but much smoother and more polished than before. And, because you’re using the atmosphere to spread the acetone, the chemical reaches much more of the model’s surface area, resulting in a very even polish.
There are other ways to use acetone on 3D prints, but vapor smoothing is easily the most popular option, as it yields a much more even surface finish than other acetone smoothing methods (e.g. using a brush).
How to Acetone Vapor Smooth ABS and ASA 3D Prints
What You’ll Need
- A well-ventilated area to work that has no exposed ignition sources.
- Wear the appropriate PPE – safety glasses/goggles, mask, gloves, etc.
- An acetone-proof container (a large glass vase or a tin) big enough to hold the parts you wish to polish. Preferably with at least 30mm clearance in ALL directions around the object to be polished.
- A loose-fitting acetone-proof lid. If your lower container is not transparent, you can use a sheet of glass as a lid – this removes the need to keep removing the lid in order to see how the polishing is progressing (and not letting the vapors escape or dust get in).
- A flat, non-porous plate such as glass or metal, to raise the object being polished at least 10mm above any liquid acetone in the bottom of the container.
- Some sheets of plastic-free kitchen roll to use as a ‘wick’ for the liquid acetone.
- Somewhere dust-free to allow the surface of the polished object(s) to harden.
- A TIMER! So you don’t forget, only to find your print has turned into a hideous misshapen lump of plastic!
Getting Started
First, make sure your container is free from contaminants, then place a few sheets of the kitchen roll up the side and along the bottom of the container. This allows the liquid acetone to wick up the kitchen roll, helping to produce a strong concentration of vapor at all levels within the container.

Find somewhere to work that has surfaces and materials that will not be damaged by acetone or the fumes. Acetone is a low-density liquid that has very little surface tension, so it splashes and ‘wets’ surfaces very easily.
To hold the kitchen roll sheets in position, place your metal support (plinth) on top. Make sure that you arrange the kitchen roll in such a way that when it gets wet with liquid acetone it cannot fall down onto your printed objects, as that will ruin the even finish.
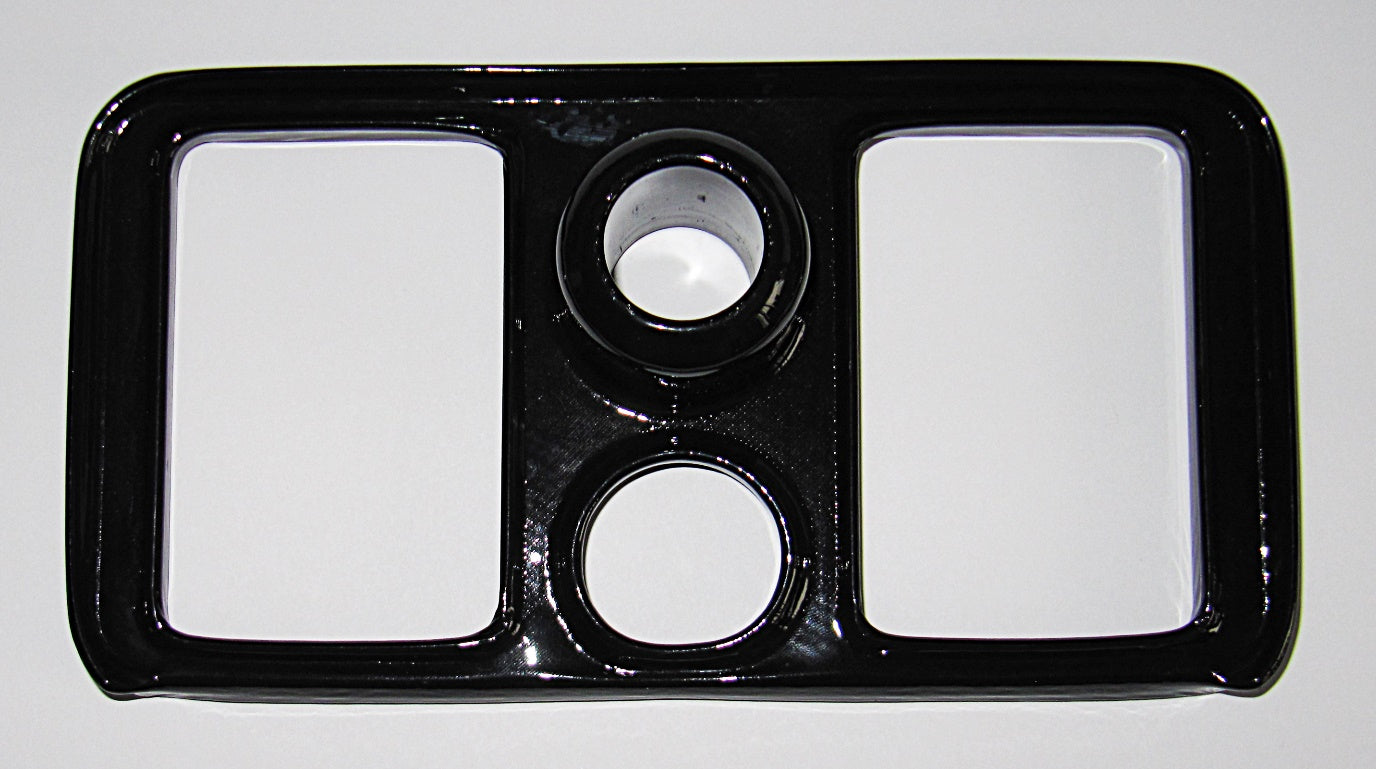
For example, in the image above, the soap dish I acetone smoothed is sitting on top of a plinth made from a small piece of glass standing on three 22mm diameter copper plumbing joints – an arrangement that stops any chance of liquid acetone reaching the dish via surface-wetting.
Things to Consider Before Applying Acetone to Your 3D Print
Not all filaments are the same, even from the same supplier. For instance, due to secondary effects from the pigments that make up the colors of ABS filaments, different colors polish at different rates.
This means you will need to monitor the polishing of different colored objects so that you can remove them at the correct time.
The polishing process not only softens the surface of the object, but the fumes also penetrate into the body of the object. Depending on the period of exposure, you will need to ‘air’ the object for a period of time based on how long the object was exposed to acetone vapor.
Usually, this takes a few days. However, for high-density objects, the full mechanical strength of the object may not be realized for weeks, or even longer!
The polishing process continues for a while after you remove the object from the container – usually for about ten minutes. So don’t be tempted to leave it in too long.
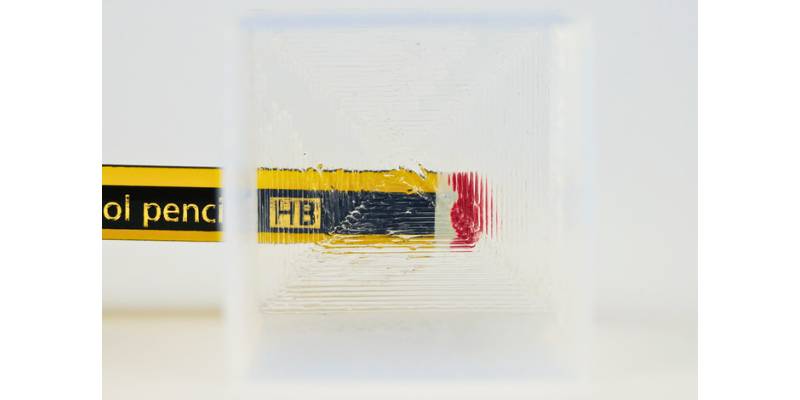
The photo I took below shows what happens to a part when exposed to the acetone fumes for too long:
Lastly, the ambient temperature affects the speed of the process – you are evaporating a volatile liquid after all.
- Too cold and it can take ages.
- Too warm, and the process goes too fast.
- Too hot, and you may be looking for a new place to work/eyebrows, so NEVER apply heat.
Finally, you need somewhere totally dust-free to place the polished object while the surface hardens. If you don’t, any dust that falls onto the surface will become permanently embedded in it.
Polishing
This is the really easy part. Here’s the steps:
- Without getting any on your plinth, pour the acetone over the kitchen roll sheets you placed up the side of the container. You need enough acetone to cover the bottom of the polishing container to a depth of a millimeter or two.
- Ensure that there is no liquid acetone present on your plinth.
- Make sure you can remove the object from the container after polishing without needing to touch it, or you will leave marks all over the surface.
- Quickly place the object in the center of the plinth. Try not to touch it again – you have just a few seconds to adjust the final position. The polishing process has already started – it’s that quick!
- Place the lid on the container and start your countdown timer. I personally set the timer to 15-minute intervals for finely-detailed objects, and 30 mins for large solid objects.
Depending on how rough the surfaces of the object are, and how polished you want the object to be, the process can take from around 15 minutes to several hours.
There is ALWAYS a trade-off between the required surface finish and the loss of fine details. Only you can decide what is acceptable.
Once polishing is almost complete, carefully remove the object. Place it in a totally dust-free environment that has good ventilation. This stops most of the dust particles in the air from falling onto the semi-molten surface of the object.
Note: Remove the object from the container at the point just before you get the surface finish you require, as the polishing process continues for a short while even after the object has been exposed to fresh air.
(You can always put it back in the chamber later if you are not satisfied.)
After about 30 minutes, a ‘skin’ will have formed on the polished object that will stop dust particles from becoming embedded in the surface of the object.
Then, remove the object from your dust-free chamber without touching it, and put it somewhere with good ventilation to allow the acetone to further leach out of it. Be careful: the object has little to no structural integrity at this point.
Depending on the solidity and size of the object, this can take from a few hours to many weeks to reach full strength.
Once you are certain that a good skin has formed on the object, you can speed up this process of solvent evaporation considerably by using a fan to continuously blow air across the surface of the object.
Alternative Methods:
Vapor smoothing isn’t the only way to use acetone to smooth ABS and ASA 3D prints.
1. Brush Application
The brush application method involves using a paintbrush to lightly coat your model in liquid acetone.
This is much quicker and easier than the vapor smoothing method, which is why it’s my personal preferred method. By using a brush to manually apply acetone to your model, you can make sure that even the smallest nooks and crannies on your 3D model are smoothed.
However, the final results are worse than vapor-smoothed 3D prints. This is because it results in brushstrokes and drip marks appearing on your smoothed 3D print, so it’s not quite the mirror-like finish you are aiming for.
Also, be very careful not to accidentally apply too much acetone to one area of your model. Doing so could significantly alter the shape and dimensional accuracy of your model.
2. Acetone Bath
The acetone bath method involves pouring liquid acetone into a polypropylene container and submerging your ABS or ASA 3D print for a short period of time.

Using an acetone bath produces a very evenly-smoothed model, but also results in a lot of waste. This is because it’s not advisable to re-use acetone after it’s been in contact with a 3D print.

There is also a risk of over-dissolving areas of your 3D print when you use an acetone bath. As such, it’s critical that you don’t leave your ABS or ASA 3D print submerged in the acetone bath for too long. A few minutes is all you need!
Benefits of Acetone Smoothing
- Glossy appearance: People generally prefer the smooth surface appearance that acetone smoothing produces compared to the natural matte-like appearance of 3D prints.
- Smoother surface feel: As a result of eliminating the layer lines, 3D prints become much smoother to the touch. This is especially useful when printing wearable models, like a watch chain or necklace pendant.
- Improved strength: According to a research report, acetone smoothed are stronger. This is because when the plastic is dissolved by the acetone, it enhances interlayer adhesion, resulting in a stronger, more durable print. So, acetone smoothing can actually help when printing functional parts, like a gear or S-hook.
- Easier to paint: The smooth and glossy surface finish that acetone smoothing provides also helps with the painting and polishing process. Moreover, paint sticks much better onto an acetone layer-smoothed surface versus the porous surface of a 3D print fresh off the print bed.
- Improved water tightness: the blending of layer lines better seals your 3D prints, making them more water-tight. This is helpful for outdoor prints as well as models that you want to keep liquid in, though I highly recommend against using acetone-smoothed parts for food-contact purposes.
Downsides of Acetone Smoothing
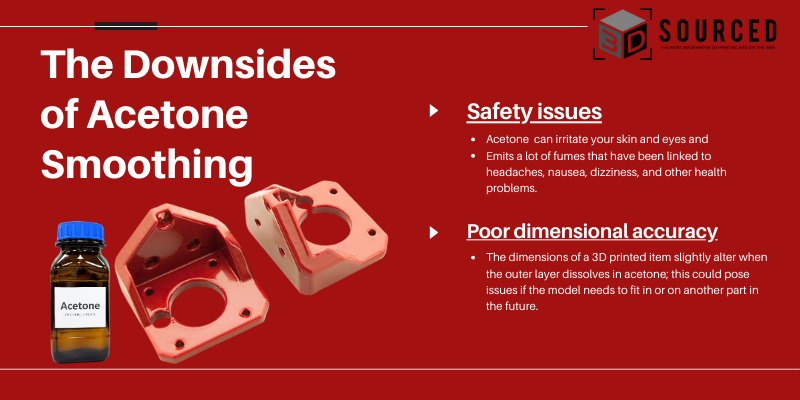
- Safety issues: When in direct contact, acetone can irritate your skin and eyes. Acetone also releases a lot of fumes, which are known to cause headaches, nausea, dizziness, and other health issues. It’s important to always protect yourself from the chemical by wearing the proper safety equipment, like gloves, goggles, and a filtered mask.
- Poor dimensional accuracy: Acetone smoothing is known to poorly affect the dimensional accuracy of 3D prints. Furthermore, when the acetone dissolves the outer layer of a 3D print, the part’s dimensions slightly change, which may cause problems later if this model needs to fit in or on another part. Avoid acetone smoothing any prints with tight dimensional tolerances, like bolts or phone cases.
Safety Practices
Because acetone is a naturally dangerous chemical, it’s important that you take the necessary safety precautions to ensure your health isn’t affected.
Here’s some common safety practices that you should follow when dealing with acetone (propan-2-one):
- Wear gloves and long sleeves to prevent skin contact
- Only use in well-ventilated areas
- Never place near flame or heat
- Wear goggles to protect your eyes from the fumes
- Wear a filtered mask (not necessary, but helps with nausea)
- Never use naked ignition sources (acetone is very volatile and flammable)
- Keep away from animals and children
- Avoid spilling; acetone can quickly stain clothes and furniture
Related posts:
- ABS painting – A step-by-step guide to painting ABS prints
- 3D Printing Visual Guide for Improving Your Finishing
- How to Fill, Paint, and More –3D Print Finishing Explained