Key Takeaways
- Nozzle size effects: The nozzle size affects the print time, quality, and strength of your 3D prints. It also determines the layer height and extrusion width settings.
- Nozzle size options: The most common nozzle size is 0.4 mm, which offers a good balance of speed and detail. You can also use smaller or larger nozzles for different purposes and materials.
- Nozzle size selection: The best nozzle size depends on your printing goals, filament type, and printer resolution. You should also consider the nozzle height and flow rate adjustments.
- Nozzle size maintenance: You should keep your nozzle clean and free from clogs, especially when using smaller nozzles or composite filaments. You can use cleaning filament or a micrometer device to do this.
When browsing for your last printer, 3D printer nozzle size may well have been the last thing on your mind. It’s an often overlooked detail.
Depending on what you need to print; the wrong setup could be holding you back.
The diameter of the nozzle affects the extrusion width of each line in a print, which impacts not just the print time but also what layer height setting you can use.
Smaller nozzle sizes allow you to use smaller layer heights, resulting in improved printing precision and thus more detail on 3D printed models.
On the other hand, larger nozzle sizes produce stronger parts with faster print times.

In this article, we’ll take a look at the most common 3D printer nozzle sizes, and I’ll share which I’ve found to be best is best for different projects and materials.
We’ll also cover the relationship between nozzle size vs layer height and if in doubt, how to measure your nozzle diameter – so you can self-assess in the future!
How Does Nozzle Size Affect 3D Printing?
The diameter of the 3D printer’s nozzle directly affects the extrusion width of each printed line, significantly impacting your print’s properties.
The best 3D printer nozzle size isn’t one-size-fits-all; it hinges on your specific goals and priorities.
For commercial 3D printing or bulk similar prints, it’s crucial to have your extruder depositing the correct amount of material. Using too much filament results in waste and inflated costs, while too little can increase print times unnecessarily.
Generally, smaller nozzles are best for detailed, intricate models, while a wider nozzle is better for practical prints that prioritize strength like replacement doorknobs. The reason for this correlation lies with the layer height setting, which I’ll talk more about later.
As for compatibility, various nozzles can be swapped on your 3D printer with relative ease. Most nozzles screw right into the bottom of the hot end assembly, regardless of their output diameter (AKA the nozzle size).
Layer Height vs Nozzle Size
Understanding 3D printer nozzle size and its relationship with layer thickness is crucial for achieving high-quality 3D prints.
As we’ve already explained, the nozzle size controls the width of each line of extruded filament, and, thus, it dictates the quality of the horizontal details of a print (along the X and Y axes). On the other hand, layer height is an adjustable slicer setting that controls the thickness of each layer and affects the vertical resolution of a print, as well as the print time and part strength.
Larger layer heights result in fewer layers in a model, meaning models take less time to print and they are more durable because they have fewer break points. On the flip side, smaller layer heights create more layers on the model, allowing for more detail on 3D prints.

If you’re printing a model with a lot of detail, like a miniature War Hammer figurine, you’ll want to use both a small nozzle size and layer height to ensure the part is detailed across every axis. The reverse is true when you’re printing a part that needs to be strong, like a gate lock.
On this note, it’s important to always make proportional changes to the layer height when you adjust the nozzle size, and vice-versa. This ensures proper and even filament extrusion and results in fewer printing issues.
Use info pop out text image from current article here
The Standard 3D Printing Nozzle Sizes
The most common 3D printer nozzle size is 0.4 mm, favored by both enthusiasts and manufacturers for its versatile performance.
This nozzle size provides a great mix of low print time, reasonable print quality, and decent part strength. 0.4-mm nozzles are most commonly used with a 0.2-mm layer height, but you can use any layer height from 0.1 to 0.3 mm.
This range gives you some wiggle room when it comes to controlling the level of detail and strength for your 3D prints. For example, you can use a 0.1-mm layer height to print a detailed miniature and then use a 0.3-mm layer height to print a strong part for your bike, all without having to change the nozzle.

While I think the 0.4-mm nozzle size is the best overall, you might want to explore the capabilities of different sizes to achieve faster, stronger, or more detailed prints. Luckily, you’ll have a lot of options, and you can find reliable 3D printer nozzles in sizes from 0.05 mm all the way up to 1.4 mm.
Use image from current article here
Which Nozzle Size is Right for You?
The best 3D printer nozzle size for you will depend on a few different factors, such as your desired print properties, what filament material you’re using, and how much time you have.
First off, as we discussed, the nozzle size can affect the print time, strength, and level of detail. As such, it’s important to keep the intended purpose of your 3D print in mind when choosing the nozzle size.
For example, if you’re printing a robot part that needs to be strong, you might prefer a larger nozzle size. In general, though, 0.4-mm nozzles provide all the strength and detail you need.
However, what filament material you’re using also plays a role in the best nozzle size. Most traditional 3D printing materials, including PLA, ABS, PETG, and TPU, work best with a 0.4-mm nozzle because most pre-made slicer profiles are tuned around this parameter. However, certain filament materials, like carbon fiber composites, yield better results when paired with a larger nozzle size, like 0.6 or 0.8 mm.
Lastly, you should also consider how much time you have as the nozzle size can have significant affects on the print time of a model. For those last-second 3D print situations, a larger nozzle size is best.
3D Printer Resolution Explained
Now in theory, smaller 3D printer nozzle sizes do allow you to achieve better precision. But for a lot of printers, especially lower-priced or older models – a smaller-sized extruder nozzle isn’t necessarily going to make a difference unless your printer supports the higher resolution necessary.
Like putting low profile, performance tires on an old classic car – it won’t make it go any faster or necessarily handle the corners better.

It’s similar to how 3D printer specifications on paper (such as advertised resolution) won’t always translate to better print quality on the finished article.
Similar to how Ultimaker and Zortrax have very similar resolutions on paper, but in our unbiased opinion our Zortrax creates better quality prints than our Ultimaker 2 does – for example.
Check out the fine detail below for a 3D printing resolution comparison on very small nozzle sizes.

If you bought your 3D printer recently though, it’s likely you’re going to be able to benefit from a smaller nozzle size as the resolution across the board is getting really good.
3D Printer Resolution Simplified
Smaller nozzle sizes offer improved precision, but not all printers (particularly older or cheaper models) can capitalize on this because they don’t support the higher resolution necessary.
Imagine fitting high-performance, low-profile tires on a vintage car – without the engine and handling upgrades, the speed or cornering gains are negligible.
Advertised resolutions don’t always ensure superior print quality, and printer specifications are not a definitive indication of the final output’s quality. For instance, while both Ultimaker and Zortrax have comparable resolutions, my Zortrax consistently outperformed my Ultimaker 2 in our print quality tests.
If you bought your 3D printer recently, it’s likely capable of using smaller nozzle sizes effectively, as resolution levels across the board are getting really good.
Should I use a Smaller Nozzle?
Let’s take a look at the pros and cons of 3D printing with smaller nozzle sizes.
The smaller the nozzle in your extruder, in theory the higher detail you can print.
This is great for those intricate prints, like if you need to print very thin walls for aircraft skin, for example.

The 3D printed model plane skin in the photo below was printed with a regular 0.4-mm nozzle. However, if we printed the same piece in a smaller 0.2-mm nozzle, the strength of the model would’ve noticeably degraded, as the extra layers would present more breaking points for the model.
It’s also worth clarifying that the nozzle size has no significant effect on the weight of a model. While switching to a larger nozzle increases the extrusion width, the number of layers on the model will drop, resulting in no difference in weight. Any small differences in the weight are usually due to external print factors, like air bubbles in the layers.
As for the nozzle size’s effect on the print time, it’s more of an exponential rather than linear relationship. Moreover, using a 50% smaller nozzle size will much more than double your estimated print time.
Testing this theory myself, I found that a print that takes 2.5 hours when using a 0.4-mm nozzle with a 0.2-mm layer height but takes about 8 hours when using a 0.2-mm nozzle and a 0.1-mm layer height.
With smaller nozzles, you might face more 3D printing issues, especially if you’re using low-grade filament. The higher detail requirements of small nozzles demand the use of pure, high-quality filaments.
Less obvious challenges with thin nozzles include difficulty in printing overhangs and bridges due to reduced layer width for the next layer to cling to.
However, one benefit is that supports are easier to remove due to the increased precision, which minimizes the necessary filament between the model and supports, making them easier to break away and reducing the need for sanding.
On the other hand, supports become much easier to remove with a smaller nozzle because the slicer can use the minimum filament necessary. This reduced contact area means the supports break away more easily, and there’s less that needs sanding afterward.
The main issue when using ultra-thin nozzles of 0.2mm or 0.1mm is the high likelihood of blockage. The smaller the nozzle, the easier it gets clogged, even by tiny particles.
Ensuring your filament is contaminant-free and the nozzle is cleaned consistently can transform a tricky printing process into a dependable operation. A filament dust catcher is particularly useful for keeping your nozzle free from debris.
How Do I Measure Nozzle Size?
The diameter of a 3D printer nozzle is far too small a distance to precisely find with just your eyes, or even a digital caliper. Because of this, you’ll have to determine the nozzle diameter in other ways.
Firstly, if you haven’t ever changed the nozzle, you can find the diameter on the manufacturer’s website. Most commercially popular 3D printers, like the Creality Ender 3, Anycubic Kobra, and Ultimaker S3, comes stock with a 0.4-mm nozzle.
If you can’t find this information online, though, you should check the side of the nozzle, where the diameter is typically engraved. This might be hard to see when it’s attached to the hot end, so you might have to unscrew it from the heat block to get a good read.
If these first two methods don’t work for you, the next test is to try printing a model (e.g. calibration print) that’s been sliced for a printer with a 0.4-mm nozzle. If the model comes out with reasonable print quality, then your printer likely has a 0.4-mm nozzle. You can also test for other nozzle sizes by adjusting the machine setting in your 3D slicer.
And, as a last resort, you can work out your nozzle size by measuring the diameter of a strand of extruded filament. The best way to conduct this test is by using your printer’s LCD to heat up the nozzle to its regular printing temperature and then rotating the extruder 10-100 mm/s.
Once filament starts to flow out of the nozzle, let it flow out evenly and cool down, and then cut it. You can use a micrometer device to estimate the true output diameter of the nozzle. It’s worth noting that this test might show you inaccurate results if you’re using too high of a nozzle temperature or a low-quality and impure material.
How Do I Set the Correct Distance from Nozzle to Bed?
Ensuring the right distance between your 3D printer’s nozzle and bed is crucial for successful prints with a professional finish.
While some may suggest using a feeler gauge for setting up your 3D printer, it can often to be too thick. Instead, I recommend using thin receipt paper.
To achieve the perfect nozzle distance, place the receipt paper under the nozzle, then gradually lower the nozzle there’s a slight resistance when attempting to slide out the paper. Printing at this height will give the bottom of your prints a smooth, glass-like finish.
How to Choose the Right Layer Height Settings for 3D Printing
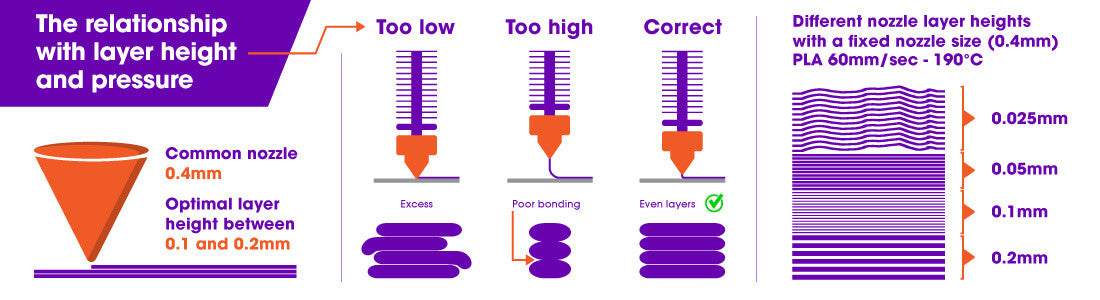
Selecting the appropriate layer height doesn’t require a specialized calculator. As a basic guideline, your maximum layer height should be 50% of your nozzle width. You could push it to 75%, but your risk losing out on vertical resolution due to a lack of pressure pressure on the extruded filament.
Understanding the relationship between the 3D printer nozzle size and layer height is crucial. For a 0.4mm nozzle, an optimal layer height would be 0.2mm, potentially stretching to 0.3mm. On the same size nozzle, layers lower than 0.1mm would just increase your waiting time for not much benefit.
Don’t forget to adjust the filament flow rate or extrusion pressure when you make changes in layer height and nozzle size (most modern slicers will do this automatically).
For most cases I recommend printing thinner layers with thinner nozzle diameters, and thicker layers with thicker nozzles.
Be aware that if you do choose to print with a thicker nozzle diameter and a very thin layer height, you’ll need to bring your extrusion settings in the slicer way down to prevent over-extrusion.
Keeping your 3D printer nozzle clean is vital, regardless of its size. One of the easiest ways to do this is with high-quality cleaning filament. You only need to use a few grams of it each time you clean, and it’ll flush out all the impurities without being abrasive.
If you’re printing thicker layer heights (in proportion to nozzle diameter) your overhangs will look a bit messier. Thinner layer heights, or better 3D printer layer resolution, will improve the detail along the Z-axis. Here’s a diagram to better illustrate layer height 3d printing.

Why Would I Use a 0.8mm or Thicker Nozzle?
Many prints do not require the fine details offered by the standard 0.4mm nozzle that often comes with printers.
If your focus is on speed and durability over intricate detail, a 0.8mm or even a 1.0mm nozzle may be the right choice for you.
Upsizing to a 0.8mm nozzle could potentially quarter the printing time compared to a 0.4mm one. And don’t forget, prints done with 0.8mm can still be impressively detailed depending on your printer.
The only slight downside could be that you use slightly more filament, but with the thicker part walls, you can likely get away with lower infill to compensate.
What Nozzle Size Should I Use For Composite Materials?
Composite filaments, including particle-based types like Woodfill, Copperfill, Carbon Fibre Nylon, or Glass Reinforced Nylon, often struggle to extrude through thinner 3D print heads.
These filaments have particles that, although still nano-sized, can have issues flowing through nozzles under 0.4mm diameter
These filaments possess nano-sized particles that can have difficulty passing through nozzles less than 0.4mm in diameter.
For any metal, glass or Carbon Fiber materials you’ll need a hardened nozzle. The brass nozzle that comes with your printer will gradually widen with use, reducing precision. More robust alternatives, stainless or tungsten nozzles last far longer and are a worthwhile investment for just $10-$25.
If you’re still wondering “What extruder size to choose?” let’s recap with the pros and cons of smaller nozzles so you can work out the best nozzle size for your 3D printer:
- Smaller nozzles offer finer details if your printer supports the extra resolution.
- Smaller nozzles increase print duration. Switching to a thicker nozzle for lengthier prints can be a time-saving strategy.
- Overhangs might be harder to print with smaller nozzles but supports detach more cleanly.
- Smaller nozzles demand high-quality filament to prevent blockages.
To assist in your filament usage, we’ve compiled a guide on the filament length for different spool sizes and materials.
- For any more nozzle information, read our full guide to 3D printer nozzles.
- We also have a guide to 3D printer hot ends
- How to unclog a clogged nozzle
- How to print overhangs and bridges over 45 degrees
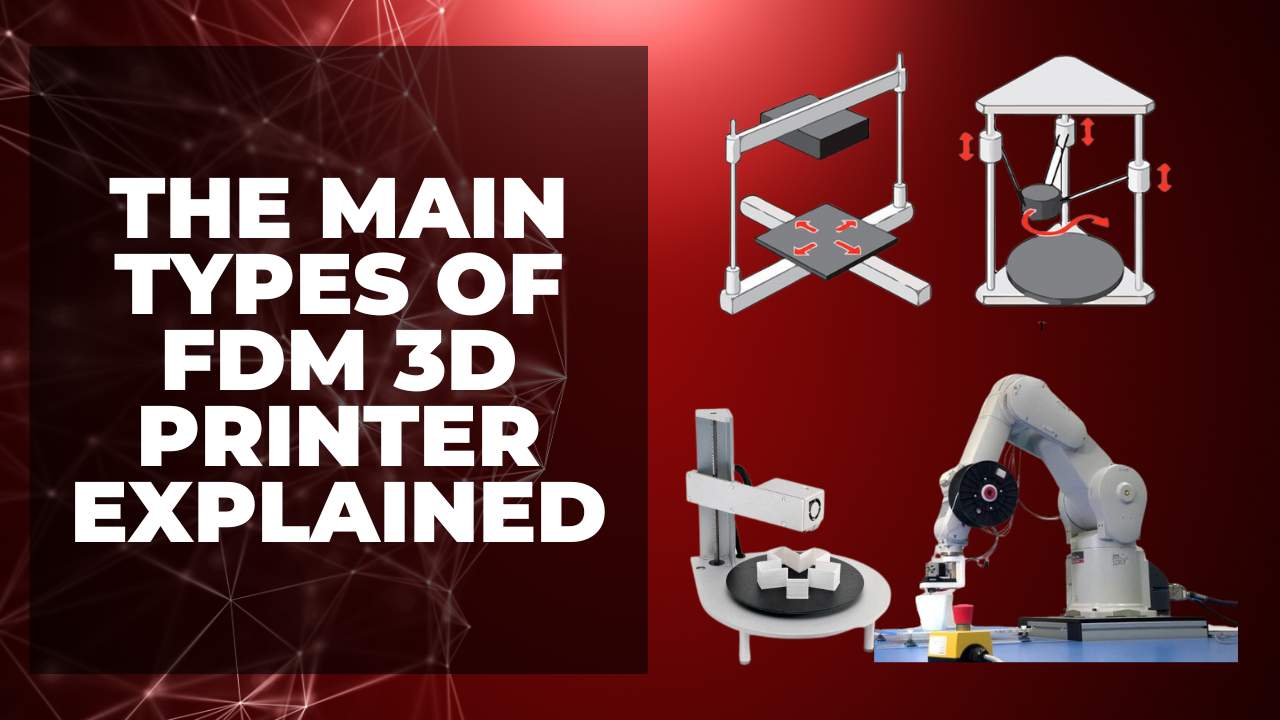
- The best FDM 3D printers