

Key Takeaways
- Adjust Slicer Settings: Lower the layer height, change the support gap, and increase the support density for better support quality and easier removal.
- Use Dual Extruder: Print your supports with a different material than your model, such as water-soluble filament, to avoid damaging your print surface when removing them.
- Reduce Support Reliance: Rotate your model or cut it into separate parts to print without supports and then glue them together later.
- Change Support Shape: Experiment with different support patterns, such as lines, grids, or zigzags, to find the best one for your model and its overhangs.
3D printing supports act like scaffolding to keep your prints in place. While not always necessary, they’re key for parts that hang over 45 degrees that are likely to droop if not properly held up.
These supports are also useful for thinner parts that could fall, break, or unwantedly bend during printing if not well supported.
3D printing with above supports is a good way to keep your complicated prints reliable, but they need to be just right. They may sound simple enough, but badly designed, poor quality above supports lead to a host of issues including unsound prints, uneven or rough surfaces, and unusable parts.
This article will explain why these support failures happen, how to identify them, and the best fixes for each potential cause.
Reasons For Poor Quality/Rough Surface Above Supports
Why is the Top of my 3D Print Rough? – Identifying Poor Quality Supports

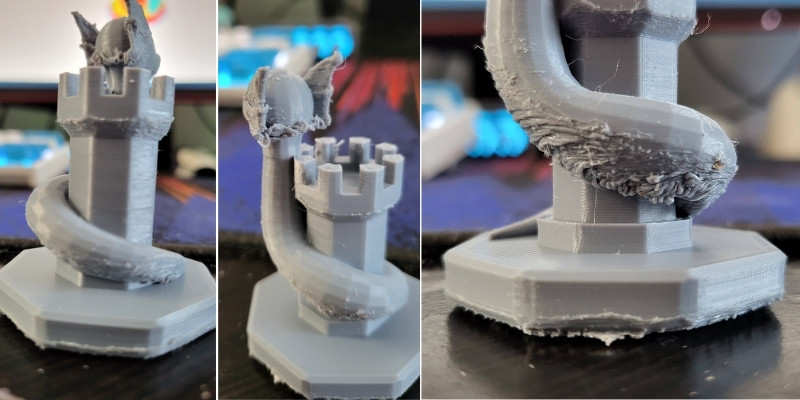
Poor quality supports result in rough surfaces on your print or drooping overhangs that clearly haven’t been held up properly during print.
This happens for a variety of reasons like incorrect slicer settings, improper printer settings, and even an overrealiance on such supports will lead to poor quality prints with rough surfaces.
Since these supports are designed to be removed from the model after printing, if they’re particularly difficult to remove without damaging your model, then they’re likely too thick. Simply making them thinner can stop this from harming your end result.
Overall, poor quality above supports will affect your model’s surface. It will appear rough, disjointed, and even broken. If you notice these problems happening often with your 3D printing, then it may be time to look at your above supports as the cause.
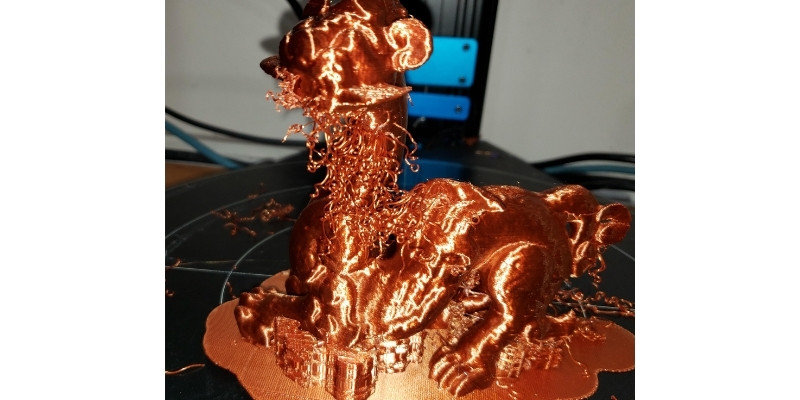
If you have an overhang in your print (like if you’re printing a crane, for example), then you’ll find that poorly designed or implemented supports won’t provide enough hold to keep them upright mid-print.
This will cause drooping and even early breaking mid- or post-print, rendering your model useless.
How Can I Improve my 3D Print Support?

Improving above support quality is often a simple fix.
Here are a few of the most common problems for poor quality above supports and their solutions.
It should be noted that if you’ve ever had an issue with any kind of bridging support, you’ll find a lot of the same fixes apply to above supports too. If you have fallen into that boat but find your usual fix doesn’t work, then it’s worth considering one of the solutions below.
Read more: how to print bridges and angles over 45 degrees
Incorrect Slicing Software Settings
Like many 3D printing issues, poor planning is often a root cause. Slicing software will only do what it’s told to do, and sometimes what you tell it to do is less than ideal.
This is the case for nozzle temperature, print speed, feed rate, and many other settings that determine a successful print.
How to Fix
A common solution for this problem is to simply lower the layer height in your software before you get to printing. If you’re using a layer height of 0.2mm, you may find that lowering this to 0.1mm will make a world of difference.
Lowering the layer height allows your printer to create more layers to both the model and its support, increasing the stability of your print and the reliability of your above supports.
Insufficient Support Gap
Supports are designed to be easy to break off the model easily once you’re done printing, and need to be printed so they don’t risk damaging your print when you remove them

This is done with a support gap, which leaves a deliberate but small space between the support and your model to make the connection thinner and easier to remove.
If you’ve ever built anything like a model plane, you’ll know the little cards that contain the necessary parts. These parts are connected to the cards with the same principle, to be broken off easily without marking or damaging the piece you need to use.
This is because the piece attaching the part to the card is thinner and has an ideal gap where the piece is attached, making it simple to break off without affecting the building part for seamless modeling.
How to Fix
Fixing an inefficient support gap may require some trial and error.
If your support gap is too big, then it will adhere better to your model, but it will ultimately be harder to remove and further risk damaging your print surface. If it’s too small, it will be ineffectual and offer no support.
By changing the size of this support gap in your slicer settings, you’ll find the happy medium so that your supports act as they should without being too well-stuck.
You’ll need to do some tweaking, as the best support gap will depend on which piece is being supported, so there’s no right or wrong answer that works for every print.
If you still have issues despite numerous attempts, then it may be time to consider a dual extruder.
Single Extruder Issues
The support gap issues mentioned above are primarily designed for single extruders which need to print the entire model using only one nozzle. If issues persist, then it could be the reliance on a single extruder that’s leading to low-quality supports and rougher model surfaces.
This is because single extruders can only print one material at a time, and so they print your supports with the same filament as the rest of your model. This means your supports will adhere to, and be just as difficult to remove from, your print as any other part.
How to Fix
Switching to a dual extruder 3D printer or upgrading your own with a second extruder is a great fix to this issue. Not only does this open the door for a wider variety of prints, but also lets you print with two different materials at once.
By printing your supports with a softer or even water-soluble filament than the rest of your model, you’ll find removing them far easier and less risky than when using a single extruder. It also means you can have a lower support gap for better quality without adding to how hard it is for you to remove.
Water-soluble filaments like Ultimaker PVA are by far the best solution to this issue if you’re printing with PLA, and well worth considering if you have access to a dual extruder. If you prefer to print with ABS, then you’re better off getting HIPS filament.
Low Support Density
Because they’re designed to be removed and disposed of, 3D printer supports are designed to use a lower infill to make them lighter and easier to break off.
Support density plays an important role in how your prints turn out and, like support gaps, too much or too little in the wrong areas will lead to 3D printer issues.
If you find any appendages or overhangs on your model droop too much even when using supports, then your infill percentage and support density may be the problem here.
How to Fix
The most reliable way to fix this issue is to increase the density only on the upper parts of your support, which will give better leverage to the rest of the support and better hold your model while printing.
If you’re still having issues using an infill of 30%, for example, you may find upping that to 40% at the top of your supports may fix this issue entirely, improving both support performance and your model’s surface quality.
Too Much Reliance on Above Supports
3D printing with supports is common for complex models that need help staying where they need to be during printing. But relying on them too much will waste filament and create far more issues than they solve.
How to Fix
While supports are useful, you can also take steps to reduce your reliance on them, requiring fewer supports overall.

Rotating your model is a good way to decrease your reliance on supports, but the best solution is to use a cutting tool to print different parts separately before simply gluing them together later on as part of your post-processing.
Cutting your models and printing them separately removes the need for supports altogether, though it does take more time and a little more effort than printing the full model at once. Still, if you find your supports are more trouble than they’re worth overall, then this is the ideal solution for you.
If you plan on cutting your model and printing it separately, then you should be familiar with which adhesive works best depending on your material. Superglue is fine for PLA, but you’ll find better results with ABS cement if you’re printing with ABS, for example.
Poorly Designed Supports
Designers are only human, and so make human errors. Even if the design you’ve found comes with ideal support settings or instructions, you might still find that they don’t really work for you.
Supports are also easy to forget if you’ve been making significant tweaks to a pre-existing design. If you’ve made changes to a model’s structure, you’ll need to compensate by altering the support settings.
How to Fix
Simply changing the support settings in your slicing software is a good fix for this 3D printer issue. Changing the infill, support density, or even shape of your supports will shore them up to efficiently hold your model as it prints.
Which settings you need to change and how will depend on the model and any changes you’ve made to it. With some careful calculations, you’ll find the right settings for your supports and print worry-free.
These settings can be as simple as changing the infill, lowering your print speed, or making better use of a cooling system.
Why Do My 3D Print Supports Keep Failing?
If the above solutions still don’t seem to work for you, there are a few more settings changes that could shore up the reliability and efficiency of your supports.
- Change Settings for Increased Reliability – As well as layer height, adjusting your nozzle temperature or print speed are efficient ways to ensure overall quality.
- Lower Print Speed – Printing on the lower end of your filament’s recommended speed in a great way to increase print quality and reliability in general, not just with your supports.
- Improve Cooling Methods – A higher nozzle temperature will make for more thoroughly melted filament, but this could lead to inefficient above supports that don’t cool fast enough to work as they should.
On that note, adjusting your cooling settings is also a quick and simple fix to a lot of above support issues. Upgrading your cooling system or simply setting your fan to a higher power or turning it on earlier in the print will harden your model and its supports faster, and so make them sturdier and more efficient overall.
Related articles:
- Are 3D Printed Parts Strong? (PLA, ABS, PETG & More)
- How-to: Fix 3D Print Not Sticking To Bed
- Fixing The Worst 3D Printer Problems: Prints Pillowing, 3D Printer Stringing and Layers Splitting
- Under Extrusion Problems or Clicking Sounds? Reasons and Solutions


