

Key Takeaways
- What is over-extrusion: Over-extrusion is when the nozzle dispenses more filament than is required, causing blemishes, blobs, stringing, and poor dimensional accuracy.
- Causes of over-extrusion: Over-extrusion can be caused by incorrect settings such as nozzle temperature, filament diameter, flow rate, or e-steps, or by using the wrong nozzle size or filament type.
- How to fix over-extrusion: To fix over-extrusion, you need to adjust the settings in your slicer or on your printer’s interface, such as lowering the temperature, matching the filament diameter, calibrating the e-steps, or reducing the flow rate.
- Benefits of fixing over-extrusion: Fixing over-extrusion can improve the quality and accuracy of your prints, prevent jams and clogs in the hot end and nozzle, and reduce filament waste.
Over extrusion is a common problem that most 3D printer owners will contend with at one point or another.
While the cause of unsightly blemishes, like uneven layers, blobs, and stringing, and detrimental to the overall dimensional accuracy of a print, not to say the cause of pesky jams if left unchecked, over extrusion can be fixed relatively easily if you know how.
In this guide, we’ll walk you through what exactly is over extrusion, the causes, and how to fix the problem for good.
Over-extrusion: Main Issues and How to Fix
Main Causes of Over-extrusion
- Temperature Is Too High
- Incorrect Filament Diameter Settings
- Incorrect Flow Rate / Extrusion Multiplier Calibration
How to Fix Over-extrusion
What is Over Extrusion?
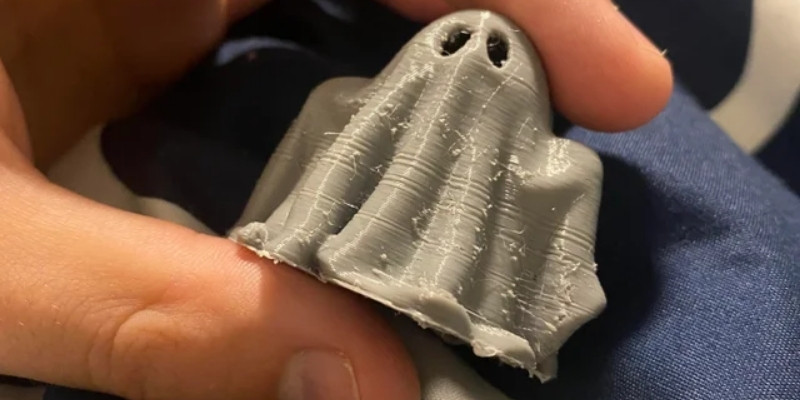
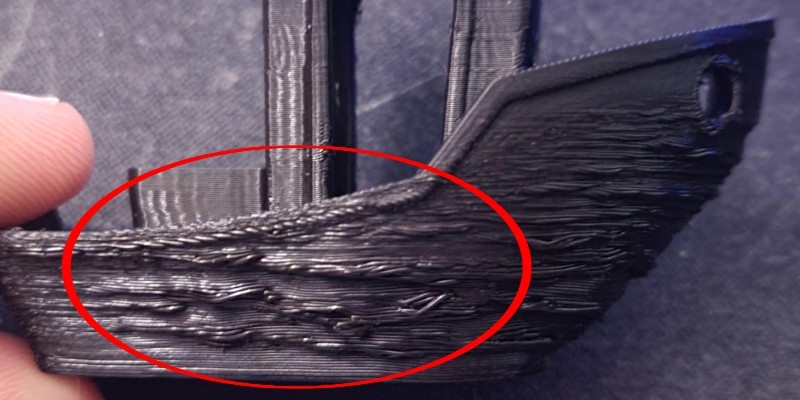
Over extrusion, as the name implies, is excessive extrusion, as in the nozzle dispenses more filament than is required. This causes a surplus of filament, which needs to go somewhere as it leaves the nozzle, more often than not souring the overall quality of prints by creating stringing, blobs, bulges, oozing, and creating unusually thick and uneven layers when 3D printing a part or model.
3D printing over extrusion is one form of inconsistent extrusion, the other being under extrusion. Extrusion is the term used to describe the process of hot filament leaving the nozzle and its way to being deposited on the build plate to create a print.
3D printing over extrusion doesn’t just ruin prints, but can also lead to jams inside the hot end and nozzle, which often involves disassembling the print head to fix, a time-consuming task.
Under-extrusion, on the other hand, is when an insufficient amount of filament is extruded. This can lead to issues such as incomplete or missing layers, holes or gaps between layers, extremely thin layers, and other structural issues of that kind that affect the strength and overall finish of the print.
For more information on under-extrusion, check out our dedicated guide.
Causes of Over Extrusion in 3D Printing
As we established above, over extrusion happens when the 3D printer extrudes too much filament through the nozzle. This can be caused by several factors and settings, which we’ll detail below.
Temperature Is Too High
Signs:
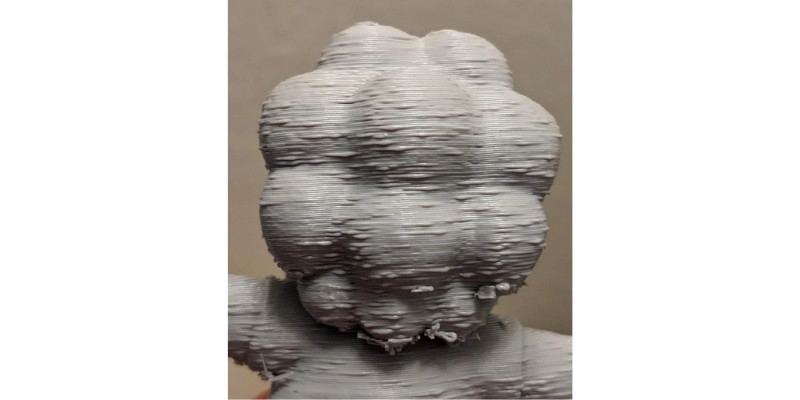
The most glaring signs of the temperature being set too high is excessive oozing from the nozzle and substantial amounts of bulges, blobs, and stringing on the print itself.
Explanation:
When the temperature is set too high, filament flows freely and unrestricted from the nozzle, affecting flow rate and control of the extrusion process. Essentially, the filament melts so fast that the printer is no longer able to control its flow adequately enough for the purposes of 3D printing.
How to Fix:
The fix is fairly straightforward: lower the nozzle temperature in your slicer before sending the file to your printer or on the printer’s interface.
You’ll want to set the temperature within the range recommended by the filament manufacturer and within acceptable limits for the particular type of filament you’re using. Here’s a rough breakdown of what temperatures you should be aiming for when using the most popular filament types:
- PLA – PLA requires a print temperature between 190°C and 230°C.
- ABS – Anywhere from 220°C to 250°C.
- PETG – Around 220°C to 230°C.
- TPU – Anywhere from 210°C to 230°C
- HIPS/PVA – HIPS/PVA requires around 220°C-240°C
From there, make small adjustments to the temperature until the telltale signs of over-extrusion (oozing, stringing, bulges, blobs, etc) disappear. Lower cautiously though, as dropping the temperature too much can lead to elephant’s foot, another common issue affecting FDM printers.
Incorrect Filament Diameter Settings
Signs:
A sure fire sign of incorrect filament diameter settings is filament rushing out of the nozzle almost uncontrollably, even at lower print temperatures. Flow rates are all over the place and prints come out plagued with major blemishes and unsightly blobs.

Explanation:
It’s a basic issue of your printer having the settings dialed in. For example, the printer works over-time and uses a higher extrusion rate than required to push filament through thinking you’re using 1.75 mm filament even though in reality it’s 2.85 mm material.
How to Fix:
Head to your slicer and adjust the filament diameter setting to match your filament. Filament is available in three main diameters: 1.75 mm, 2.85 mm, and 3 mm.
For example, in Cura you’ll need to adjust compatible material diameter, under the extruder tab in the machine settings. The process likely differs depending on the slier you’re using. Doing so ensures the flow rate matches your filament diameter, allowing the printer to extrude filament appropriately.
It goes without saying that you’ll need to buy a filament diameter that your printer supports as not all support all types with the most popular being 1.75 mm. For example, all Ultimaker printers are only compatible with 2.85 mm filament.
Read more: some of the most important 3D printer slicer settings explained
Incorrect Flow Rate/Extrusion Multiplier Calibration
Signs:
All the most common signs of over-extrusion apply here: blobs, blemishes, stringing, bulges, poor quality and inconsistent layers. Excessively bulky later and jamming/clogging problems are common issues caused by incorrect flow rate calibration.
Explanation:
Flow rate, also sometimes called extrusion multiplier, is a slicer setting that dictates the speed, or rate, and amount of filament a printer pushes out or extrudes based on other settings like filament diameter, print speed, and others.
If the setting is set incorrectly, the printer extrudes more material than required, resulting in the over-extrusion.
How to Fix:
Tune your printer’s flow rate/extrusion multiplier in your slicer. Most slicers have this dialed in at 100%. From there you can adjust the value lower, a percentage at a time and monitor for improvements.
However, for optimal results you’ll want to calibrate your e-steps, or extruder steps, to get an accurate reading of what setting will provide the best results and mitigate 3D printing over extrusion. We’ll cover this below.
Note that if adjusting the flow doesn’t fix the issue, it’s likely it is being caused by something else, in most cases print temperature, which we covered above.
How to Fix Over Extrusion
Fix Temperature Settings
Ensure your print temperature is correctly set in your slicer according to the material type and the recommended manufacturer settings.
Correct Filament Diameter Setting
Jump into your slicer and ensure you’ve dialed the filament diameter to match the diameter of your filament – 1.75 mm, 1.85 mm, or 3 mm.
Calibrate Extruder Steps
A must-do for any 3D printer, especially one fresh from the factory, is calibrating the e-steps. Doing so ensures the printer is extruding the correct amount of filament through the hot end and into the nozzle.
The right calibration doesn’t just deliver the right flow rate, but ensures that prints are dimensionally accurate. Set too high and you’ll encounter over extrusion complications such as bulges, blobs, stringing, bulky layers, and unrefined print details.
Here’s a quick breakdown of what’s required to calibrate your e-steps:
- Fire up your printer, preheat to the recommended temperature for the filament you’re using, and load into a spool of filament.
- Wipe out a USB cable, plug it into your printer, and connect it to a PC. Fire up your slicer if it has G-code command functionality, or use a third-party software like OctoPrint. You’ll use this to communicate with your printer and set the e-steps.
- From here, we won’t go into too many details as it’s beyond the scope of this article.From the top of the extruder, measure 110 mm and mark the filament.
- Send a command (G1 E100 F100) to your printer to extrude 100 mm of filament.
- Once the printer’s done feeding the 100 mm, measure again from the extruder up to the 110 mm mark you made previously. If the result is 10 mm, you’re in luck, everything’s set up. But, if it’s over or under 10 mm, this is causing over/under extrusion issues and you’ll need to calibrate the e-steps.
- Again this is beyond the scope of this article, but the next step involves adjusting the printer’s step value to match the results obtained during the 100 mm extrusion. Process.
Lower Extrusion Multiplier
Head to your slicer and find the flow rate/extrusion multiplier setting. Lower this by a percentage or so at a time until over extrusion improves. We recommend calibrating the e-steps before adjusting flow rate as this generally fixes the issue and you can confidently set it to 100%.
How Do You Adjust Over-Extrusion?
To adjust 3D printing over extrusion, make sure your hot end temperature is configured correctly, that you’re using the correct nozzle size and filament diameter, have the right slicer settings, have calibrated your e-steps correctly, and have the correct extrusion multiplier settings dialed in.
How Do I Fix Over Extrusion in Cura?
To fix 3D printer over extrusion in Cura, you need to dial in the right nozzle temperature settings, input the right diameter for your filament and nozzle size for your printer, and configure the extrusion multiplier/flow rate settings correctly.
Related posts:
- Help! 3D Print Not Sticking To Bed
- What Is Under Extrusion? Here’s Why and How to Fix it
- How To Fix Every Issue Of PETG Not Sticking To Bed
- Stop Stringing On Ender 3 – Retraction Settings
- 3D Printing: What Is Elephant’s Foot?
- Extruder not extruding? How to fix filament feeding issues


