

Key Takeaways
- Elephant’s foot explained: A common 3D printing issue where the first layer expands beyond the rest of the print.
- Main causes: Poor first layer cooling, excessive bed heat, incorrect bed leveling or Z-offset, or too much filament.
- Possible solutions: Level the bed, lower the bed temperature, increase the fan speed, add a raft, or use a slicer setting to shrink the first layer.
- Importance: It can ruin the aesthetics, precision, and performance of the printed part.
Ever spotted an unsightly first layer that seems to protrude further than the rest of your print in a bulbous border? Chances are it’s elephant’s foot, an all too common, but surmountable, problem that most makers will come across at some point or another.
For most, the effect is minimal and passed off as a minor quirk that gives a printed part or model a certain charm, but it can snowball into a major defect that ruins an otherwise perfect print.
In this guide, we’ll explain exactly what defines elephant’s foot, run through the causes, and finally provide a list of fixes to help you get rid of the problem once and for all.
Let’s dive in.
3D Print Elephant’s Foot – Causes and How To Fix
Causes of Elephant’s Foot
How to Fix Elephant’s Foot
- Key Takeaways
- 3D Print Elephant’s Foot – Causes and How To Fix
- What Is Elephant’s Foot?
- What Causes Elephant’s Foot?
- Signs of Elephant’s Foot
- How to Fix Elephant’s Foot?
- What Causes Elephant’s Foot in 3D Printing?
- How Do You Avoid Elephant’s Foot in 3D Printing?
- How Do I Get Rid of Elephant’s Foot Cura?
- What Is Elephant Foot Compensation?
What Is Elephant’s Foot?
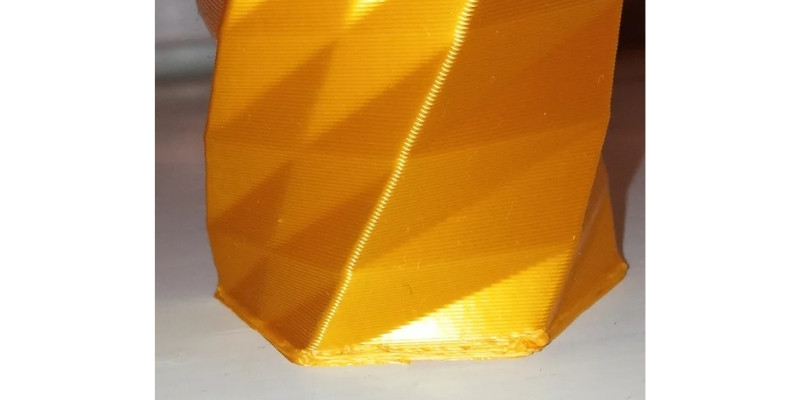
Elephant’s foot is a common 3D printing issue that affects the first few layers of a print. The first layers appear to curve upwards, bulge, or worse bubble, causing them to appear larger than the layers further up on the model. Visually, the issue loosely resembles a real-world elephant’s foot, hence the name.
While unsightly and detrimental to the overall finish quality of a print, elephant’s foot can also cause all manner of tolerance related issues. This is especially the case if the part is destined for functional, practical, mechanical applications, has precise dimensions, or needs to fit with other parts. Here even a small defect can affect the usefulness of the part.

What Causes Elephant’s Foot?
Weight from Subsequent Layers
The main culprit of 3D printing elephant’s foot is weight, as in successive layers pushing down on as-yet uncooled lower layers, forcing them to extend outwards due to the pressure.
The issue tends to manifest most strikingly in large or taller prints, where the first layers have to bear a large load and haven’t cooled correctly. Improper cooling is generally linked to poor temperature settings on the bed or under-dialed fan settings.
Poor Z-Offset Settings
Elephant’s foot can also be caused by badly dialed nozzle height, more specifically Z-offset and overall bed leveling. The nozzle effectively pushes into the deposited filament, compressing it and causing it to squish and curl upwards.
Over-Extrusion

Rarer, but this something worth investigating if you’re unable to shake elephant’s foot is over-extrusion on the first layer. Excess filament must go somewhere when compressed by the nozzle, causing it bulge upwards as it hits the bed.
Improper Cooling
But, whatever the cause of the squishing, it almost always relates back to improper first-layer cooling. If the filament hasn’t set and cooled properly, it’s in an ideal state to fall foul of pressure, whether that’s the nozzle or the upper layers of a print.
Signs of Elephant’s Foot
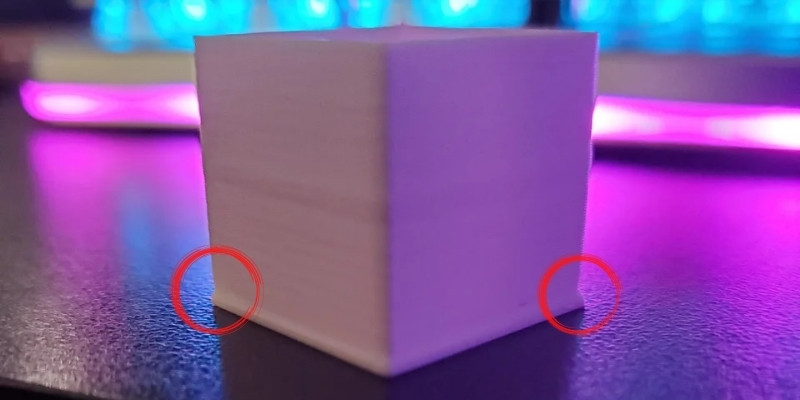
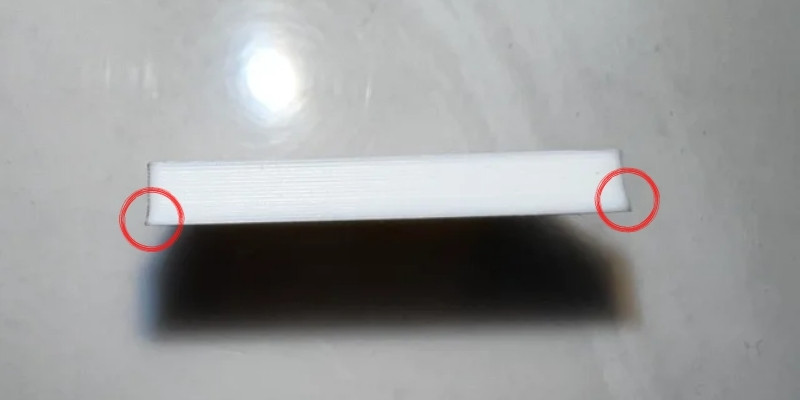
Elephant’s foot stands out from other common 3D printing for the distinctive bulge that appears on the first layer or first few layers. The layer(s) is substantially larger than subsequent ones, taking on a concave shape that juts outwards and away from the print.
As we move up the print, the problem tends to resolve itself and the layers progressively take on their indented shape and size. Elephant’s foot is often confused with warping, which is when the layer detaches from the bed and curls upwards, a different problem with a whole other host of causes.
How to Fix Elephant’s Foot?
Level The Bed and Adjust Z-Offset
If elephant’s foot has sprung up out of nowhere, your first move should be to level the bed. An uneven bed can cause the nozzle to push into the filament, which causes the upwards bulging effect of elephant’s foot.
Calibration can go awry due to a number of reasons, and it’s good practice to re-level the bed regularly. All the better if you have automatic bed leveling as this means it should take no more than a few minutes to do.
After leveling, adjust the Z-offset, or distance between the nozzle and bed. Dialing into the right Z-offset not only helps with first-layer adhesion, but can help combat elephant’s foot by reducing the pressure exercised by the nozzle on the extruded filament.
Slide a piece of paper backwards and forwards under the nozzle and lower the nozzle until you feel a slight resistance. At this point, we recommend running a Z-offset calibration test and to adjust it on the fly for the optimal distance.
Read more: the best auto-leveling 3D printers
Lower Heated Bed Temperature
Lowering your heated bed’s temperature is likely to have the biggest impact on getting rid of elephant’s foot. A high bed temperature won’t allow the filament to solidify enough to support subsequent layers, which will press down and cause the bulging effect as it deforms to compensate for the extra weight added on top.
Much like fan cooling adjustments, it’s a bit of a balancing act as you need sufficient heat to ensure strong first-layer adhesion, but not too much to cause elephant’s foot.
Stick to the range recommended by the filament manufacturer, then decrease the temperature in small increments, only a few degrees at a time until you find a sweet spot.
Adjust Fan Settings
Insufficient cooling is often the root cause of elephant’s foot. After the first layer is deposited it doesn’t have time to cool sufficiently, causing either subsequent layers or even the nozzle to push into it, creating enough pressure for the later to bulge outwards.
We suggest doing this cautiously, as the first layer needs to cool slower than other layers to ensure strong adhesion to the bed.
Use Rafts
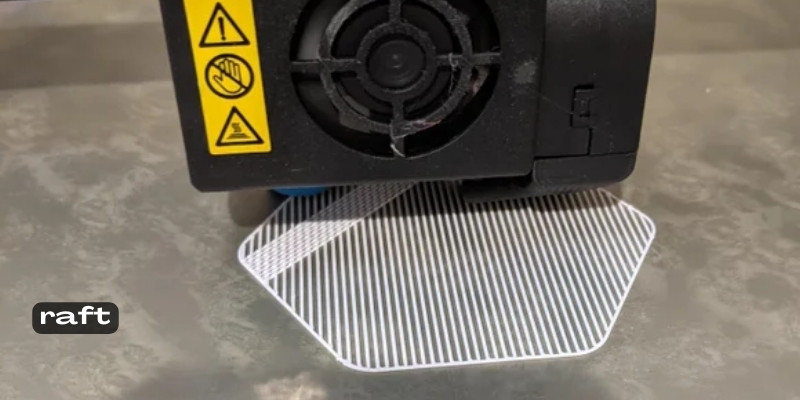
A raft is a kind of bed that’s deposited just below the actual first layer of the print, generally used to improve first-layer adhesion, but extremely helpful to combat elephant’s foot.
More of a stopgap than a definitive solution, using rafts is a great temporary way to navigate around elephant’s foot before you can make more time-intensive adjustments.
A raft creates a buffer between the bed and first layer, effectively forcing any manifestation of the issue to happen within the raft and not the model itself. You can then snap off the raft and sand the first-layer as required.
Use Elephant’s Foot Compensation
Elephant’s Foot Compensation is a handy in-slicer setting available in PrusaSlicer. With the option enabled, you can shrink or scale the first-layer to fight off elephant’s foot and use the natural compression caused by the nozzle to your advantage.
By dialing in a thinner first-layer, the nozzle will pressure it to bulge as usual, but no bigger than than subsequent layers, allowing them to match one another in size and shape almost perfectly. In effect, there’s less filament to extend outwards and create that signature elephant’s foot bulge.
As this is only available in PrusaSlicer, those employing other slicers like Cura will have to rely on the other fixes we recommend.
Read more: the best 3D slicer software tools
What Causes Elephant’s Foot in 3D Printing?
Elephant’s foot is most commonly caused by insufficient first layer cooling and excessive print bed temperatures. Another common cause of elephant’s bed is an incorrectly leveled bed and poorly dialed Z-offset, i.e. the baseline height between the nozzle and print bed.
If not set correctly, these can cause the printer to push the filament into the bed as it’s deposited, which in turn forces it to flare outwards creating the distinctive concave elephant’s foot effect. Over extrusion can, in some circumstances, also cause the problem.
How Do You Avoid Elephant’s Foot in 3D Printing?
To avoid elephant’s foot in 3D printing ensure your bed is leveled correctly, as is your Z-offset. Next, ensure your printing bed temperature is set correctly (lower tends to be better) and that your part cooling fan settings are tuned high enough to ensure the first layer cools sufficiently quickly.
You can also introduce rafts or modify the print file to cater for elephant’s foot by adding an angled chamfer on the bottom of your print. It’s also worth loosening the eccentric nut on the Z-axis.
How Do I Get Rid of Elephant’s Foot Cura?
One of the best ways to ward off elephant’s foot in Cura is to add rafts to your print. By weaving in a buffer between the first layer and the print bed, you can side-step the problem. Next, you’ll want to adjust the first layer bed temperature lower in Cura.
We recommend trying in small increments until the problem resolves itself. If it doesn’t, this means the problem is caused by something else, likely bed leveling and Z-offset.
What Is Elephant Foot Compensation?
Elephant foot compensation is a setting found on PrusaSlicer, a 3D printing slicing software developed by Prusa, the company behind the i3 MK3S+ and MINI.
The setting is designed to compensate for the natural squish when the first layer meets the heated bed by reducing the thickness of the first layer. The setting allows you to scale or shrink the first layer based on the characteristics of the model to minimize 3D printing elephant’s foot.
Related articles:
- Advanced Overview on Improving Quality of 3D Print Finish
- Fixing 3D Problems: Print Not Sticking To Bed
- Pillowing, Stringing and Layers Splitting – Resolving The Worst 3D Printer Problems
- Causes of And How to Fix Under Extrusion Problems or Clicking Sounds
- Full Guide To Troubleshooting 3D Print Quality
- Over extrusion: how to fix in 3D printing


