

Key Takeaways
- Ender 3 retraction settings: The article explains how to tune the retraction settings for the Ender 3 range of 3D printers to stop stringing, which is a common issue that causes wispy strands of filament on the print surface.
- Retraction mechanism: The article describes how retraction works by pulling back the filament from the nozzle during travel moves, which reduces the pressure and oozing that lead to stringing. It also covers various retraction settings and their effects.
- Optimal retraction settings: The article provides optimal retraction settings for different models of Ender 3, such as the Ender 3 V2, Ender 3 S1, and Ender 3 S1 Pro, as well as different filament types and print speeds. It also suggests performing retraction tests to fine-tune the settings.
- Other factors affecting stringing: The article discusses other factors that can influence stringing, such as hot end temperature, travel speed, filament quality and storage, PTFE tubing condition, nozzle cleanliness, and print path optimization. It offers tips and solutions for each factor.
Is stringing souring your time with the Ender 3?
I’ve been there – wispy plastic residue ruining otherwise perfectly good prints.
In short, it all comes down to dialing in the best Ender 3 retraction settings.
This guide will cover everything I’ve learned about this all too common phenomenon – how to set the perfect Ender 3 retraction settings, along with a few housekeeping tricks I use to prevent stringing.
You’re likely here for specific slicer settings, so I’ll provide those, too. Let’s jump in – here’s how to reduce stringing with the best Ender 3 Retraction Settings.
What Causes Stringing?
First, what causes stringing?
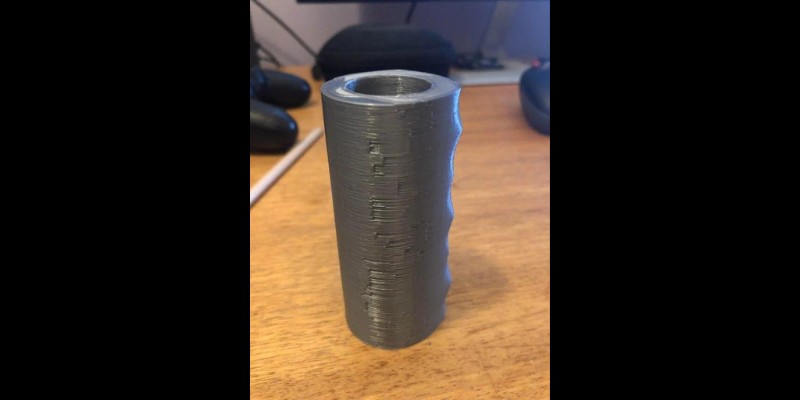
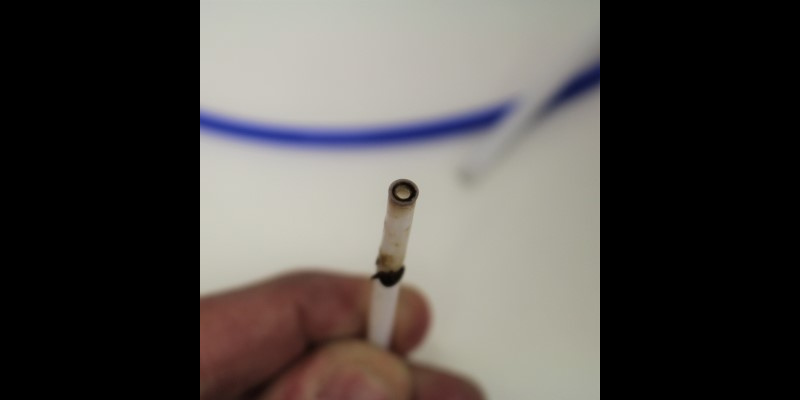
Stringing is the name given to the wispy, cobweb-like strands of filament that trail behind the nozzle when it shifts from one part of a print to another.
It also pops up in gaps (or open air) between two separate vertical parts of a print or any area where no active printing (or deposition) happens.
It’s a byproduct of the ever-present, natural pressure in the filament path continuously pushing plastic through the hot end.

In other words, although the extruder’s gears are no longer actively feeding filament, tiny traces of melted plastic leak out of the nozzle.
Stringing happens when the flow of molten plastic isn’t controlled by the usual deposition of plastic onto a pre-existing layer.
As stringing is linked to the behavior of melted plastic, filaments that print at higher temperatures are more susceptible.
Filaments like PETG are well-known for stringing for this reason, but the most popular Ender 3 filaments, PLA and ABS, are by no means immune to the problem.
Best Retraction Settings For The Ender 3, Ender 3 Pro, and Ender 3 V2
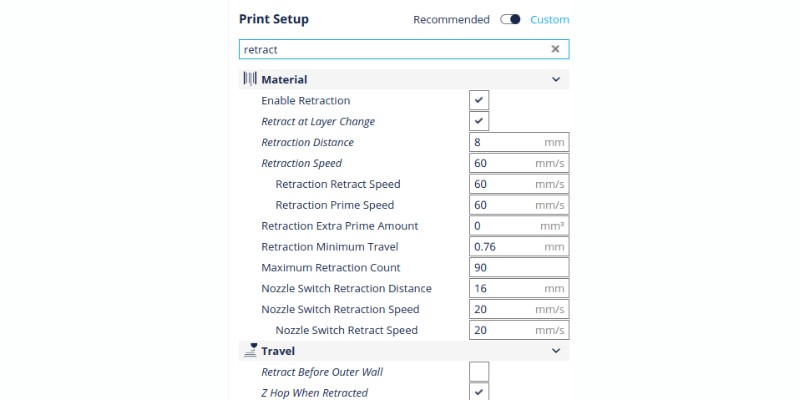
Now that we understand what each Ender 3 retraction setting does, here’s my optimal retraction settings:
- Retraction Distance: 5 mm
- Retraction Speed: 25 mm/s to 50 mm/s
- Retraction Extra Prime Amount: 0 mm/s
- Retraction Minimum Travel: 1.5 mm
- Maximum Retraction Count: 10
- Minimum Extrusion Distance Window: 10 mm
- Limit Support Retractions: Toggled On
- Combing Mode: Within Infill
These work not just on the classic Ender 3 but also as solid Ender 3 V2 and Ender 3 Pro retraction settings — though you can still tweak these based on the results you want.
With these dialed in, it’s crucial to perform an Ender 3 retraction test, such as this one, and adjust the Ender 3 retraction settings as needed.
You’ll also find a selection of calibration shapes for testing in the Cura marketplace. This video offers a guide on how to get the best out of these types of tests.
Ender 3 V2 Neo Retraction Settings
Though the Ender 3 V2 Neo is based on the V2, it benefits from slightly tweaked retraction settings to remove stringing on the Ender 3, Ender 3 Pro, and Ender 3 V2.
- Retraction Distance: 6.5 mm
- Retraction Speed: 45 mm/s
As always, your results with these settings may vary depending on filament type and print speed, but they’re a solid starting point.
I don’t recommend lowering the retraction settings below 5 mm as this makes stringing worse in my experience. You can also read my full test of the Ender 3 V2 Neo.
Ender 3 S1 Retraction Settings
As the Ender 3 S1 features a direct drive extruder, the filament path is much shorter, meaning you can get away with a shorter retraction distance.
- Retraction Distance: 0.8 mm
- Retraction Speed: 35 to 45 mm/s
These are also Ender 3 direct drive settings applicable to any Bowden Ender 3s you’ve upgraded to a direct drive extruder.
Ender 3 S1 Pro Retraction Settings

As the Ender 3 S1 Pro is essentially a bulkier version of the Ender 3 S1, the retraction differences don’t differ much between them.
However, the Ender 3 S1 Pro tends to combat stringing more effectively with a slightly higher retraction speed.
- Retraction Distance: 0.8 mm
- Retraction Speed: 50 mm/s
You may want to slightly drop the retraction speed – to somewhere around 0.6 mm – if this doesn’t produce any substantial stringing, but I don’t recommend reducing the speed below 50 mm/s. You can read more in my full test and review of the Ender 3 S1 Pro.
At lower speeds, stringing intensifies and becomes more annoying to deal with. Some other users online have also found success with speeds up to 60 mm/s, so don’t hesitate to raise it a few millimeters if you’re still seeing stringing.
Another useful tip that affects stringing, but only applies to PLA, is to lower the nozzle temperature to around 195°C – rather than the 200-210°C typically recommended by filament manufacturers. This very slightly reduces how fast the filament melts, but enough to substantially reduce stringing, especially when paired with my recommended retraction settings.
How the Right Ender 3 Retraction Settings Stop Stringing
Retraction Settings
Fortunately, there are several ways to reduce or eliminate stringing, the most effective of which is tuning the retraction settings for the Ender 3 in your slicing software.
Retraction is a mechanism built into the extruder that retracts the filament by a short distance.
Ender 3, Ender 3 Pro, and Ender 3 V2 retraction settings determine when and by how much to pull back the plastic into the nozzle when traveling between points or over a gap. Doing so relieves the built-up pressure in the nozzle and prevents the oozing that leads to stringing.
If you’ve ever glanced at slicer retraction slicing, you’ll know there are quite a few tweakable options. We’ll cover what each one does below.
For clarity and to serve as many readers as possible, we’ll focus on Ender 3 Cura retraction settings, given it’s the most popular 3D printing slicer. Note that other slicers feature variations on the names of these settings, but they serve the same function.
Enable Retraction
This setting tells the printer to use its retraction mechanism. Though this setting is typically ticked on by default, it’s worth double-checking. All the settings below are redundant without retraction enabled.
Retraction Distance
Retraction distance determines the length of filament pulled back by the extruder for each retraction move (specifically, how much the filament travels within the hot end), but also how much filament is extruded back through the hot end after the retraction move.
Retraction distance is arguably the most important setting along with speed. It’s a crucial factor in reducing instances of Ender 3 stringing.
As with most aspects of 3D printing, there’s a balance to strike when it comes to tuning retraction settings for the Ender 3.
A short retraction distance won’t be enough to prevent stringing, but you run the risk of filament not reaching the nozzle when needed if you dial in a distance that’s too large. Additionally, retracting too far can cause molten plastic to solidify and clog the hot end.
Retracting the filament too far can also cause what’s known as filament grinding, an issue caused when the extruder gears gnaw away at the filament as it makes repeated passes over the same area.
Degraded filament has a tougher time making its way through the hot end to the nozzle, which can ruin prints. Parts requiring lots of retraction moves in quick succession are especially prone to filament grinding.
Bowden systems, such as those found on the Ender 3, Ender Pro, and Ender 3 V2, typically need a longer retraction distance due to the larger gap between the extruder and print head assembly.
For the Ender 3 S1 and Ender 3 S1 Pro, you can get away with a lower distance because these printers have direct drive extruders, so there’s a shorter filament path.
Retraction Speed
Retraction speed signals how fast the extruder drive gear pulls filament back for every retraction move.
It’s directly related to retraction distance: how fast the defined length of filament travels when retracted. Higher speeds reduce stringing because the filament is whipped up into the nozzle before stringing can occur.
Much like retraction distance, it’s not a case of simply cranking up the retraction speed to solve all your stringing woes.
There’s a balance between reducing stringing with a nippy retraction and setting it so high that it affects the consistency and quality of subsequent printed layers.
Filament grinding is a concern at higher retraction speeds, so tread carefully here to avoid degrading your filament. Another common issue sees the solid filament located higher up in the hot end separate from the molten portion lower down, which can lead to clogs and jams.
Retraction Extra Prime Amount
Following a retraction move, the retraction extra prime amount settings determine how much additional filament is primed to compensate for potential oozing during a travel move. It helps top up the nozzle with the filament when the printer returns to printing.
In most cases, the retraction extra prime amount is best left at its default settings of 0 as it tends to leave blemishes and blobs on your prints when the retraction speed and distance are set correctly.
Retraction Minimum Travel
Retraction minimum travel sets a minimum distance of travel threshold beyond which retraction is triggered, and the filament is then pulled away from the nozzle.
The idea here is to limit the number of unwanted retractions in quick succession over a small area. Set too low, and when combined with aggressive retraction speed/distance settings, it can exacerbate grinding and damage your filament.
Maximum Retraction Count
Maximum Retraction Count sets a maximum cap on the number of retraction moves within a set length of filament defined by the minimum extrusion distance window (more on that just below).
The setting is designed to protect the filament from repeated gear pressure on the same portion of filament, which can lead to grinding problems.
Minimum Extrusion Distance Window
Minimum Extrusion Distance Window determines the length of filament the maximum retraction count setting applies to.
Again, the core function of this setting is to avoid damaging your filament through repeated and unnecessary extruder pushing and pulling.
Limit Support Retractions
Here you can toggle whether the retraction mechanism and all the other retraction settings apply when traveling between or within support structures.
Turning it on can cause stringing between support portions of a print but can drastically reduce the overall print time. As you’ll remove stringy supports once a print finishes, the overall quality of your part isn’t affected.
Combing Mode
This setting gives you several options to signal how the printer should behave when traveling from one portion of a print to another.
Generally, this keeps the nozzle within previously printed areas. The aim is to keep retraction moves to a minimum and shorten print times. The setting ensures any stringing occurs within the limits of your print and not on the outer surface or walls at a nominal cost to travel times.
You’ll find four combing mode options:
- Off – The printer will retract for every travel move and do so in a straight line to the next point.
- All – The printer will ensure all travel moves occur within already printed areas.
- No in Skin – The printer avoids skin/surface areas when traveling.
- Within Infill – The printer keeps the nozzle within infills when traveling.
Other Slicer Settings That Can Help Prevent Stringing
Print Temperature
To understand the way hot end temperature can lead to stringing, think of what happens when you feed filament into the extruder before a print.
The printer bumps the temperature way up, which causes the filament to flow uncontrollably out of the nozzle, creating a mound of plastic spaghetti on your print bed.
This is the pressure built up in the filament path (caused by the extruder gears pushing and the hot end liquifying the plastic) releasing through the only available opening, the nozzle.
It’s vital to have the correct hot end temperature for your filament type as recommended by the manufacturer to keep this pressure in check.
Set too high, this leads to over-extrusion manifested as stringing during travel moves and blemishes when printing, or retraction moves stretching rather than pulling the filament, negating the benefit of retraction.
By dialing down the temperature, you are effectively limiting the flow of filament and, by extension, oozing.
Here are the general ranges for each filament compatible with the Ender 3.
- PLA – 190°C to 230°C
- ABS – 210°C to 250°C
- TPU – 210°C to 230°C
- PETG – 220°C to 250°C
We recommend lowering the temperature in small increments. Doing so along with dialed Ender 3 retraction should help prevent stringing issues.
Travel Speed
Though not as impactful as retraction and temperature settings, travel speed can help prevent stringing.
By increasing the travel speed, you’re ensuring the nozzle shifts from printed area to printed area faster, limiting the window for oozing.
As always, balance is essential.
Pushing the travel speed too high can open the door to a host of other problems linked to print quality and under extrusion. Start with 150 mm/s and adjust upwards as needed, but avoid exceeding 200 mm/s.

Other Ways To Stop Stringing
Buy Quality Filament
However tempting it may be to save money by buying cheap filament, we recommend spending a little more on a proven, quality brand.

Poor quality additives and a shoddy manufacturing process can exacerbate stringing. Be sure to consult our guide to the best Ender 3 filament for our top recommended brands.
Proper Filament Storage
Good quality filament is one thing, but you must also store it correctly to keep it moisture-free. When water seeps into the filament, it can accentuate the oozing that leads to stringing.
As the moisture heats up, it releases extra pressure, which, when combined with the pressure caused by the extruder gear and hot end temperature, can push unwanted filament through the nozzle during travel moves.
Replace The PTFE tubing
If you’ve dialed in the proper settings, bought quality filament, and kept it dry, but stringing persists, then the problem is likely linked to the PTFE tubing degrading.
Through repeated exposure to high temperatures at the point where it meets the hot end, the PTFE tubing’s lubrication degrades over time, which can affect the efficiency of retraction.
Replacing or cutting back the Bowden tubing is one of the easiest Ender 3 upgrades. Check out our guide to best Ender 3 upgrades for more information.
Alternatively, you can eliminate the problem by upgrading your Ender 3 to a direct drive extruder setup, which doesn’t have Bowden tubing. Check the link just above for more details.
Maintain and Clean The Nozzle
Residual build-up on the nozzle is a natural part of 3D printing, especially if you’re a heavy user.
If left unchecked, this build-up can lead to stringing because it affects extrusion and can stick to fresh filament flowing from the nozzle.
Regularly wiping the nozzle with a wire brush or removing the part entirely for a thorough clean should eliminate the problem.
FAQs
What is a good retraction speed for Ender 3?
We recommend anywhere from 25 mm/s to 50 mm/s. Start with 25 mm/s and increase in increments of 5 mm/s until you find a setting that minimizes stringing or that works for you.
What retraction settings should you use for a direct drive Ender 3?
If you’ve upgraded your Ender 3 to a direct drive extruder setup, or have a direct drive Ender 3 like the Ender 3 S1, I recommend setting the retraction distance to between 0.6 and 0.8 mm, then dialing the retraction speed to between 35 and 50 mm/s to avoid stringing.
If you enjoyed this article, check our other guides to learn more:
- Ender 3 Print Speed Preferences (Max for V2 & S1)
- 4 Methods to Fix PETG Stringing (Fixes 90% of Issues)
- Pillowing, Stringing, and Layer Splitting – Three of the Worst 3D Printer Issues Solved


