

Key Takeaways
- Causes: Gaps and holes can be caused by various factors, such as under-extrusion, temperature changes, fast printing speed, clogged nozzle, slow feed rate, too much retraction, wet filament, etc.
- Identification: The location and shape of the gaps and holes can indicate the root cause of the problem. For example, gaps in the bottom layer may mean incorrect nozzle height or temporary under-extrusion.
- Solutions: Depending on the cause, different solutions can be applied, such as recalibrating the nozzle height, increasing the feed rate or flow rate, decreasing the print speed or retraction settings, improving the cooling system or bed adhesion, using dry and high-quality filament, etc.
- Post-processing: Some gaps and holes can be fixed after printing by using fillers, sandpaper, vapor polishing, or other methods to smooth out the surface and close up the gaps.
Gaps and holes in 3D printing cause major problems: they’re ugly to look at, ruin your model, and make useable parts unstable and even brittle.
There are a few different kinds of gaps and holes you may find when 3D printing. Some are between lines, while others may consistently occur within or between certain layers. In any case, they are a very frustrating problem with a few possible causes.
In this article we’re going to look at a few of these causes, how to recognize them, and the best way to fix them.
Gaps and Holes in 3D Prints: Reasons and Fixes
Why Am I Getting Gaps and Holes in My 3D Prints?
While the good news about gaps and holes is that they’re very easy to catch early, the bad news is that there are quite a few reasons they could be happening.
Likely causes for gaps and holes in your 3D prints are as follows:
- Under-extrusion – Your printer isn’t extruding enough filament for the model, leaving unwanted holes where not enough extrusion occurred.
- Temperature Changes – 3D printer filament reacts to changing temperatures. Too hot and the filament won’t set properly, leaving gaps. Too cold and it’ll set too quickly. Both leave unwanted gaps and misshapen outlines. Sudden changes in temperature are also an issue, so try to keep the printing environment consistent.
- Fast Printing Speed – A fast printing speed can lead to under-extrusion, which leaves gaps in 3D prints. Lowering your printing speed will help ensure the right amount of filament goes to the right place.
- Clogged Nozzle – A clogged or otherwise unclean nozzle won’t extrude filament properly, and will occasionally seem to randomly distribute it, especially between layers. Maintaining your nozzle or replacing damaged ones will help you avoid this issue.
- Slow Feed Rate – A slow feed rate prevents enough filament from passing through your extruder to accurately print your model, causing gaps where there simply wasn’t enough filament to print.
- Too Much Retraction – During non-extrusion movements, the printer pulls the filament higher up in the nozzle to prevent oozing. If it pulls it too high up, it won’t be able to push out enough filament, causing holes and gaps.
- Wet Filament – The moisture inside wet filament evaporates when the material passes through the hot end. These vapors get trapped in the material, so you’ll see air bubbles in the extruded filament, preventing proper adhesion and causing layer separation.
Quite often, errors or misjudgments in your settings lead to holes and gaps in your prints, all of which we’ll look at below.
Exactly where on your print these gaps and holes form will be the telltale sign for the cause. Here we’ll look at how to recognize the root cause of the problem and how to fix them.

3D Printing Gaps and Holes: Types and How to Fix Them
The first step in fixing these gaps and holes is identifying what kind of problem it is. In many cases, you may find the fix is simple if your gaps fall into one of these categories.
Before trying some of the more complex fixes, we recommend you first look at one of these very common causes of 3D printer gaps and holes.
First Layer Gaps
If you find the bottom of your print has consistently sized gaps, almost like they were designed to deliberately resemble a mesh, then the problem is likely with your initial layers. You’ll notice these gaps between the infill and outlines.
This issue can carry on through the print and be difficult to spot until it’s too late, wasting a lot of filament.
This problem has two common causes, the first is an incorrect nozzle height. If your nozzle isn’t close enough to the build plate, then the first layer, normally forming the base of the print, will have gaps between extrusion lines.
The second common cause is temporary under-extrusion, which itself has quite a few causes including a clogged extruder or an insufficient flow rate.
How to Fix
If your extruder is clogged or the speed is set too high, then not enough filament will be extruded to form a solid layer. Increasing your feed rate or decreasing the print speed should help with this.
Any settings that increase extrusion will help alleviate this problem, as will increasing overlaps to ensure enough filament is extruded to form a smooth, solid base.
Read more: every 3D printing fix for first layer issues
Missing or Incomplete Parts

If you find in places in your model that there’s less filament than there should be, or even none at all, then the problem is likely under-extrusion caused by an offset z-calibration.
Having your nozzle too close to your build surface will cause unwanted retraction, which will clog your nozzle and prevent enough filament from coming out.
How to Fix
To fix this problem, simply recalibrate your extruder height so it’s not too close to the build surface, and clean the nozzle to be sure.
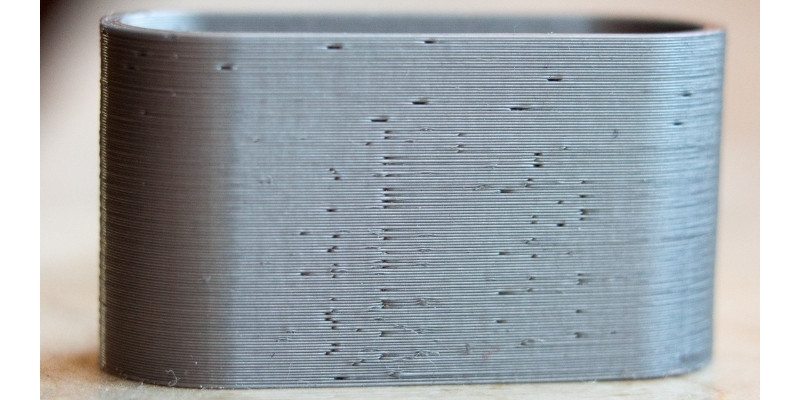
Holes in Your Print
If you’re finding random holes and gaps throughout your print, then it could be a problem with the filament rather than the printer.
In a lot of cases, poor bed adhesion will cause holes and gaps between layers to form due to the model’s low stability.
How to Fix
Improving bed adhesion with adhesives or heating the print bed can help reduce this problem, though it could also be caused by a too high z-calibration. Increasing bed adhesion and readjusting your nozzle height are good fixes.
Additionally, if you’ve left your filament out in the open air for a long time, it may have absorbed moisture from the air over time and become “wet” and brittle. This bubbliness affects print quality and can lead to small imperfections and gaps.
You can fix this by purchasing a filament dryer, or storing your filament in airtight storage when not printing.
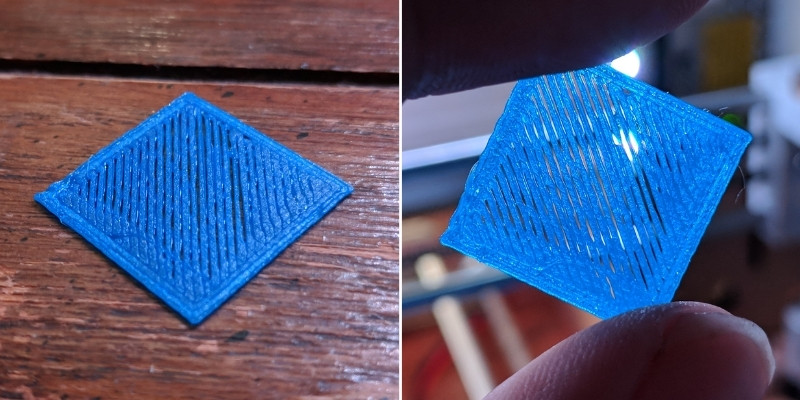
Top Layer Gaps
Gaps in the top layer of your print is called ‘pillowing’, and has a few causes and solutions. The leading cause is insufficient cooling that prevents your filament to properly set on the top layer.
Pillowing can also be caused by an insufficient layer height. If you’re using a height setting greater than the standard 0.1mm, then you may find pillowing occurs quite often.
How to Fix
Increasing the strength of your cooling fan will help top layers set as they’re supposed to, creating the smooth surface most prints need to look good.
If you find it’s not a problem with your cooling, then you may find gradually lowering your layer height greatly helps solve the pillowing issue. If you need the layer height set to higher than recommended, adding additional layers to strengthen the print works wonders.
Read more: finding the best layer height for your 3D prints
Holes and Gaps in Floor Corners
Finding holes in the base corners of your model is incredibly frustrating as it looks like the printer stops short of where it’s supposed to print. This not only makes your model less stable while printing, it looks pretty bad too.
Unfortunately, this is one of the most complex problems with holes in 3D prints, as there are quite a few causes and solutions to the problem, so it may take some trial and error to nail down the cause and understand how to fix it.

Causes and How to Fix Them
- Under-extrusion – A common issue that you can fix by simply increasing the feed rate.
- Insufficient Top Layers – Having too few top layers increases the likelihood of holes and gaps. Increasing these top layers and ensuring they’re at least 1mm thick will help.
- Printing Too Hot – If your nozzle or bed temperatures are too hot then the filament won’t cool or settle fast enough. Be sure to only use the temperatures recommended by your manufacturer and decrease them if you find the filament isn’t setting as quickly as you need it to.
- Insufficient Cooling – Another problem with temperature. If your cooling system isn’t high enough for the filament you’re using, the filament will take too long to set. Increasing the strength of your cooling fan will help solve this issue.
- Insufficient Infill – If your infill percentage is too low then you’ll find gaps and holes appearing quite frequently. Increasing this percentage will help decrease the likelihood of these gaps and strengthen your model.
- Overlap Too Small – An infill overlap is a slicer’s setting to go slightly over the print wall to reinforce it. If this overlap is too small, there will be weaknesses in your print. Increasing this overlap gradually and noting the results will help you find the sweet spot.
- Not Enough Outlines/Perimeters – Another support measure that you would do well to increase gradually and note any improvement.
- Too Much Retraction – Overly frequent retraction will decrease filament extrusion, which in turn leads to layer gaps and unwanted holes as not enough material will come out. Lowering retraction settings will help keep your model’s surface smooth and decrease the chances of clogging and other extruder issues.
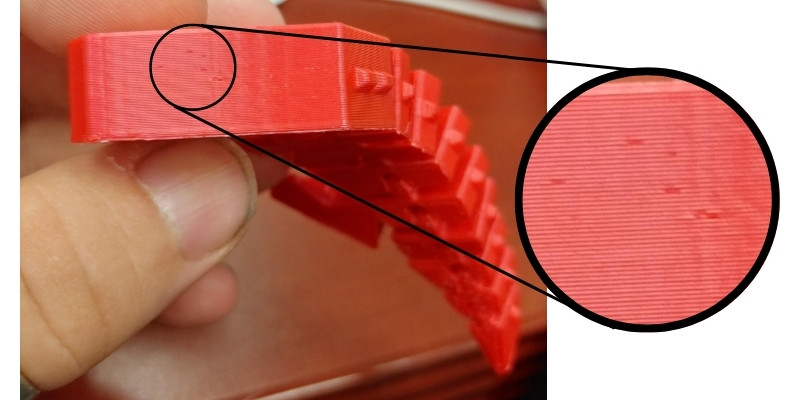
Gaps Between Thin Walls
Gaps between thinner walls of your model may appear if their width isn’t set to a multiple of the nozzle width. This empty space won’t be taken into account, and the gaps between the walls will be your printer’s compensation for it.
If you’re printing a 0.9mm thick wall with a 0.4mm nozzle, for example, then you’ll have a remaining gap of 0.1mm that the machine simply isn’t capable of filling.
How to Fix
Naturally, the easiest fix for these wall gaps is to simply ensure the wall width is a multiple of your nozzle width. Adjusting the line width or even increasing flow rate to promote over-extruding. While not precise, this method will help the filament flow into gaps and make them sturdier.
If the wall width is not negotiable, then you can try getting a thinner nozzle. While the standard size is 0.4mm, you can attach different diameters to help handle different wall widths.
Tips for Filling Layer Gaps in 3D Prints:
Here are some effective methods to limit the impact of layer gaps in your prints after your print has completed
3D Print Filler
Some gaps can be filled post-print using specially designed fillers for 3D prints, such as epoxy resins. Apply the filler directly to the gaps, following the manufacturer’s instructions for drying time. Once dried, you can proceed with further post-processing.
Sanding
Sandpaper can help in smoothing the surface of your 3D prints, with the friction melting small gaps closed. Focus on the areas where gaps are most prominent. Start with a coarse-grit sandpaper and gradually work your way to finer grits to achieve a smoother surface.
Vapor Polishing
This method is particularly effective for ABS prints. By exposing the print to acetone vapors, the outer layer of the print slightly melts, helping to smooth out imperfections and close up gaps. It is important to note that vapor polishing is a chemical process and requires a well-ventilated workspace and appropriate protective equipment.
Related posts:
- Retraction Settings: How to Stop Ender 3 Stringing
- DIY Dry Box Projects To Keep Your Filament Dry
- Using 3D Printer Cleaning Filament The Right Way


