

Key Takeaways
- Causes of Layer Shifting: Layer shifting occurs when the print head or the print bed moves inaccurately or collides with the print, causing the layers to be misaligned.
- Hardware Fixes: To prevent layer shifting, check for any loose or obstructed components, such as belts, pulleys, wires, and fans, and adjust or replace them as needed. Also, make sure the printer is stable and not subject to vibrations or bumps.
- Software Fixes: Adjust your slicer settings to optimize the print speed, jerk, acceleration, and Z-hop. Use supports for complex geometries and overhangs. Also, ensure your temperatures and flow rate are suitable for the filament you are using.
- Filament Quality: Poor quality or damaged filament can also cause layer shifting. Avoid filament that has absorbed moisture, has knots or tangles, or is inconsistent in diameter.
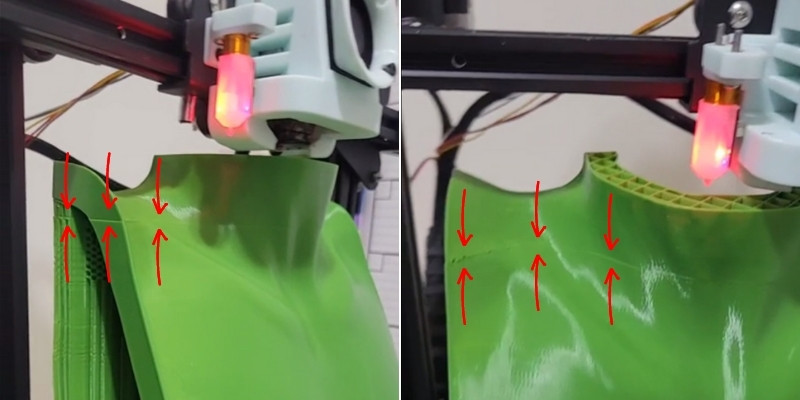
Of the many problems that can derail a print, layer shifting is among the most distinctive. At a certain point in the print, a layer or multiple layers appear to divert horizontally away from where you expected them to print.
This sometimes forces subsequent layers to skew or slant away, and appear misaligned.
Aside from spoiling the print’s aesthetic, layer shifting affects stability, structural integrity, and dimensional accuracy of the print – a death blow for functional prints.
In many cases, layer shifting ruins prints, and they’re almost always destined for the trash can. To complicate matters, layer shifts often appear as completely random and isolated events.
Fortunately, there are steps you can take to mitigate and avoid the issue. In this guide, we’ll walk you through them, including both hardware and software fixes, to have you up and printing shift-free in no time.
How You Can Fix Layer Shifting In 3D Printing
- Calibrate Your Printer
- Minimizing Unwanted and Accidental Movement
- Check Belts and Pulleys
- Reduce Print Speed
- Take Steps to Reduce Collisions
- Have the Correct Printer Power Mode On
- Manage The Temperature of Electronics
- Dial In Print Settings and Use Supports for Complex Geometry
- Check Your Filament
- Make Sure the Printer is Adequately Lubricated
Calibrate Your Printer
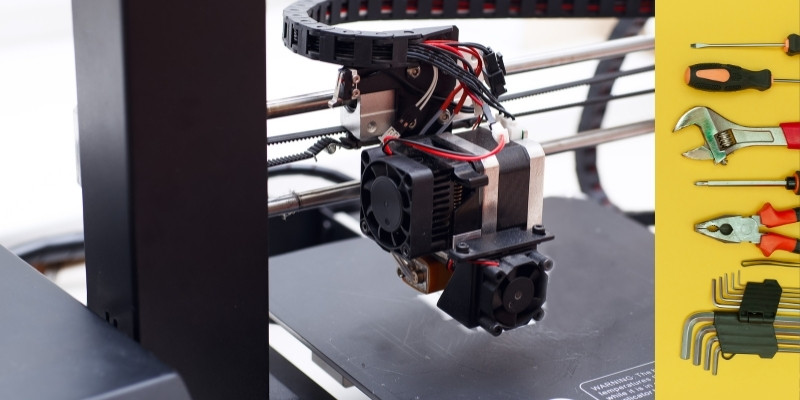
Perhaps obvious for seasoned makers, but dialing in your printer and making sure all the components are working as intended irons out the lion’s share of 3D printing problems.
First and foremost, we recommend doing a visual check of your printer, looking out for:
- Loose bolts and screws, slack belts, improperly connected wires, and the like
- Any obstructions, like filament wrapped around the belts or cables blocking movement, that could impede the print head assembly and bed’s movements
A general clean and dusting down of your printer will make sure the build surface is clean and the nozzle has no residual filament stuck on it or the build surface.
If everything looks good, move on to calibrating your e-steps to ensure the extruder has the right amount of filament.
From there, dial in the PID settings, which makes sure temperatures are where they need to be at all times.
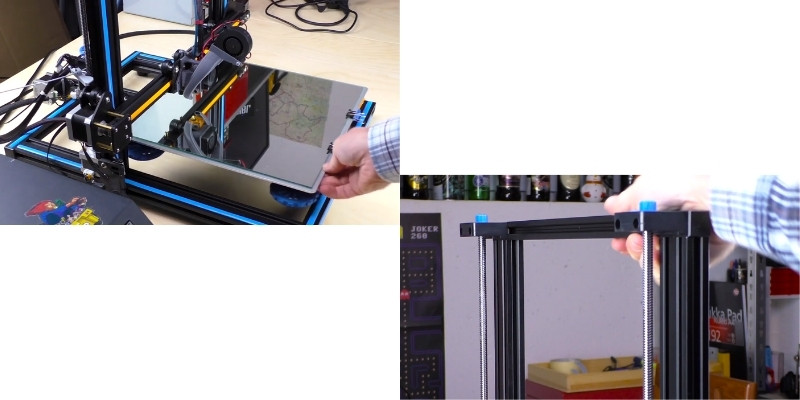
Finally, level the bed, whether manually or via automatic bed leveling, and tune your Z-offset, the distance between the nozzle and print surface. At this point, you may want to run a host of stress tests to ensure everything’s where it should be.
Minimizing Unwanted and Accidental Movement
Though 3D printers are sturdy, with a weighty metal frame to keep them from shifting, certain factors can cause unwanted movements. These small hits to stability can set the print head off course momentarily, leading to layer shifting.
To minimize this, set up your printer on a strong, solid surface that won’t shake or flex as the printer works. This ensures there’s no rebound vibrations or movements surging back up to the printer.
Also check that your stepper motors, printhead assembly, and print bed aren’t causing excessive movement, jerks, or jolts due to wear and tear or obstructions in their movement paths.
If your printer has a non-magnetic build plate that requires clips to attach to the bed, then it’s worth making sure they are securely keeping the plate in place. With even a few millimeters wiggle room, the plate may shift during the printing process, leading to layer shifting. Don’t hesitate to use a few additional clips to snugly hold the plate in place.
Lastly, accidental knocking or bumping the printer can lead to layer shifting. Set up the printer in a low traffic area, free of pets and curious children likely to bump into the printer.
Check Belts and Pulleys
Loose belts and pulleys cause layers to shift. Pulleys and belts do most of the work to keep all the printer’s moving parts in motion, shifting and gliding to where they need to be along all axes.
But, if tension is tuned properly, movements become unwieldy, pushing closer or further away from their intended location. In other words, slack creeps into the printing process, cutting down on precision.
Check the belt for the affected axis and if necessary tighten according to the printer manufacturer specifications and/or recommendations. A gentle tug should tell you if there’s too much slack. Many modern printers have external knobs you can twist to adjust tension so this is an easy fix.
Also check that all pulleys are properly attached and snug with motor shafts for the axis in question. Usually, NEMA motors have a flat side on the motor shaft; it’s best to tighten your pulley against this flat side to ensure optimal grip.
Reduce Print Speed
High print speeds can lead to layer shifting. Printing too fast can cause the motors to skip or if they are unable to keep up with the speed and motion requirements, they move inaccurately causing layers to shift.
Try reducing your speed and running test prints. It’s important to find a middle ground between print speed and mitigating layer shifting – 3D printing takes a long time as it is, so saving time while managing potential issues is the sweet spot here.
Misdialed jerk and acceleration settings in your slicer software can also sometimes exacerbate layer shifting. It’s worth tuning them to something a little more conservative to gauge whether you see any improvements.
Take Steps to Reduce Collisions
One common cause of layer shifting is when the nozzle collides with the print itself, often when the deposited filament has curled, warped, or delaminated. Improper first layer adhesion is also a common culprit here.
The nozzle effectively bashes the printed part, moving the already deposited filament, causing subsequent layers to be misaligned with the rest of the print.
To avoid deposited filament getting in the way of the nozzle’s path, make sure your temperatures are set correctly according to the filament you’re using.
Check that the first layer of your print is adhering properly to the print bed, that your Z-offset is tuned in, and level your bed.
You can also opt to use Z Hop, forcing your printer to move upwards by a short distance as it travels to minimize potential collisions as it moves around the print bed.
Have the Correct Printer Power Mode On
This doesn’t apply to all printers, but certain printers, including the Prusa i3 family, have what are called power modes. These determine how much power the printer uses, designed as a method of maintaining energy efficiency.
Switching the power mode from Stealth to Normal has been known to remedy layer shifting issues, especially those found on large or more demanding prints.
Manage The Temperature of Electronics
Keeping your printer’s mainboard and stepper motor drivers running cool is crucial to successful prints.
But, 3D printing generates a lot of heat, especially if you’re using an enclosure. Should these components heat up too much they can lead to failures and print issues, including layer shifting.
A temporary solution is to turn off the printer and let it cool down before printing again.
But a more long term option is to upgrade your fan to one with a higher airflow or higher diameter, and possibly moving its position to better direct cool air onto parts most susceptible to heating up higher than what is considered optimal, namely the drivers.
Fortunately, fans are relatively cheap as upgrades go and though opening the casing can be a little daunting, it’s an easy fix even for those with little DIY experience.
Dial In Print Settings and Use Supports for Complex Geometry
As any maker will tell you, settings tweaking and dialing is a huge part of 3D printing, especially if you’re printing complex parts with daring geometry, like overhangs, which if not printed as intended can cause collisions, leading to layer shifting.

To avoid this, ensure you’re slicing your prints with the right settings, especially the right infill percentage, fan speed, z-hop, support structures, and print speed.
Another option is to carve up your print into multiple parts to give your printer an easier time, or alternatively use supports for the more complex areas of a print
Check Your Filament
Poor quality or damaged filament, especially materials that have absorbed moisture can lead to layer shifting problems.
Tangles and knots can also create tension in the extruder causing the filament to not unspool cleanly and smoothly. You can do a visual check for knots on the spool itself and it’s worth periodically trying your filament especially if left out in the open in humid conditions.
Make Sure the Printer is Adequately Lubricated

Mechanical friction on the axes can lead to layer shifting. Check if your printer moves freely along this axis, clean and lubricate the mechanical parts like rods, lead-screws, or rails and check for broken bearings.
FAQs
What Causes Layer Shifting in 3D Prints?
The most common causes of layer shifting in 3D prints is linked to obstructions and abnormal movement of the print head caused by vibrations, improper belt tension, poorly optimized print speeds, the geometry of the print itself, loose axis pulleys, or the printer being improperly leveled and calibrated. The direction of the layer and where it’s kicking in during the printing process generally provides the best clue as to what is causing the issues.
How Do I Stop Layers From Shifting?
To stop layers from shifting, first ensure the printer is correctly calibrated. Next check for obstructions affecting the movement of the print head assembly, extruder, and print bed. Next, ensure your printer’s pulleys and belts are correctly installed and calibrated. If the problem persists, lower the print speed and use supports for tough features like overhangs.
How Do I Stop Layers Shifting in Ender 3?
Weak layer bonding is the number one issue of layers not sticking together, often referred to as delamination. To remedy this, check that the hotend and nozzle aren’t obstructed by residue filament, dust or debris. Raising the nozzle temperature, increasing the flow rate, lowering print speed, and lowering cooling can also help. The filament itself, especially, if it’s taken on moisture can cause bonding issues, so make sure the filament is dry and in good condition before printing. Lastly, using a smaller layer height tends to promote better layer adhesion.
Related posts:
- How to Remove Blobs and Zits in Your 3D Prints
- Explaining The Electricity Usage Of A 3D Printer Use
- Fixing Gaps and Holes In Your 3D Prints
- Are Your 3D Printed Circles Not Perfectly Round?
- How to prevent layer lines in your 3D prints


