After spending the better part of a month testing out the AnkerMake M5C, my lasting impression is that it’s one of the easiest, most reliable, and pleasant consumer-focused 3D printers to use in this low price range.
From its sleek design to its ultra-fast print speeds and excellent print quality, the AnkerMake M5C really does symbolize what we should all be expecting from 3D printers moving forward.
Since writing this review, AnkerMake have also gotten in touch and offered our readers a discount code, giving you $80 off if you click this link or on the product display below, and enter code: 3DSM5C.
We also have an exclusive discount code: 3DSM5C.
Use this code and get $80 off!
- Dizzyingly fast print speeds – it printed a Benchy accurately at 500mm/s
- Superb print quality, especially on my articulated dragon print
- Impressive all-round build quality
- Sophisticated, responsive, and useful mobile app
- Tinker-free bed leveling and printing
- Direct drive extruder is always nice to have
- Missing SD Card slot
- Very loud operating noise levels. With noise-canceling headphones, I could still hear it from 20 feet away.
- No on-printer screen
- Strangely, it didn’t ship with any filament – not even a test sample
- Spool holder feels a bit flimsy to me
The AnkerMake M5C is one of the best printers for beginners on the market today – and it’s also great for experienced makers who want to circumvent the tinkering and faff typically expected in this price range.
In the super-fast 3D printer race, the AnkerMake M5C is cheaper than similar models like the Bambu Lab P1S and outclasses budget picks like the Elegoo Neptune with its feature set and better print quality. (For more on the Neptune, read our review of the Neptune 4 Max!)
However, the M5C’s closed system and the fact there are few upgrades means that modders and hands-on tinkerers may want to steer clear, instead favoring Anycubic or Creality’s fleet of mod-friendly printers.
The decision to forego an on-machine screen or SD Card slot will annoy some, as well as how loud the printer gets when at full pelt. It’s also not for you if you don’t like the idea of being forced to use an app (albeit an excellently designed one) to monitor and launch prints.
My AnkerMake M5C Review Summary
Here’s a quick rundown of the AnkerMake M5C’s pros and cons:
Pros:
- Dizzyingly fast print speeds – it printed a Benchy accurately at 500mm/s!!
- Superb print quality, especially on my articulated dragon print
- Impressive all-round build quality
- Sophisticated, responsive, and useful mobile app
- Tinker-free bed leveling and printing
- Direct drive extruder is always nice to have
Cons:
- Missing SD Card slot
- Very loud operating noise levels. With noise-canceling headphones, I could still hear it from 20 feet away.
- No on-printer screen
- Strangely, it didn’t ship with any filament – not even a test sample
- Spool holder feels a bit flimsy to me
Assembly and Setup

The AnkerMake M5C lands on your doorstep in a thick cardboard box, with all the parts housed in cutouts in chunky layers of foam to protect them during shipping. In my estimation, only the roughest journey is likely to damage the components.

A large sheet with setup instructions guides you through getting the AnkerMake M5C up and running in less than 15 minutes. A nice touch is the inclusion of a metallic tool case containing spanners, an Allen key, spare nozzle, and cutters, all of impressive quality.

The AnkerMake M5C comes more or less pre-assembled. There’s only the gantry to slide into the base, a few bolts to tighten, two wires to connect, and the filament holder to attach before the printer is ready for leveling and filament loading.
It’s all extremely effortless and scanning the QR code on a label attached to the power supply cable takes you to several setup videos should you need them.
Bed Leveling and Filament Loading

The next step is to power up the printer and download the AnkerMake app. As mentioned above, there’s no on-printer screen and everything is controlled through either the app or over Wi-Fi using the AnkerMake Studio slicing software.
Pairing the app with the printer is straightforward. After a firmware update, you’ll be prompted to level the bed. The AnkerMake M5C features a contact probe that pressure taps 49 points on the bed, taking about 10 minutes to complete.
After warming up, the printer will do its thing with progress shown in real-time on the app, leaving with a perfectly leveled bed, which in my experience, required no Z-offset adjustments of any kind. As with most printers, leveling the bed after every couple prints is recommended for peace of mind.

Though the AnkerMake M5C includes a direct drive extruder, filament is fed from the spool holder to the print head via a strip of Bowden tubing. The filament is loaded into the Bowden tube and fed down to the print head. A tap of the Extrude button on the app, a squeeze of the lever on the print head, a gentle push, and the filament is loaded, ready for printing.
Testing and Results
The AnkerMake app includes a growing library of pre-configured and pre-sliced models, from vases to articulated dragons, and even impressive 3D city maps.
Regardless of whether you use one of these or load your own model into AnkerMake Studio, the printer automatically weaves in a purging routine that wipes off any excess filament from the nozzle with a choreographed little dance on the side of the build plate.
This ensures the first layer is free of potentially print-ruining blobs and strings. While you can fashion a similar routine with other slicers and printers, the fact this is done automatically is another point for convenience. And, better yet, it works perfectly every time.
Test #1: 3DBenchy

First up, and a rite of passage for any factory-fresh printer, the 3DBenchy using PLA (the printer doesn’t come with any filament, not even a test strip, so factor that in when buying).
Printed in a lightning-fast 17 minutes and pushing the M5C to speeds nearing 500 mm/s, the Benchy came out looking fantastic with next to no blemishes to speak of. This is a huge feat, given the printer is affordably priced and can print so fast.
Honestly, firing up the printer for the first time and witnessing the speed at which the print head and build surface darted around was almost worrying, triggering worries that the printer was overexerting itself.
But rest assured, it was working as designed and was nothing short of mesmerizing. A sign of things to come as the M5C’s first outing was nothing short of impressive.
Test #2: Big Eared Cat

Next, I printed a Big Eared Cat, another model from the app library, which has been optimized for fast mode printing, one of the three stripped-down basic settings options on the AnkerMake M5C.
Again, speeds reached near 500 mm/s, finishing the print in just 26 minutes. Other than some blemishes, presumably caused by the lack of supports around the bottom of the head, the model quality matched that of the Benchy with clean layers and details.
Test #3: Hinged Miniature Skull

On to a bigger model and one to test out more conservative speeds, I dialed in a Hinged Miniature Skull model, again taken from the AnkerMake app.
With speeds capped at 250 mm/s, the print time swelled to a more familiar 1 hour 15 minutes, but for a much larger model, this was still short compared to typical desktop FDM speeds.
The articulated joints came out near pristine with very little in the way of unsightly artifacts or blemishes across the complex geometries of the model.
Test #4: Articulated Dragon
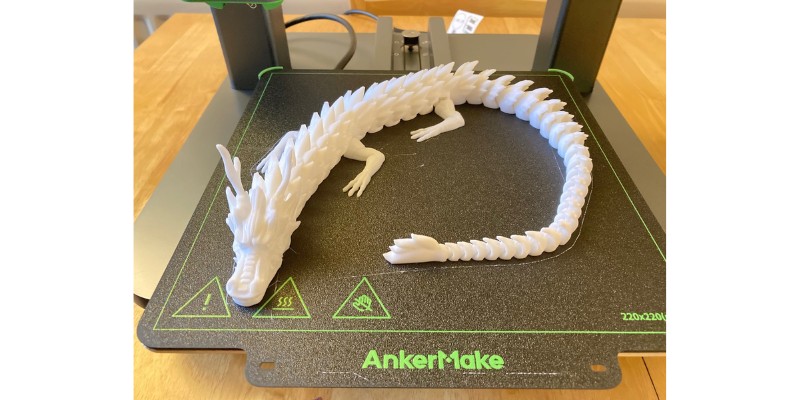
Wanting to test larger models at higher speeds, I next printed an articulated dragon that took up the majority of the M5C’s print surface.
A little over 3 hours later and a notification on the app to confirm the print was finished, the dragon came off the plate with an impressive level of detail, smooth articulations, and only a small plastic build-up on the upper scales, which can easily be shaved off with some light post-processing.
Overall, I am VERY impressed.
AnkerMake M5C Design and Features
Before we dive in, here’s a quick look at the specs:
| Specification | Value |
|---|---|
| Build Volume | 220 x 220 x 250 mm |
| Print Speed | 500 mm/s |
| Print Acceleration | 5000 mm/s² |
| Max Nozzle Temperature | 300°C |
| Max Heated Bed Temperature | 100°C |
| Filament Support | PLA, PETG, ABS, TPU, PA |
| Connectivity | Bluetooth, Wi-Fi, USB-C |
Build Quality and Design
From the moment I pulled the M5C out of its box, I was impressed with the build quality on offer here. It’s predominantly made of high-quality metal, which not only looks fantastic and gives the printer an alluring futuristic feel – and ensures it sits firmly on your desk even when running at speeds up to 500 mm/s.
It’s a big shift from the typical plastic printers in this price range. There’s a real sense that AnkerMake has spared no expense to produce a neat and stylish – yet also functional – printer from top to bottom.
There are no errant wires. The compact frame won’t take over your bedroom or workshop. And, given how sharp it looks, it easily sits alongside home appliances without standing out as an eye sore.
I was also a big fan of the LED AnkerMake logo that shows a different color depending on the printer status. Visual queues help instill the sense of a stress-free, intuitive printing experience.
Build Volume and Print Surface
The build volume is as standard as it gets for FDM printers in this price range, matching the Ender 3 and Anycubic Kobra.
The PEI-coated flexible build plate is absolutely fantastic, from the grippy coarse texture (I experienced zero first-layer adhesion issues) to the plastic guides mounted on the back of the heated bed to ensure it’s aligned perfectly (something I feel should come standard with all FDM printers of this size).
Prints snap off with a gentle flex and the bobbly, coarse finish on the underside of prints is there but not unsightly as is common with PEI plates. The black color scheme means you can actually spot debris or oil on the surface, prompting you to wipe it clean with isopropyl before launching a print.
Spool Holder
My one real gripe with the design is the spool holder.
Well, not so much the spool holder, but the plastic arm mounted on the top that holds the Bowden tube that feeds into the printhead assembly.
It’s made of flimsy plastic, flexing as filament is fed into the tube, which had me worried on several occasions that it may snap. It’s a minor issue, but feels a little sour when compared to the thought put into the rest of the machine.
Filament Compatibility
Alongside the usual FDM quad of PLA, TPU, ABS, and PETG, the M5C is also equipped to handle fill-type filament, notably those with carbon fiber filling such as PLA-CF and PETG-CF.
This is chiefly down to AnkerMake incorporating an all-metal hot end capable of pushing temperatures up to 300°C and a 35 mm³/s flow rate. The lack of an enclosure means that ABS performance will vary greatly depending on ambient temperatures, but nothing a DIY enclosure tent won’t solve.
One-Click Button
Though a nice visual addition to the printer, the One-Click Button felt quite gimmicky. You can pause and stop during prints, which is useful as a hands-on bit of functionality if you happen to misplace your phone mid-print.
The pause function works a treat as I experienced when my spool got tangled midway through the large dragon print above, picking up where it left off with nasty filament build-up of stringing on the print.
When idle, the button can perform various functions depending on the number of presses, such as bed leveling, homing, and re-printing the last printed model.
But, given that for the majority of the time, you’ll launch prints from either the app or slicer, the button quickly becomes somewhat redundant even though you can customize what it does from a limited set of options.
Print Speed
While there’s a degree of marketing associated with boasts of blistering fast print speeds so is best to approach them with a degree of caution, the M5C caps out at 500 mm/s.
However, remember: you won’t be completing a full print at this speed, as they’ll invariably fail. Instead well-sliced prints will vary speeds, pushing up to 500 mm/s when needed and then dropping back down.
When the M5C does hit those speeds, it’s designed to dampen vibrations so that they don’t cause print errors, blemishes, or artifacts, and it printed consistently for me at these speeds.
Noise
Though it can be passed off as an unavoidable part of keeping the printer within safe operating temperatures when running such high print speeds, the AnkerMake M5C is one loud machine.
This is mainly attributed to the fans, which whirr furiously throughout the printing process. With noise-canceling headphones, I could still hear them even though I was a good 20 feet from the printer.
The AnkerMake M5C also produces a huge amount of vibrations that, depending on when you decided to set it up, can run down table legs and into floors. If you have wooden floors, like I do, you’ll occasionally feel like the whole house is shaking. Again, mileage will vary here and I’d wager it’s a minor inconvenience given how excellent the M5C is otherwise. Just don’t plan on printing overnight if you live in a small apartment or have noise-sensitive people in the house.
Proprietary Nozzles
The AnkerMake M5C ships with a proprietary 0.4 mm brass nozzle with a 35 mm³/s flow rate. No complaints here as it’s a quality nozzle that works beautifully to pump out enough filament to keep up with high print speeds.
The issue is when it comes to replacing the filament. The lack of standardized compatibility means you’ll need to buy directly from AnkerMake for around $20 for a ten-pack. This is a tad pricier than your typical nozzle, so factor this in when weighing up whether the M5C is right for you.
Software

There are two AnkerMake M5C software: the AnkerMake app, and AnkerMake Studio slicer.
If we set inside the potentially thorny issue of forcing users onto an app and the absence of an on-printer screen, the app is well-designed, intuitive, and stacked with useful data and info about the printing process. You can launch prints, level the bed, home the printer, load filament, pause, stop, and adjust settings. It just works, and is a delight to use.
As for AnkerMake Studio, proprietary slicers are typically very hit-and-miss, with a lot more misses than hits. Fortunately, AnkerMake’s take is one of the good ones. Based on Cura, it features a neat, clean UI that won’t overwhelm first-timers, but hides all the granular settings and detail experienced makers will find joy tinkering. Retraction, print speeds, infill patterns, rafts, acceleration speed, supports – it’s all in there for those who want it. It’s also responsive and slicing is quick compared to Cura, for example.
When loading in a model, you’re given three base printing modes, each one containing pre-configured and pre-defined settings. The idea is to drastically simplify the slicing process for either beginners or those that want to get printing fast with more or less the best settings. They play into the ease of use of the M5C and from my experience, you could easily get away with using these for all your prints. They are that good. Here they are:
- Fast – Prioritizes speed over precision to deliver high acceleration and print speeds within the printer’s safe operating range.
- Normal – Maintains a balance between speed and precision. Prints will have a higher quality when finished.
- Precision – Prioritizes smoothness of the model surface, with more uniform layer heights between adjacent layers.
Over the course of the two weeks I spent with the M5C, AnkerMake Studio was updated twice, so it’s clearly being regularly and iteratively improved.
Final Thoughts on the AnkerMake M5C
Overall, the AnkerMake M5C is one of the most enjoyable printers I’ve had the pleasure of reviewing at 3DSourced.
From the moment it arrived, I just knew this was one special printer and the more time I spent in its company, the more I fell for its many charms. The features set is impressive. The high-speed printing feels almost like cheating given the consistent quality. And, the ease of use is a standard more manufacturers should aspire to.
If you’re looking to buy your first printer and want a machine that blends sophistication with a simple, user-friendly workflow, you can’t go wrong with the AnkerMake M5C. It has its annoyances, but all printers do. For me, the M5C’s shortcomings are ones you can live with quite easily rather than the type that makes you regret your purchase.
We also have an exclusive discount code: 3DSM5C.
Use this code and get $80 off!
And if you’re not sure whether the AnkerMake M5C is right for you, and want to see some other options, then I recommend some of these alternatives:
- Larger yet still fast 3D printer: Elegoo Neptune 4 Max (clicking this will open our hands-on review in a new tab)
- Our recommendations for the best fastest 3D printers
- The best cheap 3D printers