In the past month, I’ve assembled, tested, and had a whole lot of fun with Elegoo’s Neptune 4 Max. Some of its features were amazing– like the giant build plate– while other aspects of the printer fell short.
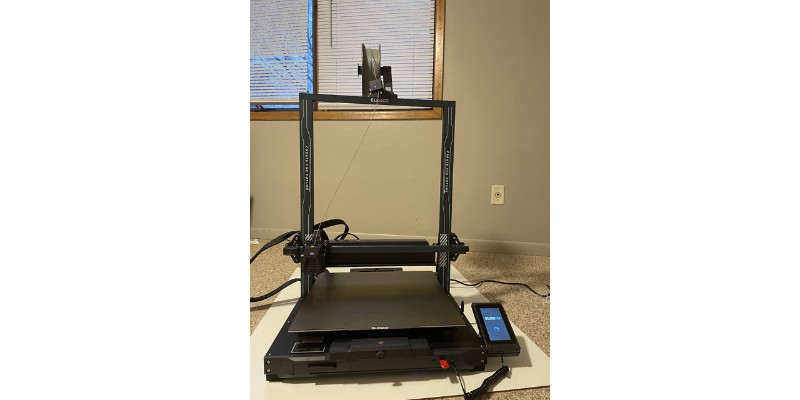
The Neptune 4 Max is made for all the 3D printing enthusiasts out there who want to own a large volume printer, without the high price they usually command.
In that regard, it does its job well. Elegoo made a few key improvements over the older Neptune 3 Max, especially in print speed. The pre-installed Klipper is the dark horse of the Neptune 4 Max.
All things considered, the Neptune 4 Max is a good deal at $470. The low cost, pre-assembly, and auto leveling makes it an appealing choice for beginners and casual hobbyists.
Let’s explore that and more in the rest of the review.
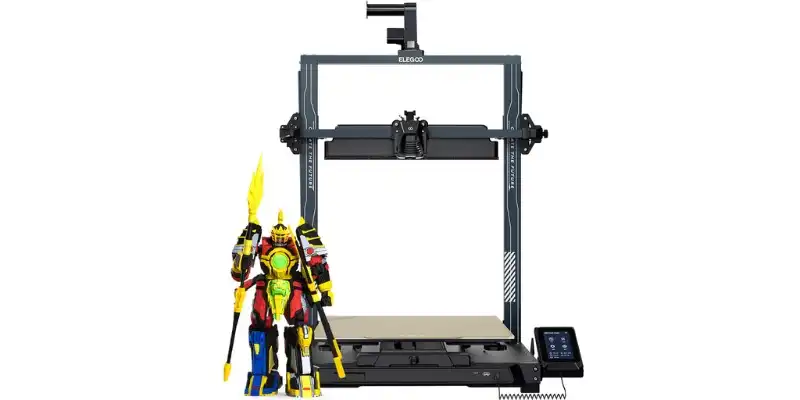
With a large 420x420x480mm build volume, integrated auto bed leveling, and fast print speeds enabled by Klipper, the Neptune 4 Max is an affordable option for hobbyists wanting to print big.
However, some tinkering is likely needed to get the best results.
- High potential print speeds (pre-installed Klipper + good processor)
- Huge 420 x 420 x 480 mm build volume
- 121-point mesh auto-leveling
- Direct drive print head
- Huge toggleable fan
- Likely to need tinkering to work properly
- Difficult to swap proprietary nozzle
- Few upgrades from the cheaper Neptune Max 3
Elegoo Neptune 4 Max Review: Summary
Before we get into the finer details, let’s go over the main things you can expect from the Neptune 4 Max.
Pros
- High potential print speeds (pre-installed Klipper + good processor)
- Huge 420 x 420 x 480 mm build volume
- 121-point mesh auto-leveling
- Direct drive print head
- Huge toggleable fan
Cons
- Likely to need tinkering to work properly
- Difficult to swap proprietary nozzle
- Few upgrades from the cheaper Neptune Max 3
Assembly and Setup
Assembly
The Neptune 4 Max, like other Neptune models, is very easy for even a complete beginner to assemble. It only takes 30 to 60 minutes to completely assemble it out of the box.
Most of the assembly time is just spent screwing parts together with Allen wrenches. Elegoo provides all the tools you need, and the instruction manual is easy to follow.
Oddly, the cable clip for the back of the extruder head is not included in the packing list. It’s visually shown being added in the first step, but isn’t numbered as it has no list number. Don’t forget it!
It took me about 45 minutes to assemble the printer from start to finish with only the tools provided in the box.
I realized later that the eccentric nuts holding the bed in place weren’t tightened properly. As is common with pre-assembled printers, they likely came loose with shipping.
It’s a quick adjustment, so make sure to check the stability of your bed before you move on. While you’re at it, remove the four plastic blocks Elegoo puts under the build plate for shipping stability.
Elegoo includes a list of potential issues that can happen during shipping and how to fix them— including the eccentric nuts coming loose.
It’s great to see Elegoo acknowledge those out-of-box problems, especially if the Neptune 4 Max is your first printer.
Leveling
The initial leveling process might take longer than the assembly, but there is auto-leveling to help you along.
Start with the auxiliary leveling. Elegoo includes a yellow instruction paper that you can use as the A4 sheet, which is what I did. It’s best to screw or unscrew all of the knobs before leveling to a middle point, so they have room to move the plate up and down.

The printer will assist you by moving to each corner, corresponding to a number on the touch screen. You can then level using the knobs under the build plate.
Elegoo’s implied leveling order is to follow the numbers and go around the plate clockwise. Going diagonally might have some benefits since opposite corners directly work ‘against’ each other.
For example, instead of 1, 2, 3, 4, 5, 6, you would level in order of 1, 4, 3, 6, 2, 5. I would suggest doing the alternate order if you only are leveling once. However, this shouldn’t really matter if you go over the surface multiple times.
With such a large surface, minor leveling issues in one corner can have a drastic impact across the plate. I went over it 2 times manually before moving on to auto-leveling.
After all that, I decided the mesh results weren’t quite what I wanted and I ended up running one more auxiliary leveling. I wanted to get as close to flat as possible instead of relying on the auto-leveling mesh.
If you do this, remember to run the auto-leveling to update the mesh again at the end.
You can either set an experimental z-offset now, or leave it at 0 until you start your first print. Either way, you’ll need to set a z-offset to get good prints in most cases.
This is all that’s necessary for setup— I’ll share my opinion on the leveling and auto leveling features as a whole in a future section.
Filament Loading
After leveling, you need to feed filament into the extruder head. Start by putting a filament spool on the spool holder and pulling down some filament.
I didn’t bother with cutting the filament at a 45 degree angle (although some people swear by it). I also didn’t need to straighten the end at all since it was straight enough to feed through the filament runout sensor. I used a new package of Elegoo’s Grey PLA.
Push the end of the filament through the filament runout sensor and pull it down into the top hole of the extruder head. Then, use the menu to select setup –> filament feeding. The extruder will pull the filament inside within moments, and you’re all set.
This took me only a couple of minutes to complete.
Testing & Results
Test #1: Elegoo Buddha

Elegoo includes a small spool of white PLA+ in the Neptune 4 Max’s package. It’s just slightly more than what is needed to print the Elegoo Buddha.
The iconic Buddha figure comes pre-loaded on the Neptune 4 Max’s USB.
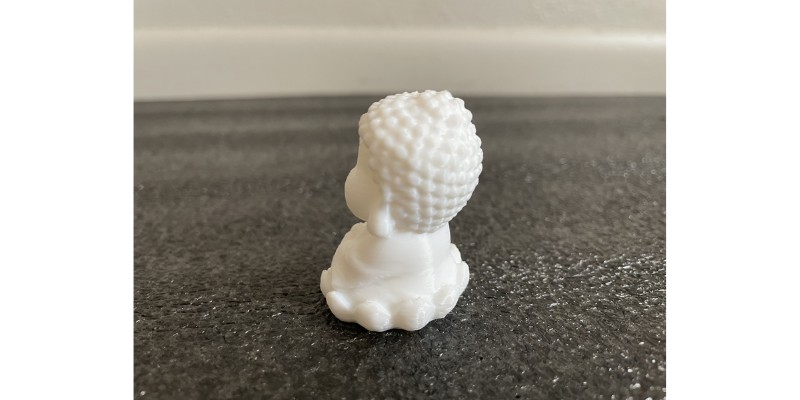
In my case, I had the z-offset too high, so the filament wasn’t being pressed into the build plate properly. After a quick adjustment (eventually settling on -0.370 mm), the Buddha printed wonderfully.
Test #2: Benchy

Contrary to the smooth Buddha printing, my first Benchy went woefully wrong. It printed just fine at the start. But around halfway through, I suspect it detached itself from the plate slightly resulting in a dramatic layer shift.
I went ahead and checked over my belt tension, re-leveled the bed, and then increased the bed temperature to 65°C. The next Benchy was much cleaner. Not perfect, but certainly not a failure!

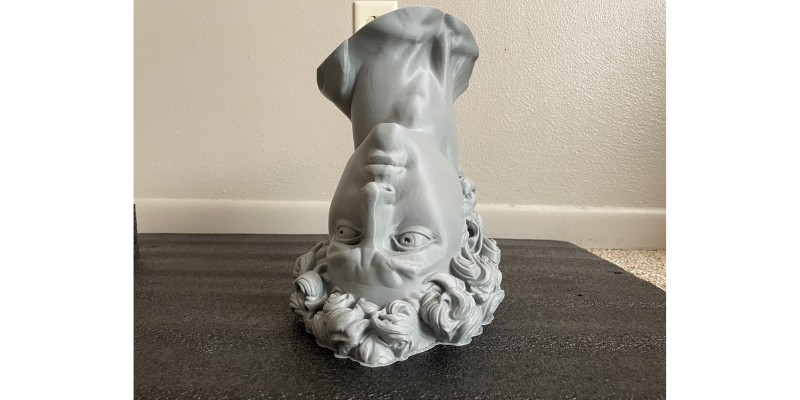
Test #3: David Head Planter Base
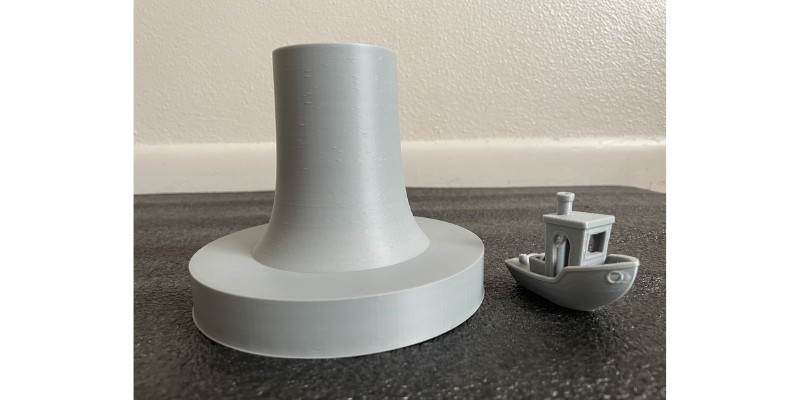
Although this planter base looks simple– and, well, it is simple– it took a couple spaghetti monsters to get it to print. It kept detaching itself from the bed part way through even after the first several layers had gone down perfectly.
After lots more re-leveling and wiping down the bed with IPA to no avail, I realized that my issue was a bed wobble. As happens with pre-assembled printers, the eccentric nuts that keep the bed in place must have shaken loose during transit.
In hindsight, I should have checked this when I first assembled the printer! Some of my earlier failed prints (and my need to frequently re-level the bed) could probably be attributed to the bed wobble, too.
You can quickly fix it by using the supplied wrench to tighten the eccentric nuts. They are located underneath the printer on the right side. Slowly turn each nut while periodically giving the plate a gentle wiggle to find the sweet spot.
The other issue I had was blobs or ‘zits’ on the surface of the print. Zits can really marr the surface of any decorative print and are annoying to diagnose, since there are so many causes of zits when 3D printing.

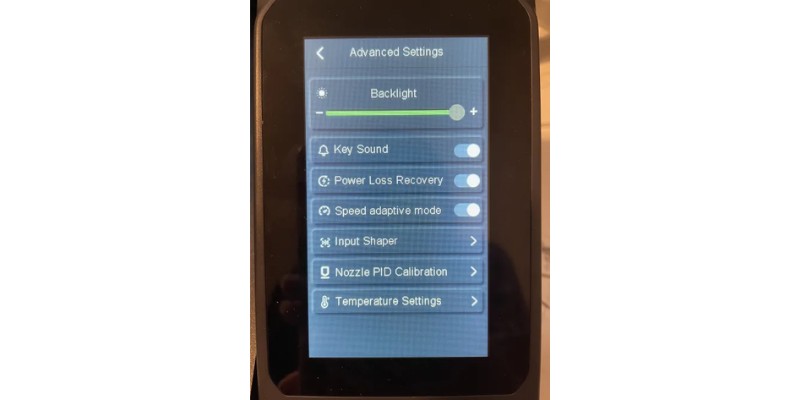
Since it’s a curved object that I lazily upscaled in Elegoo Cura, I suspect that these were caused by the printer stalling rather than an extrusion or filament problem. Power loss recovery can slow down how fast the printer can read commands since it forces regular SD card writes.
I went ahead and turned it off (which is very easy to do through the settings menu) just in case that was causing my problem. I also reduced the print speed slightly.
The base is not visible in the final design, leading me to stick with what I had rather than trying a reprint.
Test #4: David Head Planter
At long last, I printed the giant David head to finish off my planter. It didn’t quite max out the build volume, but it did get close.
The details in the final print were impressive. I realized that with these larger decorative objects, layer lines are significantly less visible because we tend to view them from further away. I think you could get some insane results with an even more detailed bust model.
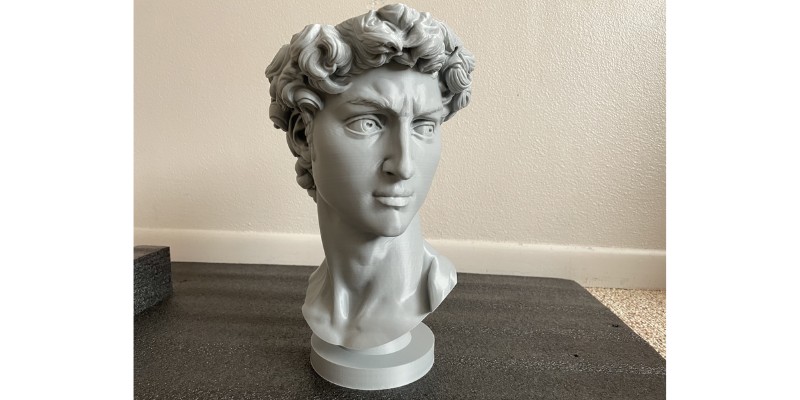
There were still a couple ‘zits’ on one of his cheeks, but they weren’t very noticeable. I plan on cleaning up the overhang of his hair above his face as it is the messiest part. Overall, I consider this print a resounding success.


Clearly, the Neptune 4 Max can create some beautiful pieces. The possibility for life-size busts, cosplay, and similar large-scale prints is amazing – but make no mistake, it isn’t perfect. The guesswork and tinkering could easily be an issue if you have limited time, limited patience, or limited experience.
I’ll cover the main design and features of the printer, and then I’ll give you my final verdict.
Design & Features
Frame & Form
The Neptune 4 Max has the same sleek appearance that other Elegoo Neptune machines have. So, what sets it apart?
The large print volume of 420 x 420 x 480mm is the main selling point. Interestingly, this is about the same as the Neptune 3 Max that it is meant to replace. The 4 Max is actually shorter by a couple centimeters to make room for the huge horizontal fan.

Another point of comparison between the Neptune 3 and Neptune 4 is the limit switch question. The Neptune 3 Max uses limit switches to keep the bed from moving too far in either direction. In contrast, the Neptune 4 Max has no switches and instead makes use of 2209 silent drivers with centerless homing.
I’m not sure why Elegoo chose to go in this direction. The only real benefit is that you don’t need wired endstops with centerless homing, and it’s up to debate whether that matters to you or not.
Unfortunately, there is a widespread issue where the printer attempts to go beyond the limits of the build plate while homing. This causes a loud, grating sound every time you need to home your printer.
Elegoo has said that it’s a problem with the firmware and released an update. This might fix your issue, you might experience no issue in the first place, or you might continue to experience that annoying grinding.
In my case, it went from happening every time to never happening over the course of printing and tuning the machine. I suspect tightening the belt helped the most, but it didn’t go away completely until later on. I never installed the firmware update.
It’s outfitted with support bars on either side to keep the frame stable, and dual z steppers with a timing belt.
Textured PEI Build Plate
The Elegoo Neptune 4 Max is equipped with a textured PEI build plate, just like its predecessors. It can be heated to a maximum of 110°C.
As you might have noticed in the testing section, all of the files I printed were well-optimized and only used a small brim. Realistically, any adhesion issues with easier filaments will be due to incorrect assembly or settings issues.
In Test #1, I didn’t have proper adhesion because I hadn’t set an ideal z-offset. In Test #3, I needed to fix the bed wobble and re-level the printer. The takeaway? PEI is not a cure-all for user error!
One very real downside of the Neptune’s PEI sheet is that there is no edge around the build plate. It’s a pain to put the flex plate back after removing it because you have to carefully line it up by eye.

That being said, there is rarely going to be a reason to remove it in the first place. All of my prints popped off easily using the plastic scraper— even when I waited no more than 1-2 minutes for the print to cool down.
Your mileage with bed adhesion and release may vary depending on the print, your setup, and what filament you’re using.
Auto Bed-Leveling
The Neptune 4 Max has an inductive sensor that it uses to probe the bed, creating a 121-point mesh.
As I mentioned before, you need to level the bed manually — preferably a couple times — before going in with the auto leveling. It only takes around 10 – 15 minutes and you don’t need to be present unless you want to be.
Once finished, you’ll be given this handy graph which represents how level the plate is. You can use it to quickly identify issues in your manual leveling efforts or even in the bed itself.
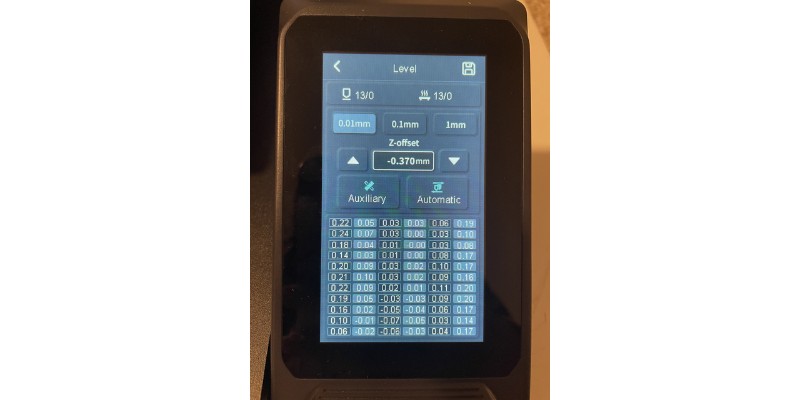
Positive numbers mean your bed is higher in that area, and vice versa for negative numbers. The closer to 0, the better! But don’t despair, because the printer should be able to compensate for anything better than +-0.25.
I prefer an inductive sensor as opposed to a mechanical one because it tends to be more reliable. The caveat is that it is only reliable when you’re still using the same metal plate. If you wanted to swap the plate, for whatever reason, it would no longer work.
For those of you who prefer and swear by a glass build plate, trying to add one to the Neptune 4 Max is probably more effort than it’s worth.
Personally, I was happy with the auto leveling and found the mesh bed to be beyond helpful for leveling and troubleshooting problems.
Electronics
The Neptune 4 Max’s processor is a 64-bit 1.5G quad-core, and it’s part of why Elegoo can advertise print speeds of up to 500mm/s. Another part of that reason is Klipper– I’ll elaborate on that further down.
Aside from the processor, the 4 Max had a couple quality of life features that I thoroughly enjoyed. There are two lights you can use to monitor your prints. One is inside of the print head, and the other is a bigger light attached horizontally on the frame.
You can turn them both on and off while printing, or outside of printing from the main menu. The print head’s light was especially useful for me since I could monitor the first layers of small prints easily.

The Neptune 4 Max also has a detachable touch screen, connected telephone-cord style. I can imagine this being useful if you ever wanted to add an enclosure or partial enclosure. For me, it just felt nicer to bring it close to my face while I changed settings or monitored a print.
Finally, there is a small filament runout sensor attached to the top of the printer.

I’m certainly not mad that they included one. I think it’s a foregone conclusion on newer 3D printers. However, I do wish it weren’t quite so high up considering the giant z-axis of the printer. If you’re printing something vertically flat, then the sensor will detect a ‘runout’ far before you actually are out of filament
Wi-Fi Connectivity
The Neptune 4 Max has Wi-Fi connectivity, a helpful and easy to use feature that is a straight upgrade from previous Neptune 3 models. All you need to do is navigate to the Wi-Fi option using the touchscreen and select your network. Then, make sure you’ve added the network printer on your slicer and you’re all set.
The Wi-Fi connection was a bigger deal than I initially thought. Since my computer is in a different room from my printer setup, it saves a lot of time. This is doubly true while you’re trying to slightly tune settings in your slicer!
Print Head
The print head on the Neptune 4 Max is a compact direct drive, with a proprietary hot end, inductive sensor, and a large fan in the back.
Let’s start with the hot end. Out of box, you will get a 0.4mm spare hot end and one already installed in the print head. It has a maximum temperature of 300°C.
That’s fine and all for people who never want to increase the nozzle size. Everyone else is out of luck, at least for now. Elegoo currently offers no options for different nozzle sizes that work with the Neptune 4 Max.
The current lack of customizability strikes me as odd, considering the selling point of the printer is build volume. Want to swap to a bigger nozzle so you can complete those huge prints faster? You’ll have to wait until Elegoo stocks larger sizes of the proprietary nozzle that they’ve forced you to use.

Another concern is how hard it is to reach the nozzle. It takes a lot of effort to take apart both the extruder and hot end component, and that’s exactly what you need to do. If you have clogging issues with the Neptune 4 Max, it’s going to be even harder to fix it.
As for the inductive sensor, I liked how easy it was to find and troubleshoot. Sadly, this is only relevant because I had issues with the sensor in the first place.
The lovely inductive sensor is what keeps the hot end from ramming into the plate at any given moment. Somewhere along the way, mine stopped working.
You can troubleshoot it by carefully opening up your extruder head. The sensor is located in the back left and has a faint red glow.
Pick up the build plate and carefully move it under the sensor. You might have to maneuver it up and down a couple times to get it right. The red light will turn off whenever the sensor detects something.
If it’s working, check the connections between the sensor and the rest of the machine. Be very careful not to wiggle the wires back and forth while pulling them out or pushing them back in. The plastic casing is brittle and easy to damage.
For me, the fix was gently pushing the plugs to make sure they were secure and the sensor downwards in case it was out of place.
If the sensor isn’t working, then you might have a bigger issue on your hands. I would suggest contacting Elegoo (they have solid customer service) and checking out their Discord or other community channels before proceeding.
Firmware: Klipper
Klipper is the hidden secret weapon of the Neptune 4 Max. It comes pre-installed, removing the difficulty of making the switch from Marlin to Klipper.
You realistically won’t notice Klipper until you’re trying to make config changes and really fine tune your machine. If you do go down that route, there will be no more reflashing Marlin for every single change you make, for instance.
Klipper also has some added quality for high-speed printing. Unlike Marlin, which only runs on the motherboard, it uses a combination of a motherboard and an external computer to run g-code. The (oversimplified) result is faster printing as it can run g-code much faster. Plus, you will be able to use features like Input Shaping that help retain quality at faster speeds.
Software: Elegoo Cura
Elegoo Cura comes preloaded on the USB stick, and that’s what I used for every test print in this review.
It’s the default, plug-and-play option since you can just select the premade profile and get started. Especially if you’re not using any supports, Elegoo Cura should work fine and is the most beginner-friendly option.
But if you’re consistently having issues that can’t obviously be traced to something else, you might want to swap your slicer. Orca Slicer or Prusa Slicer are both good options. Orca even has a profile for the Neptune 4 Max– no manual porting required.
Final Thoughts on the Elegoo Neptune 4 Max
Ultimately, the Neptune 4 Max is a solid option if you want to experiment with Klipper and printing fast at a large scale. I personally enjoyed working with the printer and I’m beyond excited to continue printing massive builds with it!
It offers Klipper, and one of the largest build sizes on the market, for a relatively low cost.
- High potential print speeds (pre-installed Klipper + good processor)
- Huge 420 x 420 x 480 mm build volume
- 121-point mesh auto-leveling
- Direct drive print head
- Huge toggleable fan
- Likely to need tinkering to work properly
- Difficult to swap proprietary nozzle
- Few upgrades from the cheaper Neptune Max 3
However, if you’re not able to dedicate the time and energy to troubleshooting, then buying a Neptune 4 Max is taking a risk.
Therefore, if you’re a beginner or casual hobbyist, it’s probably not worth the hassle or the headache if things do go wrong.
At times, the Elegoo Neptune 4 Max feels more like an impromptu engineering project and a rushed attempt to keep up with the FDM market than a serious upgrade to the Neptune 3 Max.
But for the price, and the quality of large prints I managed to print, I was impressed with it overall. There are few printers as large as this that can manage this quality at this size, that retail at this price.