
Creality and Flashforge are goliaths in the consumer 3D printer market. By not sacrificing power for affordability, their main lines are as approachable as they are capable.
Creality offers the Ender 3, and Flashforge has the equally impressive Adventurer 3 -but in my experience, there are a few major differences that could make or break your decision.
The Ender 3 has a larger build volume and can use more filament types. At half the price of the Adventurer 3, it’s the better budget choice for beginners.
On the other hand, the Adventurer 3 has an enclosed build area (good for heat-sensitive materials), more connectivity options, and is ultra-silent. So overall it’s a more user-friendly experience.
For me, those are the most important distinctions – but this guide will explore all of the details I’ve found in my 2- 3 years of owning these 3D printers, so you can make the right choice!
Creality Ender 3 vs. Flashforge Adventurer 3: A Quick 3D Printer Comparison
OVERALL TOP PICK

Creality Ender 3
Available at:
CONSISTENT PICK

Flashforge Adventurer 3
Available at:
3DSourced is reader-supported. When you buy through links on our site, we may earn an affiliate commission. Learn more
Creality Ender 3
| Price: | $189 — Available at Creality store here / Amazon here |
| Build volume | 220 x 220 x 250 mm |
| Print speed | 30-60mm/s |
| Layer height | 0.1-0.4mm |
| Print accuracy | 100 microns |
| Filament compatibility | PLA, ABS, TPU, Wood, Copper |
| Bed leveling | manual |
| Max temperature | 240C |
| Assembly | DIY assembly |

Pros
The most popular among budget FDM printers.
Easy assembly and no-frills usability.
Very upgradeable.
Cons
Newer versions of the Ender 3 are available.
Creality’s Ender series has been a household name in 3D printing for some time now, and the Ender 3 is the most popular among budget FDM printers for hobbyists and enthusiasts alike.
The Ender 3 is one of the best-priced FDM printers on the market. Its easy assembly and no-frills usability make it ideal for beginners, and its power and filament compatibility make it great for veteran 3D printing enthusiasts too.
Simply put, for its price tag, the Ender 3 is one of the best consumer FDM printers on the market.
The Ender 3 was released in 2017, and Creality has been building on it ever since to improve its range to cover a wide range of 3D printing needs. Here we’ll only be talking about the standard Ender 3 model, but if you’re impressed enough by that alone, the rest of the Creality Ender range is definitely worth checking out.
We couldn’t possibly cover the entire Ender series here, but the Ender 3 V2, Ender V2 Neo, S1, and S1 Pro are all advances on the Ender 3 we’re looking at today. So if you like what you see here, you can always go for one of their more modern printers.

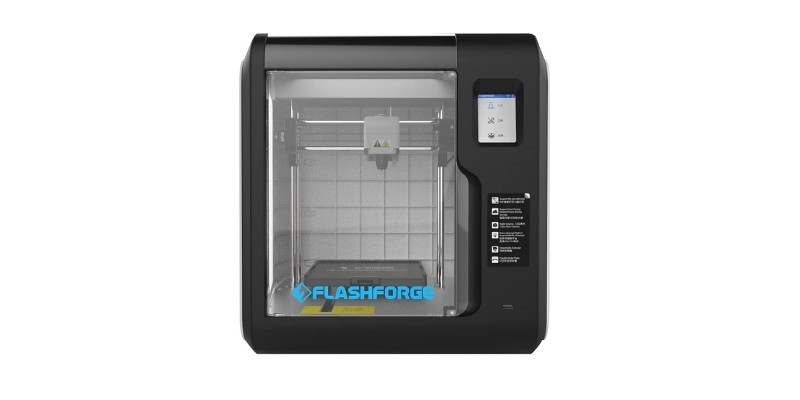
Flashforge Adventurer 3
| Price: | $369 — Available at Flashforge here / Amazon here |
| Build volume | 150 x 150 x 150 mm |
| Print speed | 30-100mm/s |
| Layer height | 0.1-0.4mm |
| Print accuracy | 200 microns |
| Filament compatibility | PLA and ABS |
| Bed leveling | manual |
| Max temperature | 240C |
| Assembly | comes assembled |
Pros
One of the most beginner-friendly FDM printers on the market.
Added safety of its enclosed build area.
Fantastic as an educational 3D printer.
It also has a built-in camera for remote monitoring and an easily replaceable build plate.
Cons
Not much room for tinkering and upgrades.
Probably one of the most beginner-friendly FDM printers on the market, the Flashforge Adventurer 3 is ideal as both a hobbyist’s 3D printer and a teaching tool.
The added safety of its enclosed build area, which is quite rare for FDM printers, makes it great for use in schools. And it’s ease-of-use doesn’t detract from its overall power.
As an educational 3D printer, it’s a fantastic introduction to FDM printing that won’t leave you scratching your head.
There are more connectivity options for the Adventurer 3 as well, making it a versatile machine for however you want to connect. It’s also ultra-silent, printing at only around 45db, which is about as quiet as an average library.

Like Creality, Flashforge has learned and built on the success of their flagship Adventurer 3. So if you like what you see here, then you might want to check out the upgraded Adventurer 3 Pro which has higher filament compatibility and remote controls.
If you’d also like to check out the Adventurer line, you’ll see a hotter extruder temperature, quick heating, and much larger build area when compared to its predecessor, just about rivaling the Ender 3. It also has a built-in camera for remote monitoring and an easily replaceable build plate.
The adventurer 4 lite offers similar upgrades but at the cost of a replaceable build plate and camera. Be advised that the Adventurer 4 Lite is a misnomer, as it’s the same size as the Adventurer 4.
Ender 3 vs. Adventurer 3: At a Glance
Best for Value: The Ender 3 is easily one of the best-priced FDM printers on the market today. Its reputation of reliability and ease of use is rare in a printer costing under $200.
While fairly standard in design, its lack of bells and whistles makes it great for beginners too. All in all, the Creality Ender 3 is a great first 3D printer, or an excellent addition to a seasoned hobbyists workshop.
While not perfect by any means, the large build volume and easily earned accolades make the Ender 3 a budget 3D printer fan’s dream.
Premium Option: If you’ve got extra money to spend and aren’t too impressed with the Ender 3 or others in its range, then the Flashforge Adventurer 3 is the better choice.
Also extremely easy to use, the enclosed build area is rare in FDM printers and makes it both safer and quieter to use than the Ender 3 and indeed many FDM printers of similar cost.
As a teaching tool, the Adventurer 3 is invaluable, as it’s designed to be used by people of all experience levels and even in schools.
The main drawback is that the Adventurer 3 has a very small build area for its price, at only 150mm³, it’s very small compared to the Ender 3 or even other FDM printers around the same price.
Ender 3 vs. Adventurer 3: 3D Printer Comparison
Build Volume
| Creality Ender 3 | 220 x 220 x 250 mm |
| Flashforge Adventurer 3 | 150 x 150 x 150 mm |
As far as build volume goes, the Ender 3 is a clear winner. With its build volume of 220 x 220 x 250 mm, it dwarfs the Adventurer 3’s 150 x 150 x 150 mm.

Of course, build volume isn’t everything. But it does mean that the Ender 3 has the capacity when it comes to bigger prints like cosplay additions and busts. So if you’re looking to think big, then you’ll want a printer that has a much larger print volume than the relatively small Adventurer 3 offers.
Even the upgraded Adventurer 3 Pro has the same size build volume, making the standard Ender 3 an easy choice if larger projects are on your horizon.
Winner: Creality Ender 3
Print Bed
| Creality Ender 3 | self-adhering |
| Flashforge Adventurer 3 | flexible |
The print bed distinction is one of the biggest differences between the Ender 3 and the Adventurer 3.
The Ender 3 offers a self-adhering print bed, using magnets to keep it and your print in place. This eliminates the more traditional need for glue or tape to keep the print still and prevent warping or unwanted movement mid-print.
This self-adhering bed also makes removing your prints a little easier, lowering the risk of breaking on removal. With a simple, and careful, use of a spatula, removing your project from the Ender 3 is exceedingly simple.
While the Adventurer 3 isn’t quite as stable, it instead uses a flexible heat bed to remove the need for scraping. By carefully bending the platform once it’s cooled, your project can be easily and painlessly removed.
The Adventurer 3’s enclosed print area means that adhesion isn’t as important as it is with open build areas like the Ender 3’s. This is because your prints will be less exposed to outside variables like drafts that are known for warping and misshaping prints.

Both models offer heated beds of up to 100℃, further helping with bed adhesion. So the only real decider here is which method of print removal you prefer between the two. The Ender 3’s build plate is designed to heat up very quickly, however, taking only 5 minutes to reach its maximum temperature.
So while the build plate comparison here comes to a tie, the Ender 3 is your best call if you value speed.
Winner: Tie
Bed Leveling
| Creality Ender 3 | manual |
| Flashforge Adventurer 3 | manual |
Bed leveling is often a tedious part of FDM printing. While the more expensive FDM printers offer automatic leveling, it’s not to be expected in budget printers such as these.
Unfortunately, neither the Creality Ender 3 nor the Flashforge Adventurer 3 offer automatic bed leveling. However, you can modify the Ender 3 with an automatic bed leveling upgrade.
If automatic leveling out the box is a must for you, then you’re better off checking out the rest of the Ender 3 line. The Ender 3 V2 Neo offers automatic bed leveling, as do the S1 and S1 Pro. Be careful, however, as the standard Ender 3 V2 still does not have automatic bed leveling, and so it must be done manually.
Ender 3’s solution is elegant in its simplicity. The adjusting knobs to level the bed manually are deliberately large and easy to manipulate without needing to squint, which takes a lot of the tedium out of the leveling process.
The Adventurer 3, further leaning into its easy usability, simply has 9 different bed leveling settings adjustable with the built-in touchscreen. While this does mean it lacks precision, it also takes a lot of the guesswork out of the equation and helps you get used to what bed leveling is and the best ways to go about calculating it.
Winner: Tie/Ender 3
Extruder
| Creality Ender 3 | 0.4mm diameter, 240℃ max temp |
| Flashforge Adventurer 3 | 0.4mm diameter, 240℃ max temp, detachable nozzle |
The extruders for both the Ender 3 and the Adventurer 3 are comparable. Both have a diameter of 0.4mm and they both heat to the same maximum temperature of 240℃.
The only main difference is that the Adventurer 3’s nozzle is detachable for easy replacing, repairing, cleaning, or upgrading. For this alone, the Adventurer 3’s extruder is the better choice, because even if you are in any way disappointed, you can change it out with ease.
Winner: Adventurer 3
Filament Compatibility
| Creality Ender 3 | PLA, ABS, TPU, Wood, & Copper |
| Flashforge Adventurer 3 | PLA & ABS |
Both the Ender 3 and the Adventurer 3 support ABS and PLA, but the Ender 3 has a wider range of compatible filaments.
As well as PLA and ABS, the Ender 3 is compatible with TPU and specialty filaments like wood and copper.
If, however, you prefer the enclosed build area and easy usability of the Adventurer 3 but are put off by its limited compatible filaments, then it’s definitely worth your time to check out the Adventurer 3 Pro.
Enclosed build areas are ideal if you plan to use ABS filament, which is more prone to warping when exposed to the elements as it would be with the Ender 3 (although, you could just pick up an enclosure for the Ender 3).
The newer Adventurer 3 Pro has – among other upgrades like a hotter nozzle and glass build plate – a much higher range of usable filaments like PETG and specialty PLAs like marble and fluorescent.
Winner: Ender 3
Ease of Use and Assembly
| Creality Ender 3 | DIY assembly |
| Flashforge Adventurer 3 | comes assembled |
The Creality Ender 3 is a very simple machine designed for easy usability for 3D printing enthusiasts of all levels. This makes it a great choice for both beginners and 3D printing veterans.

That being said, the Adventurer 3 is about as simple as it gets while still being a powerful machine. It’s entirely controlled by the touchscreen and is deliberately limited in its settings (like with bed leveling) to make it very easy to use for complete newbies.
Designed as a teaching tool, the Adventurer 3 will have even the completely inexperienced printing confidently in no time.
The Flashforge Adventurer 3 also wins in terms of assembly. While the Ender 3 requires DIY assembly (marketed as an enthusiast’s dream) that’s estimated to take 2-4 hours depending on your experience, the Adventurer 3 is practically ready out of the box.
Winner: Adventurer 3
Price
| Creality Ender 3 | $189 — Available at Creality store here |
| Flashforge Adventurer 3 | $369 — Available at Flashforge here |
Even at its cheapest, the Adventurer 3 is almost double the price of the Ender 3, which can seem like a bit of a rip-off when you compare the build sizes.

If these qualities aren’t worth the extra ~$180 to you, then we absolutely recommend the Ender 3 instead. Its DIY assembly and open build area are a small price to pay for its price of under $200.
While you do get what you pay for with either machine, the Ender 3 is the better option if you’re on a budget or simply don’t want to spend too much on a printer.
The Adventurer 3’s higher price tag is mainly attributed to its enclosed build area, extreme ease of use, and the fact that it comes pre-assembled.
Winner: Tie/Ender 3
OVERALL TOP PICK
Creality Ender 3
Available at:
CONSISTENT PICK
Flashforge Adventurer 3
Available at:
Ender 3 vs. Adventurer 3: Our Verdict
Both the Creality Ender 3 and the Flashforge Adventurer 3 are impressive machines in their own right, though the choice of which one is the best comes entirely down to your priorities.
If you want to make bigger 3D projects without spending a lot of money, and don’t mind assembling it yourself or needing to watch out for outside variables while printing, then the Ender 3 is definitely the right 3D printer for you.
If you’re a complete beginner or are trying to teach a friend or loved one about 3D printing, then the smaller and safer Adventurer 3 will definitely be worth the extra expense.
And if you’ve got the budget, consider upgrading to the new Ender 3 S1 and S1 Pro range. We recently reviewed the Ender 3 S1 Pro (shown below) and thought it was great – but it costs more than the Adventurer 3 or standard Ender 3.

Related Posts:
- Ender 3 vs Ender 5
- Ender 3 V2 vs Ender 5 Pro
- Sovol SV06 vs Ender 3 (V2 / Neo)
- Ender 3 Extenders: The Best Extension Kit Upgrades


