
Creality Sermoon V1 Review: Summary
Creality’s Sermoon V1 3D printer is a great basic 3D printer for beginners, kids, and small spaces.
3D printing is growing massively, and every year more and more people get their hands on a 3D printer.

Creality Sermoon V1
Pros
Great for beginners and kids
Very simple to use: one-touch filament feed in, magnetic print bed, no assembly required, and enclosed
Low price
Quiet – I ran it all night on a 15-hour print, and in my one-bed apartment it did not disturb me
Cons
Smaller than average build volume
But, 3D printing can be intimidating. Some don’t have a background in tech or electronics, and might find designing or sending 3D model files to be a step too far, or you might not have much space in your crowded apartment.
If this matches you, you’ll need a printer that fits your lifestlye. The Sermoon V1 is Creality’s attempt at a user-friendly, beginner 3D printer that’s great for teaching kids the basics of design, manufacturing and engineering principles.
A 3D printer for kids needs to be safe, easy to use, and work without having to troubleshoot too many technical problems. Both the Semoon V1 and V1 Pro (we tested the standard V1) can print right out of the box – without any assembling or leveling required. One-touch filament feeding is also a nice touch.
Other nice features include the magnetic print bed, designed for flexibility and stable, consistent printing, as well as easy print removal after your model is done. Unlike most printers in its price range, the Sermoon V1 has WiFi connectivity, and you can print directly from your smartphone if you download the Creality Cloud app – and even track your print remotely.
It’s also very quiet – printing at around 45dB.
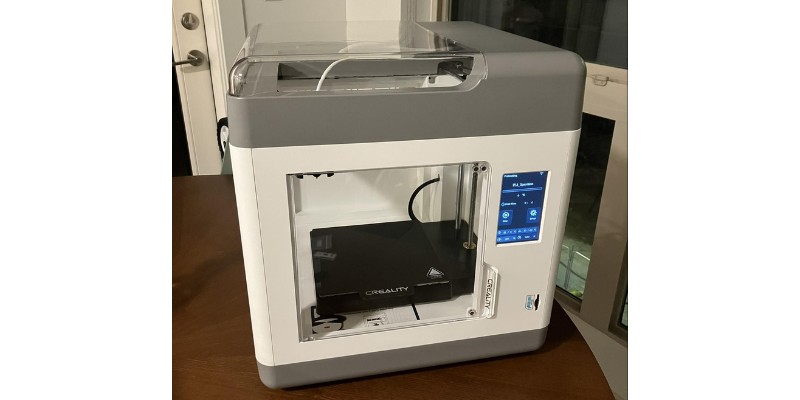
However, if you’re looking for a larger 3D printer, look elsewhere. Naturally, enclosures limit your build volume, and the Sermoon is smaller than other entry-level Creality printers such as the Ender 3 V2 Neo (which you can also read our review on).
The Creality Sermoon V1 has a build volume of 175 x 175 x 165 mm, so you’ll need to decide whether this limits you with your planed print projects.
Set-Up
Unboxing
The box arrived in the mail with no signs of damage. Unboxing the machine and all the extras included in the package was simple. The cutest mascot – Creality’s Cuva – greeted me from the side of the package.

The package doesn’t come with a full physical manual, but it does include a small pamphlet with a QR code that directs you to the manual. I found the written setup directions a little bit confusing, but luckily Creality has made a very helpful unboxing video.
Have you ever bought something and opened it with excitement, only to have your momentum grind to a halt while you search for batteries? Products can’t be ready out of the box unless the box contains everything you need.
The Sermon V1 package did just that – it had clipper pliers to remove the zip ties from the packaging, a mini screwdriver, an extra nozzle, and a selection of hex keys. The entire workflow from receiving to starting your first print was clearly thought through, and everying was packed to set me up for success.
Assembly and setup
Following the instructions in the video, I was able to get the Creality Sermoon V1 unpackaged and ready to use in a few minutes. There were a few pieces of protective foam that need to be cut out, and plastic removed from the surfaces of the windows.
The instructions were clear and thorough. The only place where someone might get hung up is with the voltage.
The factory default voltage is 230V, which is too high for standard American outlets. They remind you a few times to adjust the voltage to your local voltage if necessary. Once I verified my voltage needs it was simple to switch the machine to its 115V setting which is compatible with my outlets.
The video walks you through loading filament through the nozzle. This was a very straightforward process. Run the filament through the tube as directed, and press the small lever on top to feed it into the nozzle.
There is no need to calibrate anything or level the printer bed. Everything comes ready to go so you can get to printing without delay. You don’t even have to figure out how STL files work and choose one for your first print. The package comes with an SD card preloaded with several files you can choose from that are all ready to print.
Sermoon V1: First 3D print test
Getting Ready
Figuring out how 3D modeling works and how to use different files is a huge barrier for new 3D printing enthusiasts. They are complicated, and a lot can go wrong. That is why it’s so cool that the Sermoon V1 comes with an SD card that has multiple models all ready to go for you. That is key for this machine being true out-of-the-box printing. You can go from cutting the tape off of the packaging to starting your first print in under half an hour!
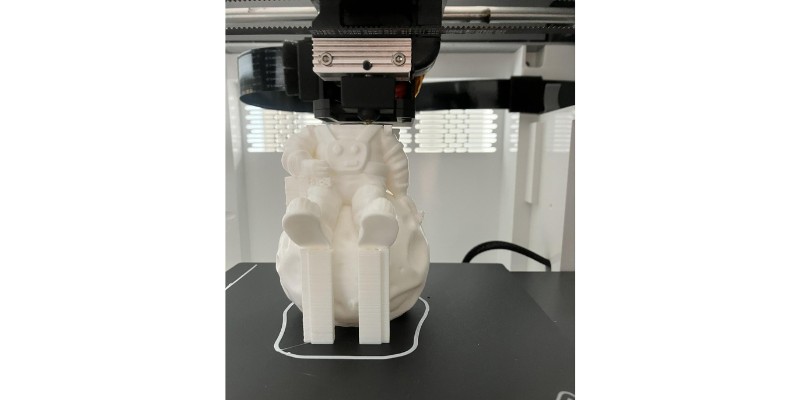
I chose the “Space Man” file on the SD card for my first print. It’s the one they print in the video tutorial, and I thought the finished model of an astronaut sitting on the moon looked great. This print took about 15 hours, so if you are looking to see results as soon as possible you could choose something that would print more quickly.
I didn’t change any settings, I chose my file and let the machine do its work.

Printing
I was curious to see how this printer would deliver on its “silent printing” claims. I live in a one-bedroom apartment and set the printer up in the main room. Since my Space Man model was a 15-hour project, I ended up letting it print overnight.
While there is a soft whirring audible near the machine, from the other room I couldn’t hear it at all. That quietness makes it compatible with makers like me who live and craft in a small space.
The machine is fully enclosed, but has windows on 3 sides and the top so you can keep an eye on your print from every angle. It was fun to feel safe enough to lean in and watch the 3D print happen without worrying about accidental burns or injuries.
The Sermoon V1 Pro has a feature that automatically locks the door during printing which makes it especially safe for children who may be curious. I tested the basic version, so the door doesn’t lock, but the magnet keeping it in place is strong enough that the door can’t be accidentally bumped open.
There was no detectable smell in the room during printing. I was curious to see if printing in a small space would affect the air quality, but my indoor air quality monitor did not spike. That made me feel better about the potential exposure to fumes.
Results
I set the print to run overnight, and in the morning the part was finished and the printer totally cooled down. The magnetic printer bed was secure but easy to remove without messing up the part. It was easy to remove my Space Man print from the printer bed.
The part turned out great. It was a pretty detailed model and the small pieces all came out correctly even without any kind of calibration. The surface of the model was very smooth.
I had some trouble removing some of the supports and even damaged the piece a little bit while trying. Ultimately that was fine and only happened because of the way the supports were built in the file, not because of the printer itself.

I was impressed with the quality of my little Space Man model. It was amazing to get something so refined with no changes to the settings. Truly straight out of the box.
Creality Cloud App
Downloading the App
From the instruction pamphlet that came with my package, I was directed to download the Creality Cloud App. Finding it and setting up an account was quick and simple.
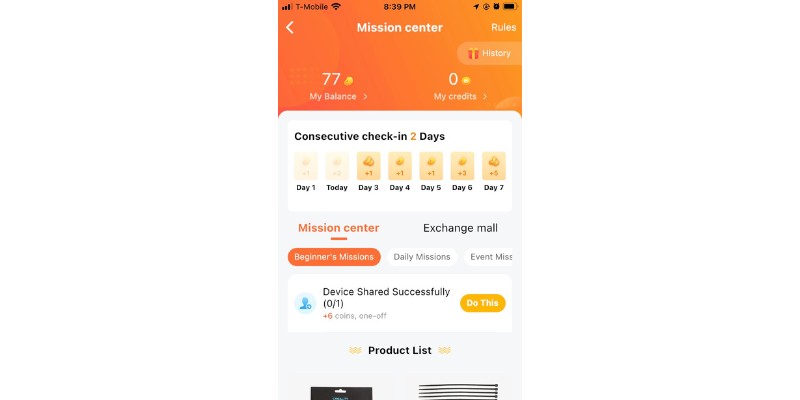
Creality has designed its app to be engaging and make normal 3D printing tasks feel like video game quests. Users earn “cuvacoins” (the in-app currency) by doing things like logging in to the app daily, uploading files, participating in groups, and starting printing projects.
You can redeem your cuvacoins for model files and even physical products like filament or replacement nozzles. Looking through the app, the cuvacoins were more useful than I expected for an in-app currency.
Beginners, especially kids, might enjoy earning cuvacoins while learning more and experimenting with 3D printing.
The app walked me through linking a device. I was easily able to connect my new printer to wifi and connect it to my account on the app via Bluetooth.
Once my printer was connected it was simple to find a fun file to print – there are hundreds of options right there in the app – some free, others paid.
I wanted to see how the printer would be able to handle something a little bit more intricate without any manual leveling or changing the settings. I chose an articulated snake so that I would be able to see in the model’s movement if something had gone wrong during printing.
Second Print
Sending Print from the app
I was nervous that sending the file to print from the app would be more difficult than printing something preloaded on the SD card had been. It ended up being even simpler. Once I had picked which file to print, it was only a few clicks before my machine was whirring away, working on that first layer.
It was cool to be able to see the status of my project throughout the whole printing process. The app gave me an estimated project time before I began, then continued to update it over the course of the print.
It also told me exactly which layer was printing out of the 71 layers my snake needed. When the print was over it told me exactly how long it had taken- 10 minutes quicker than the estimated 9 hours.

Results
Once again, my model printed exactly as expected. It was easy to remove from the printer bed once it had cooled completely. This time I had no trouble removing the supports from my finished part. That confirmed that the problem before had been the Space Man file supports being too strong.
My articulated snake was able to move completely smoothly. As any seasoned 3D printer knows, you can achieve movement with a 3D printer that is totally different than any conventional plastic toy. This printer would be a great way for a child to learn to 3D print and create interesting toys to learn about engineering.

Creality Sermoon V1 Review Summary: Should You Buy It?
The Creality Sermoon V1 3D printer is a great choice for beginners, especially kids and people with small spaces.
I was very impressed by the Sermoon V1’s print-out-of-the-box capabilities. The package included everything a new maker needs to get straight to printing. The system required little setup and no assembly, leveling, or calibration at all before it was ready to print. Unboxing to first print only took me about 30 minutes. That quick turnaround is great for encouraging newbies to stick with printing.
The Creality Cloud App was easy to figure out and makes WiFi printing accessible to anyone.
The biggest drawback to the Creality Sermoon V1 is the small build size. However, if you are going to be printing in a small space and don’t have a lot of room on your desktop, a smaller machine like this is a great choice. The downside of the smaller max build size is also made up for by the fact that the build plate is fully enclosed, which makes it extra safe.
The Creality Sermoon V1 3D printer is a step toward making 3D printing more accessible to new audiences.
Creality Sermoon V1
Pros
Great for beginners and kids
Very simple to use: one-touch filament feed in, magnetic print bed, no assembly required, and enclosed
Low price
Quiet – I ran it all night on a 15-hour print, and in my one-bed apartment it did not disturb me
Cons
Smaller than average build volume
Related articles:
- Ender-3 V2 Neo: A Hugely Improved Classic [Review]
- Creality Halot One Plus Review
- 3D Printer Spotlight: Testing The Creality CR-10 Smart
- Creality Ender 3 S1 Pro Review: Best Under $500?
- Toybox: A Family-Friendly 3D Printer [Review & Test]
- The best enclosed 3D printers


