
3D printing is taking off everywhere. Tired of simple 3DBenchy and other prints, makers are searching for exciting new 3D printer projects to tackle in their spare time.
When 3D printing at home, a case of analysis paralysis often leaves us wondering what 3D printing project to embark on next.
While many of the coolest things to 3D print include toys, clothing, and even car parts, there are also plenty of 3D printing engineering projects that require more assembly for those looking for a more detailed and creative way to use their printers.
Here we will look at some of the best 3D printer projects being made at home and in businesses everywhere.
Deer Scarer – A Traditional Japanese Fountain 3D Printing Project
Also known as a Japanese Fountain, deer scarers are known for their place in zen gardens and their soothing water noises and satisfying clunks.
This neat water feature feels comfortable anywhere relaxation is necessary, and makes for a great 3D printer project for anyone wanting to sneak a little more zen into their lives.
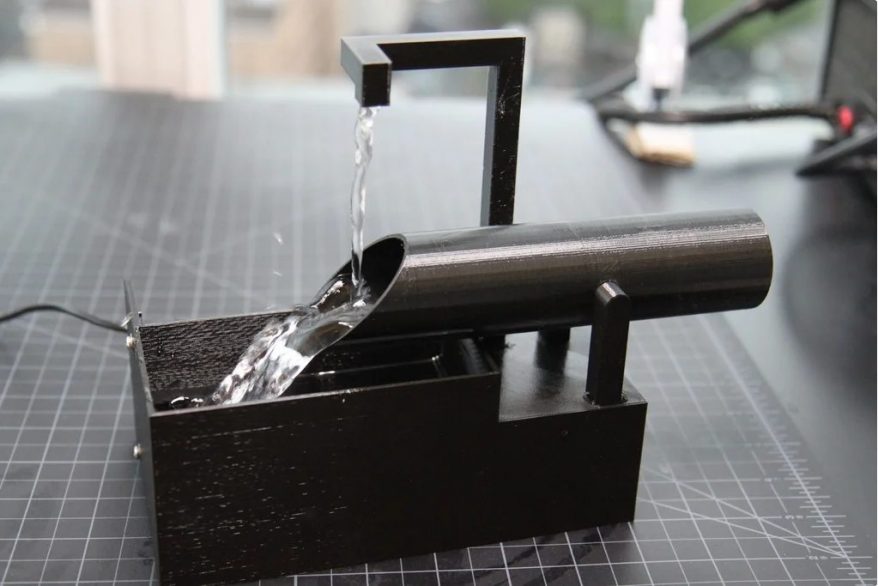
It’s worth noting that as well as the 3D printed pieces, extra parts are required to make the Deer scarer functional. These include:
- A pump
- Vinyl tubing
- 12mm screws, M3 nuts, and M3 Washers
- Silicone sealant (though silicone caulk will also work)
- A DC power supply
The main thing to keep in mind when printing is that the main tube designer recommends that the main tube is printed using an infill of around 70% to ensure the correct balance.
Ensuring the pump fits is as tight as possible is important to avoid leakage.

Following the instructions and files for this 3D printing project are available for free here, you’ll soon have your own 3D printed deer scarer is complete and ready to go anywhere!
Note: This 3D printer project uses both water and electricity. Caution is advised.
The Joy Robot – 3D Print a Pal!
Designed as an entertaining little companion for children’s hospitals, this adorable little Joy Robot makes for an excellent and rewarding challenge as a 3D printed project for engineers and robotics aficionados.
However, this project requires a lot more work than simply printing and gluing together. Motors are required to allow the robot to roam around and move its limbs and head, and the face is made up of an LCD display that can also be altered remotely to show various facial expressions and even make it blink.
More than a simple RC toy, the Joy Robot is an adorable 3D printer project that requires some good hardware and a fair bit of know-how, as some of that parts will be difficult to construct with smaller 3D printers.
What you will need:
- PLA filament
- Screwdriver and Bolts
- Super glue
- Pliers and cutters
- Soldering iron
- Wiring
You will also need a wide array of different electronics, which are laid out in detail in the link below. These include servo motors for movement. Remaining hardware required includes wheels, as well as nuts and bolts that can be found in most workstations.
Circuitry and software installation is the trickiest part of this project, but fortunately there are detailed tutorials available to ensure a smooth build of this project here, along with the free files. The creator simply asks that their creation be shared and a donation given if possible, which is a more than fair exchange for one of the coolest 3D printing projects we’ve ever seen!
And if you find yourself enjoying the likeness of this cute little guy, you can find the files for a statuette of the little guy to be used as a toy or a charm here.
If this 3D printed project has got you intrigued, you might also be interested in our article about 3D Printed Robotics.
Prosthetics — A 3D printer project to make a real difference
The medical applications of 3D printing are currently being used to help in many forms of healthcare. 3D printing in the dental industry has seen numerous breakthroughs in recent years, and the projected uses of medical 3D printing could save millions of lives.
Among these medical applications are 3D printed prosthetics for amputees and people born with limb difference.
Traditionally, a prosthetic limb took at least a week to make and cost thousands of dollars. The fitting needs to be made with plaster shaped to fit the individual.
These waiting times can be difficult for patients, and the high costs render some unable to afford the prosthetics they need to live comfortably in ways many of us take for granted.
3D printing complements the creation of prosthetics to save both time and money, making them far more accessible to those who need them. A CAD model is made from a simple scan of the affected area in as little as fifteen minutes. This scan can then be sent anywhere for printing. From this scan, the print can be made in any color or style.
There are many different ways these 3D printed prosthetics can be customized. From realistic limbs that match the patient’s skin tone, to Iron Man arms and gauntlets; all suited to the tastes and needs of the patient.
This printing process is fast, though printing times depend on complexity. For example, it takes as little as 14 hours to 3D print a fully articulated prosthetic hand.

Once the 3D printed prosthetic is finished, it can be fitted to the patient to ensure correct size and comfort. From there, the patient can then begin physical therapy as necessary to acclimatize themselves to their new limb.
A major benefit of 3D printed prosthetics is that the CAD files from the initial scan can be kept forever.
This means children who receive 3D printed prosthetics will be able to have their scans simply resized and newly printed as needed so their prosthetics can continue to comfortably suit them as they grow.
3D printing medical applications are seeing use all over the world, and 3D printed prosthetics are already changing the lives of millions of amputees.
These 3D printing projects make much needed prosthetics far more accessible to many people in need.
Fully Mechanical Robot Arm – Reach for the Stars!
Robot arms are intriguing things, it’s fascinating how a few servo motors and the right amount of artificial ligaments have changed the way we look at factory lines and mechanical workshops.
This designer took it up themselves to create a motor-free (i.e., fully mechanical) robot arm that fits comfortably on a desktop.
Anyone wishing to learn about or teach mechanical engineering should find this to be a satisfying and rewarding 3D printer project. As it’s a completely motor- and electricity-free design, this robot arm works very well as both an example of basic technology as well as being an impressive print in its own right.
The files are available for free here. Those with more knowledge of circuitry may also be able to alter the design to fit a motor if they wish.
Maneuvering the arm may seem tricky at first, but this is a 3D printer project that would make a cool addition to any desk.
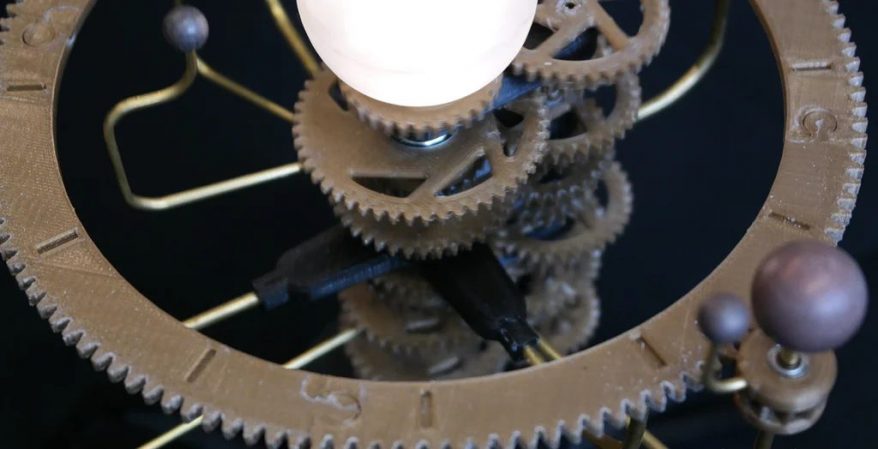
A Mechanical Planetarium and Orrery – Out of This World
3D printing engineering projects don’t get much more satisfying than fitting together working gears.
Because of this, orreries are one of the best, and most intricate, ideas for a 3D printing project available, and our favorite is this mechanical planetarium (Pluto optional).

Your creativity can shine when printing the planets, as each one can be painted to be either realistic or look however you want. Any filament should work, as long as they’re consistent to ensure the parts all fit and work together.
Because this is a working mechanism, it’s very important to ensure steadiness and precision when preparing the pieces to fit together.
Fortunately, the 3D printed parts all come with markers to show what gear needs to go where. Simply follow these markers and all the parts should fit without any hassle.
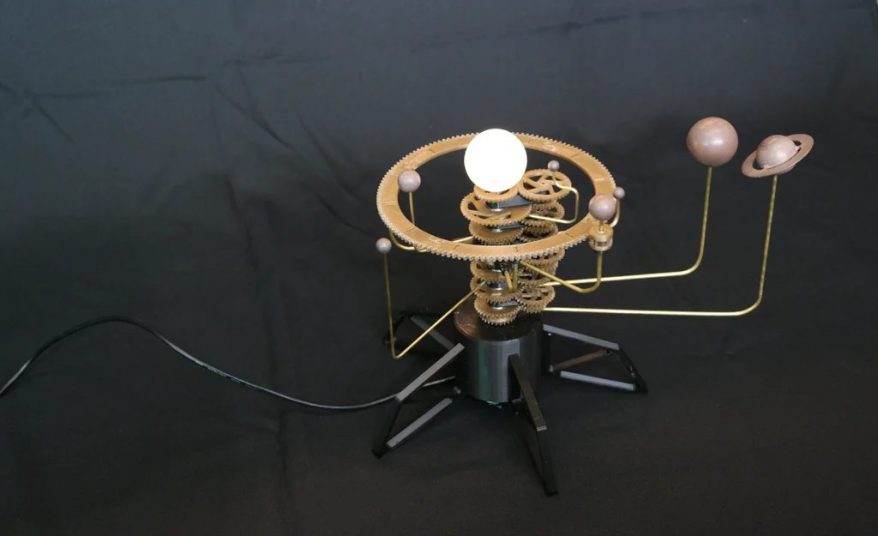
Some tubes need to be bent to attach the planets. Fortunately, the files linked below include a handy template for what tubes need to be bent for each purpose if printed on A4 at 100% zoom.
The moon can be adjusted after mounting, but ensure they’re as accurate as possible avoids collision and locking. It’s important to make sure that the moon’s distance from Earth remains equal.
Once you’re sure you have the moon where you want, secure it with super glue and wait for it to completely dry before resuming.
Now that you’ve got every part of your 3D printed engineering marvel in place, simply get the planets to align and you’re done!
This orrery is a great talking piece, a satisfying pastime, and a great educational 3D printing project for students of mechanical engineering (or astronomy).
This mechanism is significantly more complex than most 3D printer projects, and therefore needs many additional components on top of your 3D printed parts, a list of which is included alongside the files here.
If you’re looking for something simpler, a more basic 3D printed orrery project can be found for free here.
Drones – From Printer to Sky!
Few things are as satisfying as literally letting a 3D printed project take flight. Because of this, 3D printed drones are an excellent project for anyone to undertake.
Due to their differing designs that vary in both complexity and capability, drones of all shapes and sizes can be made regardless of hardware, and with very little engineering knowledge.

There are many 3D printed drone files available for purchase, like the sleek one found here, but if you’re confident in your engineering skill, you can design one yourself or find and tweak prototypes that others have posted.
See also: our article on 3D printing drones.
The LEAF, named after its resemblance in flight to a fall leaf, is a prototype drone with a simple enough design for anyone who may not have the deftest of hands when it comes to remote controls. It requires only a few extra parts and is durable enough to handle a few bumpy landings.

You’ll need 4 brushless motors amongst other hardware to ensure this project takes flight, all listed in the link above. However, substitutions can be made if you chose to alter the LEAF from the original files.
Assembling the LEAF should be a straightforward yet rewarding 3D printed project for beginners, but its status as a prototype leaves it open for tweaking or even use as a simple base model for bigger, more complex drones.
Combination Locks — Easy and useful 3D printing project
One of the more practical 3D printing projects, combination locks are simple to print and come in very handy.
The first step in creating your combination lock is deciding the combination, namely how many numbers you want to open your lock and the order they should go in.

If you want to add a chain to the project, print the two halves of the lock separately and slot the chain link when it reaches the desired height. Take care not to let the metal collide with the print head.
The designer recommends using only the normal rings (not LT) for any combination over two digits.
Once printing is completed, this lock can be assembled following the instructions linked below and used to store money for safe keeping, or have a chain attached for some extra security wherever you need it most.
Once you’ve decided on your combination, you can begin printing. When printing, be sure to include the correct number of cylinders and chambers for your desired combination.

Available here as changeable digit locks, padlocks are an easy 3D printing project for beginners who are looking for something a little more complicated than standard prints.
Ferris Wheel – All Around Great
Big 3D printer projects don’t necessarily need big 3D printers. This motorized Ferris Wheel (seen in action in the video below) is a great project for anyone with smaller 3D printers who don’t mind a lot of post-print construction.

It’s hard not to compare the assembly of the Ferris Wheel to the building of a model miniature or 3D puzzle. With hundreds of parts to print and a lot of work, this is a project for which you’ll need to dedicate some serious time, but the results speak for themselves.

The designer of this project has included and in-depth explanation of both the printing and assembly, right down to bed leveling and attention to screw placement. This beginner-friendly approach to detailed instructions have been well received in the comments, though you will need to brush up on your French if you want to read some of the more complicated replies.
Kit Cards – Fun DIY 3D printing projects for all ages
If you’re looking for a new 3D printing project but want to leave the assembly until later, or are just looking for a fun project to share in later, kit cards are the way to go.
From the Millennium Falcon to a Da Vinci-inspired catapult; many 3D printed kit cards are available.
The beauty part of kit cards is that they’re printed in one go. Simply by selecting your desired material and color, you can set your 3D printer to work.
PLA can be used as well as the rougher materials, as long as they can be easily snapped off the card.
Most kit cards will require glue to be assembled. Though some, like the Da Vinci catapult, will only need to be slotted together, using only wire or string for tension.

Different projects have different instructions, but most CAD files will come with these. Or you could wing it and see how you do flying solo!
The best part about 3D printed kit cards is their potential to bring out your inner hobbyist.
Whether you’re looking to keep your hands busy or spend some creative time with a loved one, kit cards make for great educational exercises!

Once assembled, just decorate the completed structures to your liking. If you didn’t need glue, they can be disassembled and reassembled for further practice.
3D printed Millennium Falcon kit card here / 3D printed Da Vinci catapult kit card here
The Smart Alarm Clock – Potential Takes Time
This open-sourced project, simply named ‘Smala’ is a Wi-Fi connectable alarm clock that auto-adjusts and can be built and modified to act as far more than a simple clock.
While only the case is 3D printed, and the engineering involved is more electrical than mechanical, Smala makes for a great 3D printing project that’s loaded with potential.

Beginners to engineering can simply follow the detailed instructions here, while more advanced engineers will find the included files to be malleable enough to tweak and change this alarm clock to be almost anything you want.
Software and coding specialists will also find the use of the Raspberry Pi to be of great use in modification, and can enable features such as Bluetooth connectivity and even voice activation!

While the files can be found here, you can find much more information in the main wiki.
Electric Coffee Maker – Morning Brew
Where would we be without coffee? Even if you’re one of the lucky few who doesn’t need a good caffeine kick to get your day on track, it’s difficult to ignore the economic and social significance of those little magic beans.
Coffee comes in all shapes and sizes, as does the apparatus used to prepare it. This 3D printing project idea is open for optimization and customization, so just like a good cup of joe it’s great project to fiddle with to get just right.
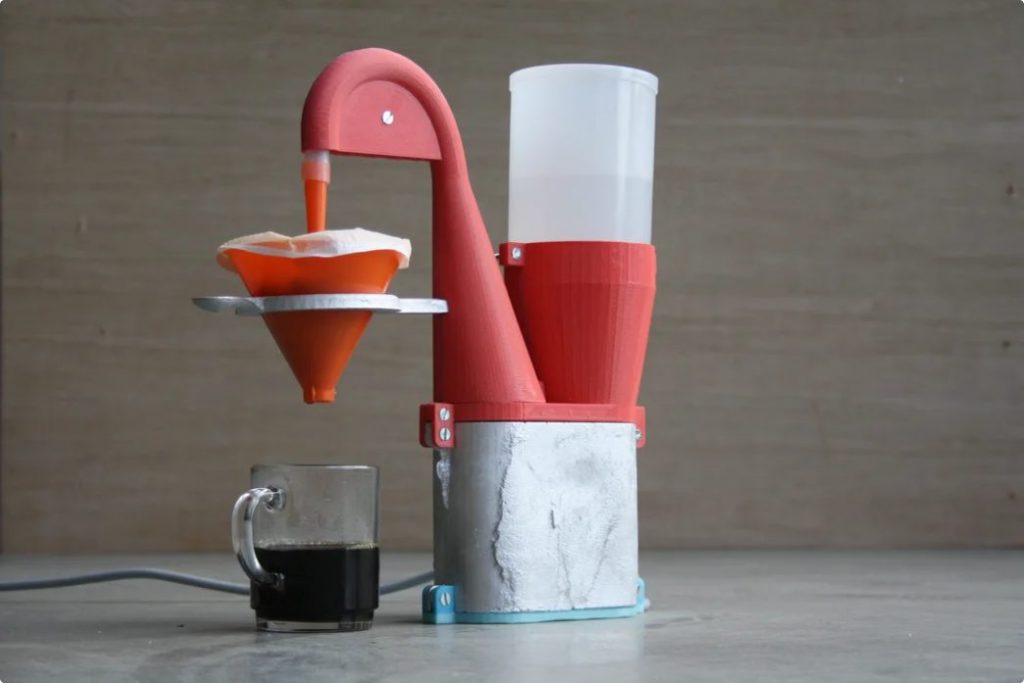
This is once again a 3D printing project that will require caution during assembly, as it involves both electricity and water.
With a little metalwork and some creativity, the 3D printed coffee maker can make a great addition to your kitchen. Coffee tastes all the better for having been made through equipment you’ve made yourself!
An important thing to keep in mind is the printing material you choose. While most PLA filaments are considered food safe, it’s always a good idea to double check that your final product is safe to us for food and drink.
Because the electric coffee maker requires electricity, it does need some additional parts, which are listed with the files and instructions found here.
Drawing Machine – Print to Sketch
Have you ever wondered what would happen if you combined a CNC machine with a 3D printer? Well, the answer would probably be this partially 3D printed drawing machine!

While the extra parts may not be cheap, the end result is hard to argue with. This drawing machine is not only a great 3D printing project to get your creative juices flowing, it’s also a great addition to any garage or studio.
The video below outlines in great detail the process of getting this project up and running from scratch.
When you’re done, your new drawing machine can be set up to draw works of art, placemats, or anything else you need from pencils, pens, markers, chalk, or anything else you can clamp onto the holster!
The files and instructions for this awesome 3D printer project are available here.
Mechanical Clock – A useful and practical 3D printer project
As we’ve already seen with the orrery, 3D printing projects are not only for statues and ornaments. 3D printing can also be used to achieve working mechanisms, and what better mechanisms to make for your next project than a clock?
Like a good 3D puzzle, the different gears slot together once printed. Held together with screws and kept in motion with an anchor escapement, this 3D clock project is not only satisfying to put together, but very cool to see in motion.

The designer has even optimized the files so that even older printers will be able to make a working model. So even if you’re a 3D printing veteran with some outdated equipment, that shouldn’t stop the mechanical clock from being your next awesome 3D printer project.
The materials and guidelines can be found here, and assembly is very simple.
Because of the relative simplicity, the clock is a great addition (not to mention talking piece) for your home, but can also be made to sell. Any color and design will do, and the design can be tweaked for size, so any manner of customized clock can be made for yourself, or for online shoppers! You can check out our article on the best 3D-printed clocks for more.
Other project articles to check out:
- 3D printer projects for absolute beginners
- 3D printer projects for engineers
- 3D printed robotic arm projects
- Raspberry Pi projects


