

Key Takeaways
- Nozzle temperature: Use a temperature tower test to find the optimal nozzle temperature for PETG.
- Travel speed: Increase the travel speed gradually until stringing is reduced or eliminated.
- Retraction settings: Adjust retraction speed, distance, minimum travel, and vertical lift to prevent oozing.
- Filament quality and dryness: Use high-quality PETG filaments and keep them dry with a filament dryer or storage box.
Stringing can happen in all filaments, but PETG stringing is more common than most others. When it happens, you’ll see unwanted, thin, plastic strands on your 3D printed object.
Stringing in PETG occurs when molten filament oozes from the nozzle as it moves between two points, resulting in hair-like strings of plastic on your print. This over-extrusion may also create blobs – little bumps on your print that can ruin its surface finish.
But why is PETG particularly prone to stringing?
- Key Takeaways
- PETG Stringing Issues
- How Do I Stop Stringing in PETG?
- How Do I Stop My PETG From Blobbing And Leaving Zits?
- How To Fix PETG Stringing on the Ender 3
- How To Fix PETG Stringing on Ender 5
- How to Fix PETG Stringing on Prusa
- FAQs
PETG Stringing Issues
Compared to other filaments, PETG has a higher chance of stringing because of its high printing temperature (220 – 250°C). At such high temperatures, PETG is relatively more fluid. This makes it ooze smoothly out of the nozzle even when it shouldn’t, resulting in stringing.
But stringing shouldn’t always be the case while printing with PETG. Here are a few things you can do to stop it.
How Do I Stop Stringing in PETG?
You can stop PETG stringing by adjusting your nozzle temperature, travel speed, and retraction settings. You can also prevent it by using high-quality PETG filaments and always keeping them dry.
Read on to find out how you can put a final stop to stringing whenever you print with PETG. The 4 main fixes are:
- Adjust nozzle temperature
- Adjust extruder travel speed
- Change your retraction settings
- Keep your PETG filament dry
1. Adjust Nozzle Temperature

Why it affects PETG Stringing:
When it comes to 3D printing with PETG filament, the nozzle temperature is one of the most important factors to consider. Too low, and you’ll find that your print quality drops. Too high, and your filament will overflow and create strings.
Generally, PETG prints between 220°C and 250°C, but how do you get the perfect nozzle temperature for your PETG prints?
How To Fix:
To get the best results, the nozzle temperature should be just high enough to ensure the filament melts and flows correctly while adhering to the build plate. A good place to start is at about 245°C, though nozzle temperature will vary slightly depending on your printer and filament brand.
To get a good sense of the correct nozzle temperature for your printer and filament brand, use a temperature tower test.
The test instructs your printer to print a tower of multiple blocks. Each block is printed at a different temperature, with the base printed at the highest temperature. As the tower rises, the printing temperature drops by 5°C up to the final block at the top.
When the print is done, physically analyze it and decide your optimal printing temperature based on which block has the highest print quality.
2. Adjust Travel Speed
Why it affects PETG Stringing:
Travel speed refers to how fast the nozzle moves between gaps when it’s not extruding filament.
It’s essential to keep your travel speed reasonable for PETG because if the speed is too slow, your nozzle will have more time to drool out the melting filament. If the speed is too fast, print quality drops.
But if you’re printing at a reasonable speed, the nozzle will move quickly enough before the melting filament oozes and forms strings and blobs.
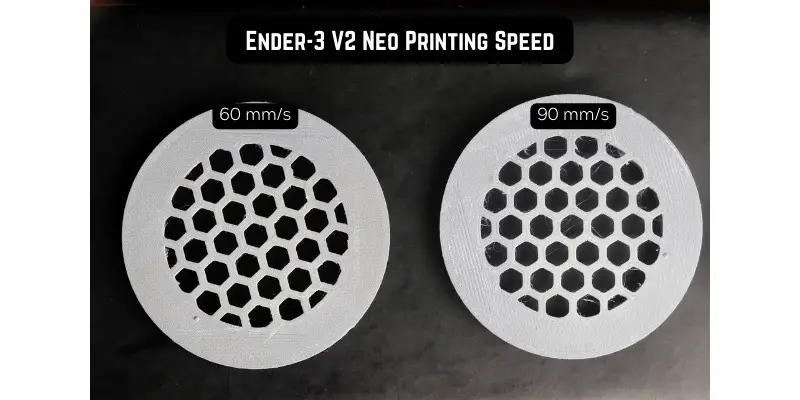
You can see in the image above how increasing speed leads to more stringing in the final part. This was from a recent review we did of the Creality Ender 3 V2 Neo, and applies to all 3D printers.
How To Fix:
Starting at around 90 mm/s, try increasing the printer’s travel speed gradually by 10 mm/s until you no longer notice any stringing or blobs.
3. Adjust Retraction Settings
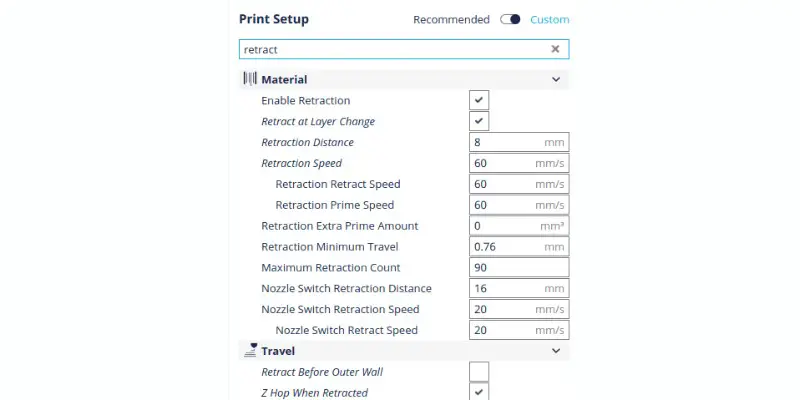
Why it affects PETG Stringing:
Retraction is the process of pulling the filament back up the nozzle after a move is completed. This prevents the plastic from being extruded while the nozzle is stopped, which reduces stringing.
The amount of retraction you’ll need can vary depending on your printer, filament, and model, so it’s better to experiment to find the best settings. So, where do you start?
There are four retraction settings you can tweak to control stringing. You can run a simple stringing test and see how the stringing changes as you change the following settings:
How To Fix:
Retraction Speed
Retraction speed is how fast the filament is pulled back whenever the nozzle moves between areas where no extrusion will occur. You want your filament to retract quickly before it has time to drip out in places it’s not supposed to.
With PETG, a retraction speed of 25 to 40 mm/s on Bowden tube extruders can get the job done without causing any stringing. On the other hand, direct drive extruders push the filament directly into the nozzle without going through a tube. Therefore, a retraction speed of 25 to 35 mm/s is enough to prevent stringing.
Retraction Distance
Retraction distance refers to how far back the filament is pulled away from the nozzle as it travels. Bowden extruders need about 2 to 5 mm of retraction distance. Direct drive extruders require 1 to 2 mm.
Retraction Minimum Travel Distance
This refers to the minimum distance your extruder has to travel before retraction occurs. If this distance is too much, it may prevent any retraction from happening, while tiny distances will constantly trigger retraction and make the printing process slow. To get an optimal retraction minimum travel distance for PETG, start at 2 mm and reduce the distance gradually by 0.1 mm until you find a sweet spot where no strings are noticeable.
Vertical Lift
This feature lets the nozzle move up a small distance to create a gap between it and the object during short breaks in extrusion. Also called Z-hop, it is said to prevent the unwanted filament from dripping onto the object as it prints, reducing blobs and stringing.
There are mixed opinions about its efficacy, but it certainly doesn’t hurt to give it a shot. In some slicers, you can also configure the vertical lift distance, but that should be a last resort.
4. Keep Your PETG Dry
Why it affects PETG Stringing:
It’s good practice to keep any filament dry, but it’s even more critical when working with PETG. This is because PETG has a greater tendency to absorb bits of moisture if left exposed in the open. Moisture expands PETG, causing clogging, nozzle damage, strings, blobs, and zits.
How To Fix:
It’s not always easy to create a moisture-free environment, but using a filament storage container can help. If you can’t immediately get one, keep the PETG away from humid, hot, and wet conditions.
If you suspect that your PETG has become moist, you can use a filament dryer to restore it to its dry state. Some of the best filament dryers we recommend include:
- PrintDry Filament Drying System, which allows you to dry wet filament in real-time as you feed it to your 3D printer. It also comes with a vacuum-sealed container and air removal pump to keep your dry filament dry.
- PolyMaker Filament Storage Box II, which includes a storage box with a built-in high-precision thermo-hygrometer that lets you monitor humidity and temperature.
How Do I Stop My PETG From Blobbing And Leaving Zits?
PETG zits and first-layer blobs commonly happen alongside stringing, so they are also preventable. The lumps and zits appear as small bumps on the surface of your printed objects.
They happen when the filament pressure remains high during retraction, causing a short burst of melted filament to get into a printed layer. This over-extrusion of filament shows up as a blob, zit, or some blemish in your print.
Just like stringing, you can prevent PETG zits and blobs by adjusting your nozzle temperature, travel speed, and retraction settings. Also, ensure your nozzle is clean because any residue or build-up can lead to blobs and zits. You should also slow your printing speed to about 40 – 60 mm/s.
Lastly, consider upgrading your filament if you want to reduce PETG stringing. We often underlook the quality of filament when troubleshooting printing problems, yet, it’s often the first line of defense against bad prints.
If you’re printing as a hobbyist, that’s okay. But if you want to take your print quality to the next level, you need to work with some of the best PETG filaments out there. Here are a few that have stood the test of time – and quality:
How To Fix PETG Stringing on the Ender 3
PETG Stringing on the Ender 3 Pro
If you’re working with an Ender 3 Pro, try these settings to fix PETG stringing:
- Bed temperature: 85 °C
- Nozzle temperature: 220 – 240 °C. PETG prints between 220°C and 250°C, but a temperature above 245 °C might cause nozzle damage.
- Retraction distance: 6 – 6.5mm.
- Retraction speed: ≤40 mm/s
- Print speed: 30mm/s – 50mm/s
PETG Stringing on the Ender 3 V2
Many of the print settings on the Ender 3 Pro will work on Ender 3 V2. However, the Ender 3 V2 has a carborundum glass plate, which has implications if you use PETG.
PETG sticks so easily to glass that it can even fuse into the glass plate itself. Over prolonged use, you’ll notice residues on the glass, which can spoil your first layer finish.
To stop this issue, we recommend using a glue stick or some good old blue painter’s tape on the build plate. Then, set the bed temperature at about 85°C to get a proper adhesion on your print. If you want more details on getting excellent adhesion with PETG, have a look at this PETG adhesion guide.
How To Fix PETG Stringing on Ender 5
On your Ender 5, use the same print settings as you would on an Ender 3. In addition, try adding cooling to your printing process. This will help the filament to cool more quickly, reducing the amount of stringing.
How to Fix PETG Stringing on Prusa
There are several ways to reduce stringing and oozing on your Prusa. But the most essential methods include optimizing your retraction settings and printing at a temperature of 220°C – 250°C. If you’re using the MK2.5/S or MK3/S/+, keep your retraction at a maximum of 2 mm.
You can also try sequential printing, which allows you to print each part separately and reduce stringing. To activate sequential printing on your Prusa, go to Print settings -> Output options -> Sequential printing.
FAQs
What is a good retraction for PETG?
With PETG, a retraction speed of 25 to 40 mm/s on Bowden tube extruders can get the job done without causing any stringing.
How do I get PETG to print smoother?
You can get PETG to print smoother by keeping your filament dry, reducing nozzle temperature, and optimizing retraction.
Related articles:


