Having tested the Revopoint POP 2 over the last few days, using it both as a handheld 3D scanner and a stationary scanner with the turntable, we were impressed with its precision, accuracy, and ease of setup for the price.
It was accurate when scanning stationary objects like toys, household appliances and other parts, and we also used it to scan parts to 3D print, and to scan faces (but read on for our tips for face scanning!). Our calibration test confirmed the accuracy of 0.07mm, so it’s great for the price – but still, don’t expect industrial-level quality.


For more beginner hobbyist makers who want to scan things to 3D print, you’ll have no problem setting it up and starting your 3D scanning adventure in just 5-10 minutes.
However, the software needs tweaking and improving. Some of the English doesn’t read completely intuitively in the software, and it could generally be improved and optimized.
For example, if you want to export an STL file, if you select where you want to export it to, but press the enter button on your keyboard instead of the “ok” button on the menu, it doesn’t export, but exits out of the export process as if you had. (This happened on Mac, I don’t know if this is also a Windows problem.)
But overall, while the software is just adequate, the Revopoint POP 2 hardware offers great quality for the price, and more than makes up for it.
3DSourced is reader-supported. When you buy through links on our site, we may earn an affiliate commission. Learn more
Main Specs
- Price: $699 – Available at Revopoint 3D store here
- Accuracy: up to 0.05mm (confirmed 0.07mm in our test)
- Camera setup: 2x IR sensors, projector, RGB sensor
- Technology: structured light
- Scan options: Fast Scan or High Accuracy Scan
- Scan modes: Features, Markers, Body, Face, Dark/Hair, Head
- Color: both color and no color scan modes
- Exportable file formats: PLY, OBJ, STL
Setup
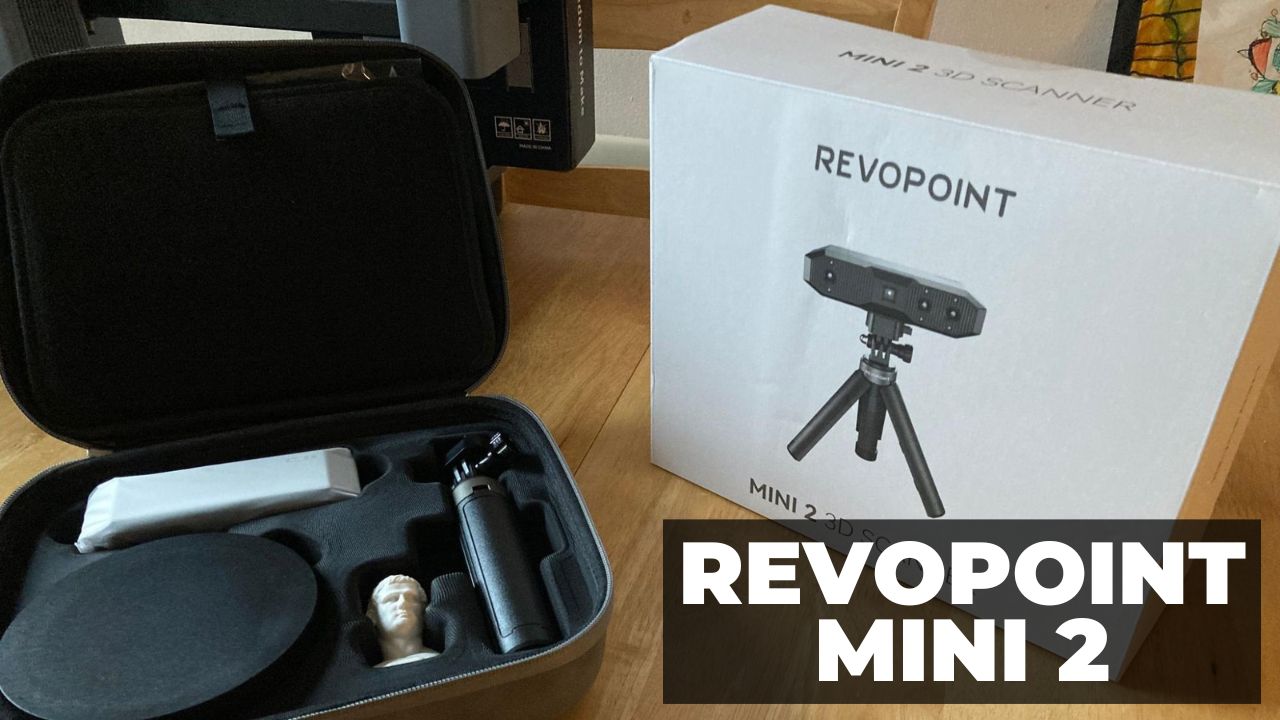
We received the Revopoint POP 2 Premium Edition, which comes in a flattering grey case containing the neatly-packed 3D scanner, turntable, and various accessories.
While the Revopoint POP 2 comes mostly pre-assembled, there is a short 5 minute assembly process to get the scanner up and running.
If you’re connecting it to your computer or laptop, there are cables for both Mac and Windows. We tested it using an M1 Macbook, and Revopoint package the POP 2 with a USB C cable, as well as a USB A 3.0, so you won’t have any trouble connecting or have to use an adaptor. However, the turntable cable only uses a default USB, so if you’re a Mac owner like us, you’ll need to pay a couple of bucks for an adaptor.
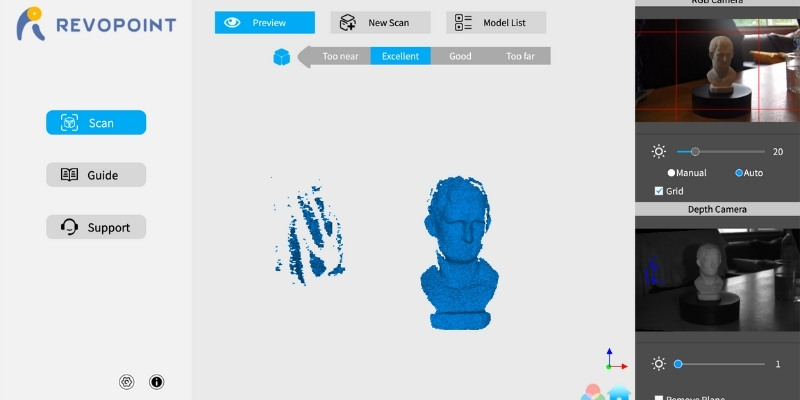
Once you’ve connected the cable via the Micro B 3.0 to the Revopoint 3D scanner, and then to your computer, load up RevoScan software. You can download it for free on Revopoint’s site. It automatically previews both the RGB camera and IR depth camera views, as well as the scanner data benign captured so you can adjust to the ideal scanning position.
THE REVIEW
Revopoint POP 2
Available at:
Revopoint POP 2 Review & Test
First Scan
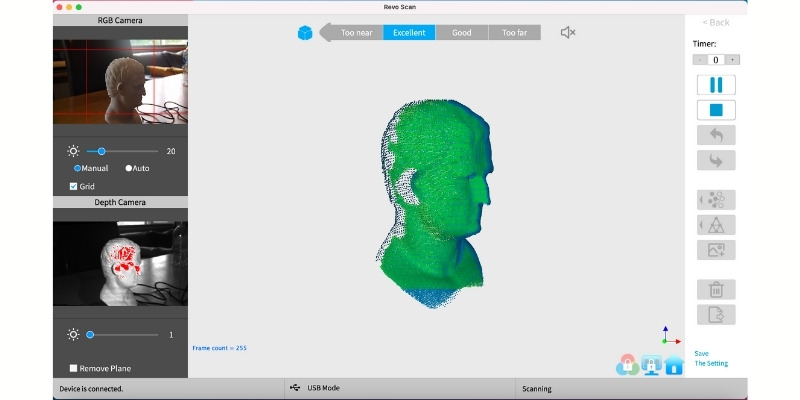
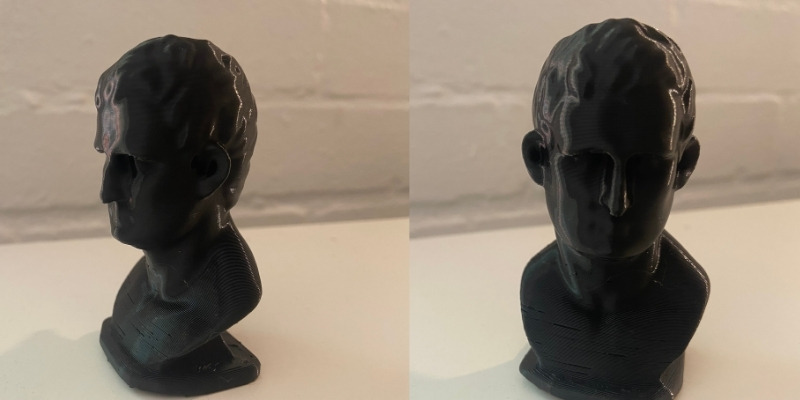
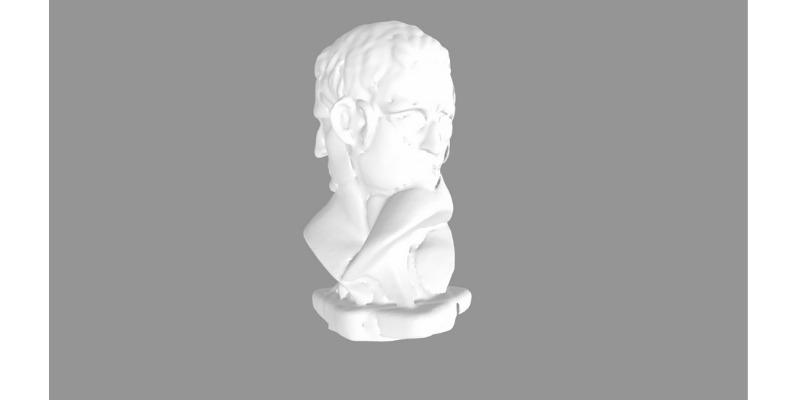
Revopoint ship the POP 2 with a statue object to use as your first 3D scan. Resembling a Roman marble statue the likes of Michelangelo would have chipped away at, we first tried 3D scanning the statue to check the quality.
To create a scan quality comparison, we used just the standard turnstile without any markers, and without the black sheet to cover the background.
Then move the object far enough away from the scanner that the distance is measured as “Excellent” and click New Scan.
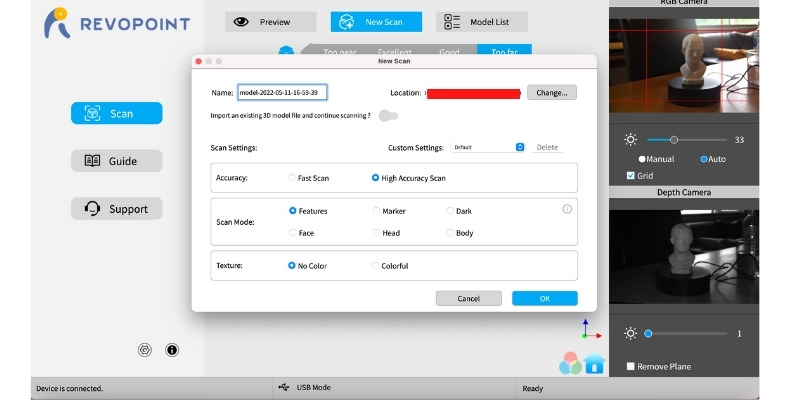
If you’re in a rush, you can select Fast Scan – but be prepared to suffer a slight loss in quality. For the best results, go for High Accuracy Scan. You can also pick what type of object you’re scanning, for example to focus on faces, heads, bodies, or standard objects, and you can also opt for a color scan or a no color scan.
Simply have the turntable on and turning, and start scanning (spacebar key is a shortcut) and you’ll start generating the point cloud.
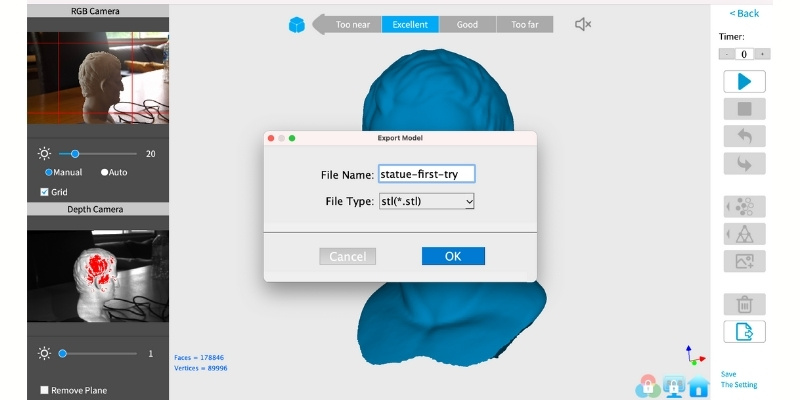
When the model is scanned, simply stop the scan, name it and export it. You can choose between PLY, OBJ and STL file formats, but we chose STL to import into Cura and 3D print.
You can also turn the model on its side during the same scan to capture any difficult-to-scan areas, such as the top or within any overhangs.
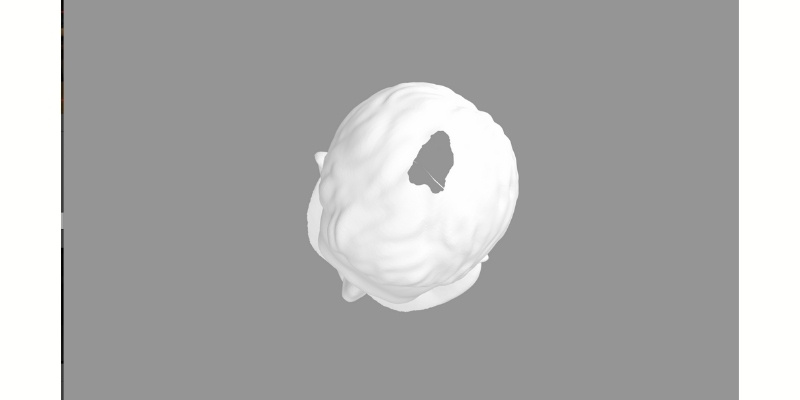
You can see the areas on the top of the head (there are other areas under the nose that also didn’t capture) missing because of the single scan position, and Revopoint’s RevoScan software will recognize and combine the two differently-located scans into one cohesive model automatically.
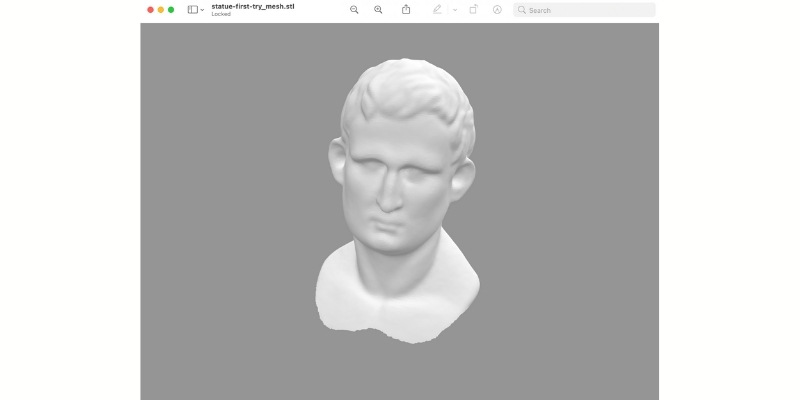
The first scan was good – you can clearly make out the face and features, and the texture of the statue’s hair. This wasn’t a human face but a faux-marble statue, so the features were never as sharp to begin with – yet still, we wanted to sharpen up the scan by using the improved turnstile, background, and by optimizing our capture settings.
We switched from Feature mode to Marker mode – using the markers on the larger turntable (and adding many more on) to compare the quality with this mode.
We also used RevoScan’s intelligent detection features to combine two scans together: we scanned the model normally, paused then scan, put the model on its back, and then resumed scanning – it recognized the model and put the two viewpoints together.
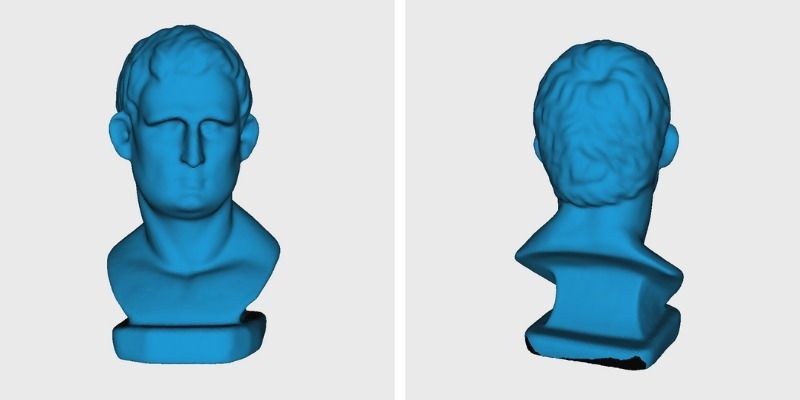
We then 3D printed it using our Ender 3 S1 Pro:
Other Scans
We tried scanning multiple views of the same object, to then put them together in Revo Studio, Revopoint’s post-scan editing and optimizing suite.
We tried a model of Latios, a Pokemon toy, scanning both the standard view, and with it upside down to capture the underneath.

Once we had captured these, we imported the two models into Revo Studio and merged the two together.
This gave us a fully filled-in model – and considering this is done automatically (you can tweak things manually if you’re technical, but we’d prefer to show you the automatic merge for newer hobbyists) it was accurate. There was a slight misalignment on the wings, but overall it recognized the areas and positions of the model well – and this can be fixed.
We also tried a few other objects, including another toy with some more precise insides, and a mug, to see how they captured.
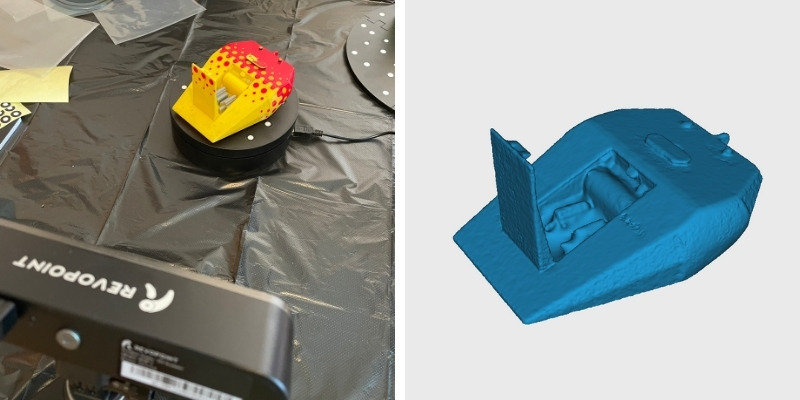
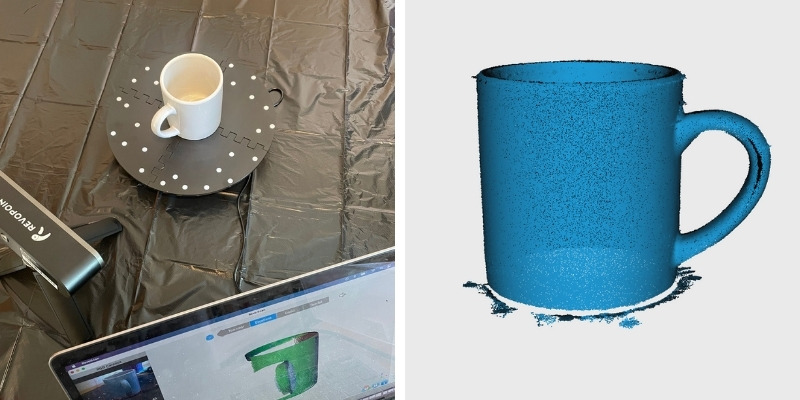
For the toy (Firestorm from the original Robot Wars series) we set RevoScan to automatically fill any holes, so by the time we imported it into Revo Studio, it was a solid mesh. For the mug, we didn’t select this option, hence the model isn’t solid – the noise around the outside would have likely caused the shape to be distorted if we had selected this option. For the best results, use Marker Mode.
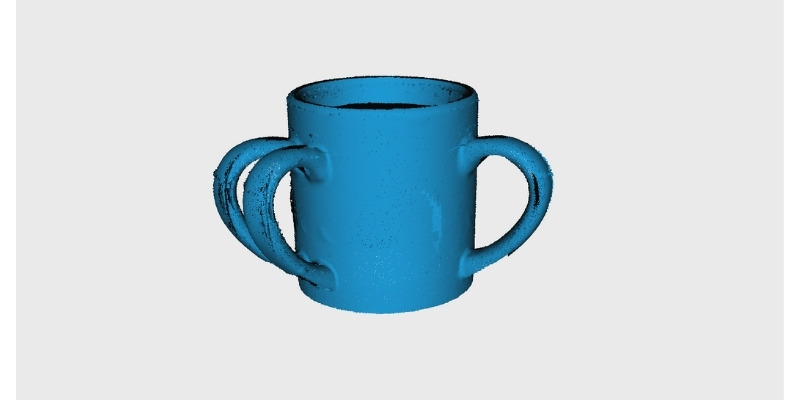
You do get occasional alignment problems, and there’s no going back once you’ve started a scan – you just have to cancel it and start again. Occasionally this leads to comical Frankenstein’s monsters scans – such as this three-handled mug that might have just reinvented haute couture design.
These errors aren’t common though, and overall we found the Revopoint POP 2 to be very reliable and consistent.
Color 3D Scanning
You can also scan in color with the Revopoint POP 2, which we were very interested in trying out. We’d read online that you needed to select the fast scan option rather than high-quality scan mode to try this, so we chose that option – but it may be the case that you can use the high-quality option, we should have tried that (and will update this when we have!).
We first tried a 4×4 Rubik’s cube, to see how it would capture the bold and bright neon colors on the cube. Obviously, the cube surface and shape is easy to capture, but we were more focused on the actual colors, rather than torture testing the scanner on intricate shapes.
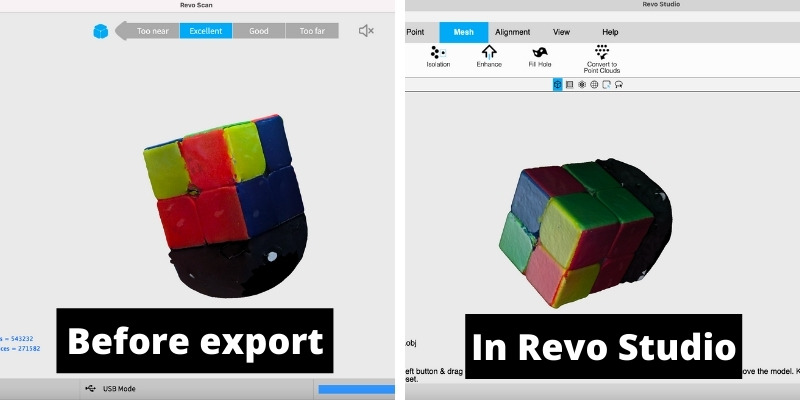
Strangely, it captured the black turnstile here, as well as the cube. So, in this case we would need to remove that black growth on the bottom of the cube in editing, a minor annoyance. You can select the clip plane option in the software to prevent this happening in your scans.
The yellows, oranges and greens were really bright and clear – I wasn’t expecting the colors to be captured so vividly.
However, there wasn’t any black in this model, with black a notoriously difficult-to-capture color (bordering on impossible) as these sensors use light to capture the texture and whereabouts of an object.
We then tried it on a toy model with black parts, a replica of a robot that competed on Robot Wars (the UK version of Battlebots), as well as on a shiny silver ring to see if it could capture both the intricate details on a small shiny object.
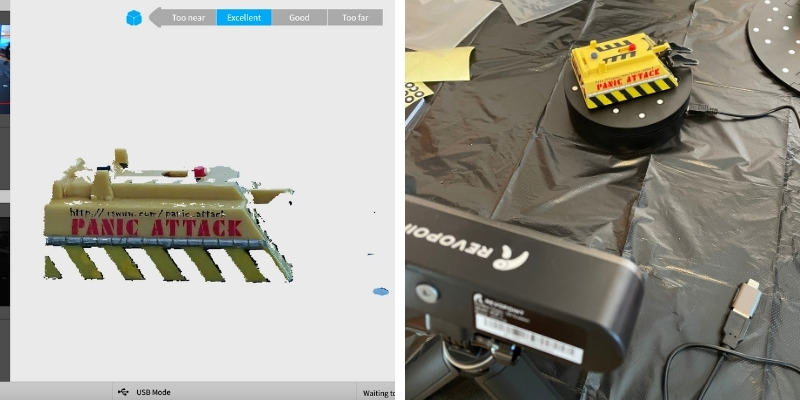
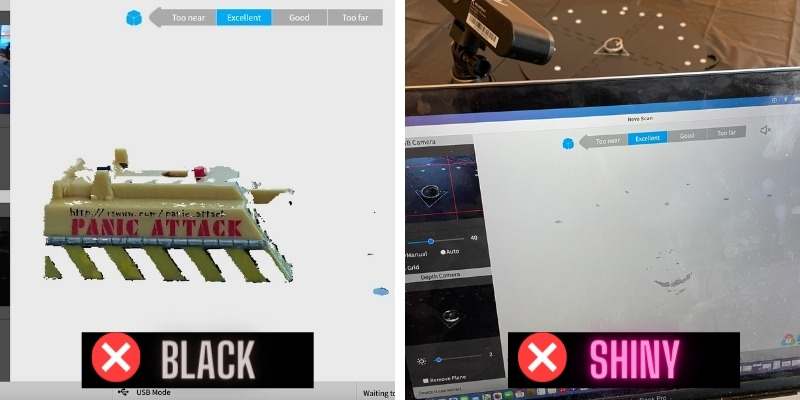
As expected, we couldn’t capture the black parts – but there are ways to get around this.
To make black surfaces show up, you need to spray them with a matting spray that coats them. It’s a similar story with shiny objects: you need a dulling spray to make them opaque to capture them.
These sprays are fairly cheap, but some things, such as human eyes, obviously can’t be sprayed, so you’ll have to make those changes in post-production, unfortunately.
Another issue was the shiny ring was too small: Revopoint say the minimum object size you can scan with the POP 2 is 20 x 20 x 20 mm, and perhaps the ring fell just below that.
But, clever tinkerers online have found workarounds for this by placing the small object on top of the larger object and scanning both, such as a white mug. Then you just remove the mug in post-processing.
Revopoint POP 2 Accuracy and Calibration

Much discussion has centered around how accurate these scanners actually are, and whether they’re as accurate as they say they are. The original Revopoint POP was advertised as accurate to 0.3mm, with this upgraded Revopoint POP 2 said to be accurate to within 0.1mm.
So, we loaded up Revo Calibration, Revopoint’s software for re-calibrating your scanner as well as testing accuracy, and tested this. The results were an accuracy of 0.07mm – very impressive.
Face Scanning
A major part of desktop 3D scanning questions are around scanning bodies and faces, so this was something we will further update this article on in the future. We haven’t tried this as much as we would like – focusing instead on stationary objects.
We will add more face scans we have more experience (we’re hesitant to make a judgment on how good it is for these without having really got to grips with it), but from our testing, we have one main tip: avoid using the auto fill in holes opinion in Revo Scan if you’re scanning faces.
Naturally, when scanning faces with other things around you (and the scanner sometimes loses its calibration with the face if you move it out of the optimal scan distance) you’ll pick up bits of noise. While these aren’t a problem and can easily be removed in post-processing, if you have autofill on, the software can sometimes create large growths on the side of your face from a tiny speck of noise.
This was one example: it was an accurate scan until a small bit of noise turned the scan into something you might want to sneak quietly around in The Last Of Us.
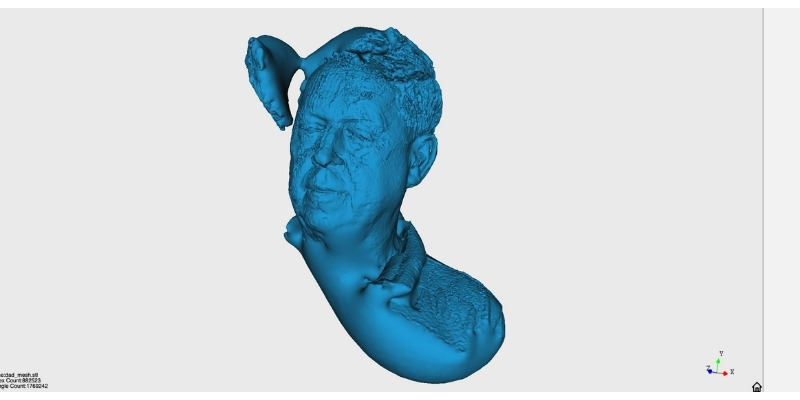
We suggest you take time to learn the distances well for scanning, which can take time to get used to if you’re brand new.
However, the actual ability of the Revopoint POP 2 to pick up details on faces was actually very impressive – this scan distinguished accurately the small nasolabial folds and other features that I wasn’t expecting it to pick up on a human face.
This model above doesn’t capture how effective the low-cost 3D scanner actually was for scanning facial details – and we will update this when we have tried this out more.
General Tips and Tricks for the Best 3D Scanning Results with the Revopoint POP 2
- Make use of the various other accessories that come with the kit — The larger circular turnstile lets you place larger objects to 3D scan (the standard turntable isn’t big enough), and the kit comes with a number of black-and-white dotted pattern marker stickers that improve model precision and detection if using marker mode. Place a lot of these on your turntable, especially on smaller objects.
- We also recommend using the black sheet on any surface you use. If you’re using a workshop table, or even any other colored surface, you’ll probably be fine, but blacking out any background noise will deliver the best results.
- Tick the Clip Plane option to ignore the turntable in scans.
- Don’t use the fill holes option in RevoScan if you are scanning faces and have picked up any noise in your scan. It will add unwanted features to your scans.
- Press the software buttons when exporting files, don’t use shortcuts or the Enter key – it can trigger bugs.
THE REVIEW
Revopoint POP 2
Available at:
Software – RevoScan & RevoStudio
RevoScan
You can download all of Revopoint’s software tools for free from their website. The main tool, RevoScan, lets you start new scans, pick your settings, creates meshes (if exporting as an STL, not needed for OBJ and PLY), and lets you export your scans as either an STL, OBJ or PLY file for editing or 3D printing.
You get access to all the previews and data live with RevoScan: it’ll show you the grey-view picture from the depth sensors, the color data from the RGB camera, and the mesh cloud data picked up from the main scan (and any noise, if you aren’t doing it right).
You also get a live feed of your scan’s progress, so you can see if any alignment issues have occurred (you can’t undo this – you have to just cancel and restart the scan), and see how complete your point cloud looks, to choose when to finish the scan. You’re updated with the total number of frames captured, and the total number of points, as the scan goes on.
After a scan, RevoScan takes you to the next menu – the mesh. You can choose the level of mesh noise to remove, and the level of scan smoothing you want, if you choose manual mode – otherwise RevoScan will pick your settings for you. You also have the option of filling in any holes, which for some scans are useful, while others – such as when we tried scanning a face, and a small area of noise got into the scan, which when filling the holes created a zombie growth-like thing sticking out of the head!
We found scans mesh and finish in around a minute on average, though this will depends on your scan and the number of frames.
RevoScan can be buggy, such as the pressing enter rather than clicking the export button issue we mentioned in the intro. Some translations are off – Revopoint would benefit by paying to have the software translated properly to make it more intuitive and understandable.
Alignment issues happened occasionally (such as in the three-handled mug we showed above – but maybe we’ve just accidentally re-invented modern appliance architecture) – however, when we better set up markers on the turntable, these happened far less. The Revopoint is a powerful and reliable entry-level 3D scanner – you just need to get the settings right and learn the intricacies.
RevoStudio
You used to have to post in a forum to get a license key (though the software is free), but now Revo Studio has come out of beta, you can directly download the software on their downloads page.
The software works decently as a 3D scan editing and optimizing tool for fixing and editing STL files (and PLY and OBJ).
We tried the merge option to merge two scans together. We used a scan we did of a plastic Latios pokemon toy, scanning facing down, and facing up.

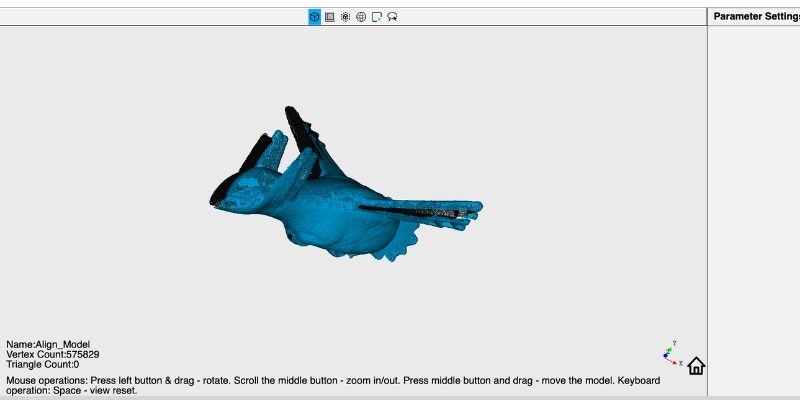
It’s worth noting that RevoScan will notice if you are scanning the same object positioned differently in some cases, such as the statue figure facing up, and on its back – but in some cases this doesn’t work, as we found out by trying to 3D scan the statue on its front and back, accidentally creating a two-headed Roman statue thing.
There are options for filling in holes (though RevoScan also has this option) as well as a variety of other features for improving your scans and removing anything extraneous from your final design.
Others found it buggy and reported it crashing often, but RevoStudio never crashed for us.
Revopoint POP 2 vs POP: the Differences and Upgrades
The main difference between the new POP 2, and the original Revopoint POP, is the significant improvement to accuracy. Whereas the original Revopoint POP shipped with an accuracy of 0.3mm, the POP overhauls this to an accuracy of up to 0.05mm – which we tested and confirmed to be at around 0.07mm.
The Revopoint POP 2 also now features two scanning options: Fast Scan for quicker scans, and High Accuracy Scan for patient makers who want top quality.
Improvements have also been made to the smoothness of scans via higher 10fps scans (vs 8fps on the original POP), and embedded 6Dof gyroscope for better shape, marker point and color feature cloud mapping and stitching.
Read more: Revopoint POP vs POP 2 vs MINI
THE REVIEW
Revopoint POP 2
Available at:
There is now also the low-cost Revopoint Inspire 3D scanner. I’ve also tested this, and you can read the full comparison in my Revopoint Inspire review.
Specs
- Price: $699 – Available at Revopoint 3D store here
- Accuracy: up to 0.05mm (confirmed 0.07mm in our test)
- Camera setup: 2x IR sensors, projector, RGB sensor
- Technology: dual camera infrared structured light
- Scan options: Fast Scan or High Accuracy Scan
- Scan modes: Features, Markers, Body, Face, Dark/Hair, Head
- Color: both color and no color scan modes
- Exportable file formats: PLY, OBJ, STL
- Single capture range: 210 x 130 mm
- Min scan volume: 20 x 20 x 20 mm
- Scan speed: up to 10fps
- Alignment: via feature, market, and color
- Weight: 195g
- Scanner dimensions: 154.6 x 38.2 x 25.6 mm
- CPU: Dual-core ARM Cortex-A7
- Connection type: micro USB
- Compatibility: Windows, MacOS, Android, iOS
Other articles you may be interested in:
- The best 3D scanners reviewed
- The best cheap 3D scanners
- DIY 3D scanners and 3D printable 3D scanners reviewed
- The best 3D scanner apps
- Revopoint Pop 2 vs Pop vs Mini compared
- Revopoint Pop 2 vs Creality Lizard and CR-Scan 01